
TDA7439/STA540 Amplifier - a small yet high quality amplifier
Part 1 - intro and hardware, Part 2 - software, Part 3 - conclusion
Part 2 - Software
The software does the main work in this amplifier build. Only one microcontroller is used to control the whole project - the PIC16F873.
The software needs to do the following:
- Interface with the TDA7439 via the I2C/TWI bus. The TDA7439 is a receiver/follower device only that will receive bytes from the microcontroller so set the input, volume, balance, bass, mid and treble
- Interface with the MAX7219 using a like SPI serial bus. This will display the active input, volume level and functions for bass, mid, treble and balance when needed
- Handle the RC5 protocol IR commands via the TSOP4838 infrared receiver
- Power on/off the amplifier and TDA7439 processor
- Power on/off the Bluetooth module
- Save settings periodically to the EEPROM (if changed)
- Display standby/mute/on status on the RGB LED
All the software has been written in C, specifically BoostC from SourceBoost and it's just over 1000 lines of code. The compiled and assembled program fits in 1950 words, so easily within the PIC16F873 ROM. It also fits just within the limit of the free license of BoostC.
A lot of functions were also reused from my previous projects, such as the MAX7219 code and the IR code. I did make some improvements in efficiency though.
Although writing the assembler directly could have reduced the size further and efficiency, it's a challenging task for a hobby programmer and I'm happier with how much easier it is to write in C and use a compiler to produce the machine code required.
The PIC was programmed using my UsbPicProg.
Update: Software updated. This is to fix a minor issue with not being able to force the amplifier to switch off via remote if the TV is on, and also adding a PNP transistor switch to power on/off the MAX7219 display. MAX7219 bit bang loop has also been optimised.
My source code is available on github.com. Snippets are also below with explanations...
Initialisation and Configuration
Before a PIC can run the code, it needs configuration (written during programming), and initialisation (read once running in the code).
Configuration involves telling the PIC what speed to run at, how to run at that speed (what oscillator), what protection is in use (watchdog, code protection etc) and so on.
Once a PIC powers up initially or after a reset - you need to tell it what pins are inputs, what are outputs, what speed the timers tick at, what interrupts are active, the timer pre/post scalers and so on. These kinds of settings are done in an init routine, because they are something you need to set, but these settings can be changed at runtime later (so are not set during programming).
Configuration registers
The PIC16F873 datasheet has details of what the configuration registers set. This varies per PIC so check the specific datasheet.
BoostC can have a set of #pragma variables in the source code, which make it through to the hex file and UsbPicProg detects these and writes the result to the PIC during programming.
The PIC16F873 actually has just one CONFIG register
// Configuration registers - PIC16F873
#pragma DATA _CONFIG, _BODEN_OFF & _PWRTE_OFF & _WDT_OFF & _CP_OFF & _XT_OSC // Brown out reset off, Power-up Timer off, Watchdog timer off, Code Protection off, XT oscillator

// Set clock frequency - 4MHz Crystal
#pragma CLOCK_FREQ  4000000
My configuration above is basically setting the bits in each configuration register appropriately. Many of these are defaults, however the keys ones are:
| Bit Names | Bits | Use | My setting |
|---|---|---|---|
| FOSC | 1-0 | Oscillator Selection bits | 01 - XT oscillator Crystal/Resonator |
| WDTE | 2 | Watchdog Timer Enable bit | 0 - which means it's disabled. Enabling the watchdog resets the PIC if code is unresponsive but prevents delays from running. |
| !PWRTE | 3 | Power-up Timer Enable | 1 - which means it's disabled |
| BOREN | 6 | Brown-out Reset Enable | 0 - BOR Reset disabled |
| LVP | 7 | Low-Voltage Programming Enable bit | 0 - RB4/PGM is digital I/O (high voltage on MCLR must be used for programming) |
| !CPD | 8 | Data Code Protection bit | 1 = Data memory code protection off |
| !CP | 13-12 | Flash Program Memory Code Protection bit | 11 = Code protection off |
The final #pragma tells BoostC what speed the system clock is (it does NOT tell the microchip what speed to run at), so that it gets the delay routines correct. My PIC16F873 is running off a 4MHz crystal.
Initialisation
Initialisation is called from the main() method (the entry point to running most programs). The initialise() function is called before the endless loop starts in the main() method. Its purpose is to set the configuration of everything we need, ports etc. Below is my method:
There's a lot done here - so breaking it down:
- Ports - the TRIS and PORT registers are set. TRIS registers tell a pin whether it is an input or output. For example, portb has two input pins - RB0 and RB2 so it is set to 0x05 (in hex) or 00000101 in binary. The PORT register can be written to for pins set as output pins or read from for pins set as inputs. At initialisation, I set all outputs to off except RB3.
- OPTION !RBPU - Enable the built in Port B weak pull-ups
- ADCON0 and ADCON1 - set to 0x00 and 0x0F respectively to ensure the ADC (analogue to digital converter) is disabled to allow digital I/0
- Timer 1 - Here I setup the Timer 1, see below
- Timer 2 - Here I setup the Timer 2, again see below
- RB0 interrupt - RB0 is an input connected to the IR sensor. Using INTCON and OPTION we can tell the PIC to raise an interrupt if this input changes. During the IR routine, we also change it later to interrupt on going high, but the initial detection is going low
- MSSP I2C - Here I setup the MSSP to perform hardware I2C communication.
- readData() - this reads all the saved variables from the EEPROM
- I delay a second before setting up the external hardware, just to allow the power supply to stabilise.
- Then the standby LED is lit, and the code moves on to initialising the MAX7219 with a 2 second test
- INTCON GIE and PEIE - Finally enable all the global and peripheral interrupts
- cTask - This is used for my task scheduler in the main() loop. It's set to zero for no task to run
/***********************************************************************************
  Function called once only to initialise variables and setup the PIC registers
************************************************************************************/
void initialise() {
    // IO ports setup
    trisa = 0x00; // all ouptuts
    porta = 0x02; // set to off except LEDLATCH
    //porta = 0x00; // set to off
    trisb = 0x05; // RB0, RB2 are inputs
    portb = 0x08; // set to off, except LEDDISPON (RB3)
    trisc = 0x18; // RC4[SDA] and RC3[SCL] are inputs (for I2C), rest outputs
    portc = 0x18; // set to off, except RC4, RC3 for I2C

    option_reg.NOT_RBPU = 1; // Port B pull-ups disabled

    // ADC setup
    adcon0 = 0x00; //  ADC off
    adcon1 = 0x07; // All digital I/O

    // Timer calculator: http://eng-serve.com/pic/pic_timer.html
    // Timer 1 setup - interrupt every 131ms seconds 4MHz
    // Timer1 Registers Prescaler= 2 - TMR1 Preset = 0 - Freq = 7.63 Hz - Period = 0.131072 seconds
    t1con.T1CKPS1 = 0;   // bits 5-4  Prescaler Rate Select bits
    t1con.T1CKPS0 = 1;   // bit 4
    t1con.T1OSCEN = 0;   // bit 3 Timer1 Oscillator Enable Control bit 1 = off
    t1con.NOT_T1SYNC = 1;// bit 2 Timer1 External Clock Input Synchronization Control bit...1 = Do not synchronize external clock input
    t1con.TMR1CS = 0;    // bit 1 Timer1 Clock Source Select bit...0 = Internal clock (FOSC/4)
    t1con.TMR1ON = 0;    // bit 0 enables timer
    tmr1h = 0;           // preset for timer1 MSB register
    tmr1l = 0;           // preset for timer1 LSB register

    pie1.TMR1IE = 1; // Timer 1 interrupt
    pir1.TMR1IF = 0; // Clear timer 1 interrupt flag bit

    // Timer 2 setup - interrupt every 890us (0.00088800)
    // 4MHz settings
    // Timer2 Registers Prescaler= 1 - TMR2 PostScaler = 8 - PR2 = 110 - Freq = 1136.36 Hz - Period = 0.000880 seconds
    t2con |= 56;       // bits 6-3 Post scaler 1:1 thru 1:16
    t2con.TMR2ON = 0;  // bit 2 turn timer2 off;
    t2con.T2CKPS1 = 0; // bits 1-0  Prescaler Rate Select bits
    t2con.T2CKPS0 = 0;
    pr2 = IR_PR2_890US;// Preload timer2 comparator value - 0.00088800s
    pir1.TMR2IF = 0;   // Clear timer 2 interrupt flag bit
    pie1.TMR2IE = 1;   // Timer 2 interrupt enabled

    // Setup for RB0 Interrupt [IR Sensor]
    intcon.INTE = 1; // RB0 Interrupt (for IR receive)
    option_reg.INTEDG = 0; // RB0 interrupt should occur on falling edge
    intcon.INTF = 0; // Clear RB0 interrupt flag bit

    // Initialise I2C MSSP
    // Master 100KHz
    // TRISC set SCL and SDA pins as inputs above
    // SSPEN (I2C), CKP (clock polarity), SSPM3:SSPM0 -> 1000 = I2C Master mode,
    sspcon = 0x38; // I2C enabled (SSPEN), Master mode
    sspcon2 = 0x00;
    sspadd = 9; // Clock 100Khz @ 4Mhz Fosc - 4000000 / (4 * (9 + 1))
    sspstat.SMP = 1; // Slew rate disabled
    sspstat.CKE = 0;
    pir2.BCLIF = 0;

    // Read in variables from EEPROM
    readData();

    delay_s(1);
    RED = 1; // Standby LED

    // Setup and test the MAX7219 8 digit display
    // v1.2 change this to allow for display on pin
    ledOn();
    ledTest();
    delay_s(2);
    // v1.2 clear not needed before off
    ledOff();

    // Interrupt setup
    intcon.PEIE = 1; // Enables all unmasked peripheral interrupts (required for RS232 and I2C)

    // Enable global interrupts
    intcon.GIE = 1;

    // No task at initialisation
    cTask = 0;
}
Remember, this initialisation routine only runs when I first plug the mains cord into the unit. When the amplifier is powered off, the PIC is still running 24x7.
Timers
Four timers are built in to the PIC16F627A: Watchdog, Timer0, Timer1, and Timer2, and I use 2 of them. They run independently of the code, and when running, can cause interrupts when they complete a full count (the counter register overflows).
Timer 1
Timer 1 is used as a timer to identify if the mute button is being held (in order to enter function mode). It's been set with a simple prescaler to reach an interrupt time of 131ms. A time of 100ms to 150ms feels responsive enough to a button press and 131ms was chosen because it's the next simplest time period after an RC5 repeat message time of 114ms.
When the button is held, the timer is reset on each subsequent command, so that the timer 1 does not interrupt.
Timer 1 is only switched on after pressing the mute button. If the button is pressed briefly, it is switched off again. If held beyond 1.5 seconds, it is also switched off after that period.
Timer 2
Timer 2 is used for timing pulses on the RC5 Infrared communications. This allows the IR commands to be received via interrupts on both this Timer 2 ticking at just shy of 890 μs (microseconds) and the IR receiver changing state.
A great resource for calculating the setup values for a timer is here - http://eng-serve.com/pic/pic_timer.html. By specifying your clock speed, it gives the values needed to setup the timer to interrupt at a period needed.
The code only turns on the timers when they are needed - i.e., an event occurred, or IR state changed. This is for efficiency and would allow the PIC to sleep too (though I didn't implement that in the end).
I found however, due to the overhead of the instructions for a PIC running at only 4 MHz, that the timer 2 had to be configured to count 872 μs instead of 890. At this interval, the decoding of the IR signals worked correctly.
Interrupts
There are two ways of detecting events - polling for them in your code by constantly checking an input, or letting the PIC detect the event and fire an interrupt routine to deal with the event.
Polling is often done, but the PIC and C compiler I'm using is not multi-threaded, so you cannot have one thread doing the poll constantly, whilst another thread does other work.
The alternative is an interrupt routine. This routine basically allows us to say 'an event has happened, stop whatever you are doing at once and handle it'.
My program uses interrupts for:
- External portb change interrupt [intcon.INTF] - this is used for infrared signal decoding
- Timer 2 overflow interrupt [pir1.TMR2IF] - this is also used for infrared signal decoding
- Timer 1 overflow interrupt [pir1.TMR1IF] - this is used for counting how long the mute IR button was held
Details of the interrupt service routine for each of these covered further below.
Other interrupts are possible, but not required.
The main() loop and polling
The main() method has an endless while loop in it, and within that is both a task scheduler and input polling.
The task scheduler is there to pick up and process any events that have been flagged as part of the interrupt routine. It's better to process events here so that any executing code is not blocking further interrupts. Not so important in this project as the interrupts are not time critical but it's good practice and I always code a task scheduler like this to handle events.
There's also one piece of polling, mainly because the priority is not high (and I also forgot that interrupt on change is only available on RB4 to RB7 and my circuit used RB2). An optocoupler connected to portb pin 2 (RB2) will go high when my external appliance (TV) is powered on, and low when it is powered off. It's state is checked constantly in the main() loop.
If the RB2 input goes from high to low, and the power is off, the amplifier will power on and a flag (iPowerExternal) will be set so the system knows it's been powered on by the external trigger.
If the amplifier is powered on, and it was powered on by the external trigger and the RB2 input goes high again then it will power off.
/***********************************************************************************
  MAIN PROGRAM
************************************************************************************/
void main() {
    initialise();

    while (1) {
        // Task scheduler
        // If there are tasks to be performed, find out the
        // most recent task from the array and execute it
        while (cTask > 0) {
            if (cTask.TASK_INT_EXT0) {
                rc5Process(); // IR sensor received a signal
                cTask.TASK_INT_EXT0 = 0;
            }
            if (cTask.TASK_TIMER1_MUTE) {
                // Mute and update display
                doMute();
                showVolAndInput();
                // turn off the timer
                timer1Reset();
                cTask.TASK_TIMER1_MUTE = 0;
            }
            if (cTask.TASK_TIMER1_FUNC) {
                // enter function mode
                iFunctionMode = 1;
                // Show first function
                functionDisplay();
                // turn off the timer
                timer1Reset();
                cTask.TASK_TIMER1_FUNC = 0;
            }
        }
        // Poll for EXT_POWER
        if (!EXT_POWER && !iPower) {
            // Powered on by external appliance
            iPowerExternal = 1;
            // set the input to the trigged input (input 1) = in2 on the tda7439
            iActiveInput = 2;
            doPower();
        }
        if (EXT_POWER && iPower && iPowerExternal) {
            // Powered off by external appliance
            // don't power off if iPowerExternal is zero (i.e. powered on by IR)
            iPowerExternal = 0;
            doPower();
        }
    }
}
IR commands
I've written up processing of IR commands separately. The code on this article is pretty much what has been used on this amplifier project.
The key alteration vs my previous projects is I wanted the ability to control balance, low-bass, bass and treble from the same simple six button remote as my other two amplifiers.
I decided to use the mute button as a function button if it is pressed and held for about 1.5 seconds. This is where the Timer1 described above is put to use and basically if the mute button is pressed, the Timer1 will start.
When the mute button is held, timer 1 will be switched off, reset and switched on again. As RC5 messages repeat every 114ms, this means the timer gets switched off before it interrupts. The iMuteHeld variable counts how many times the button was held for.
A count of how many times the mute command repeats (iMuteHeld) is used to detect how long the mute button was held for. Brief presses will make this variable count once or twice and once the button is released, the timer 1 will overflow causing the interrupt routine to flag the mute task TASK_TIMER1_MUTE.
If the mute button is held long enough for the RC5 message to repeat 15 times or more though, the timer is not turned back on and the flag to enter function mode is set, TASK_TIMER1_FUNC. 15 times is picked because the button hold should occur every 114ms, corresponding to about 1.7 seconds. Displaying function mode is done in this routine so there's immediate feedback that the button has now been held long enough. This cannot be done for the mute routine otherwise the amplifier would go in and out of mute whilst the button was held. That's why timer 1 is required so I can identify that the button has been released
The main() routine takes care of the subsequent commands to either mute (button pressed briefly and released) or enter function mode (button held).
In function mode, the input/channel up/down buttons change between each function (balance, low-bass, bass, treble), and the volume up/down buttons alter the value up/down. Pressing the mute button briefly again exits the function mode and returns the buttons to their normal purpose.
My adjusted rc5Process() function is below:
/***********************************************************************************
  Read and process remote control RC5 commands
************************************************************************************/
void rc5Process() {
    IR_LED = 0; // switch off IR LED
    if (rc5_address == 0) { // Addresses above zero are not for this device
        // Process commands
        if (iPower) { // Don't process the following if power is off
            // Get current volume level
            switch (rc5_command) {
                // For each command, cause the correct action
                case 13: // Mute (13 / 0x0D / D)
                    if (rc5_flickBitOld != rc5_flickBit) { // Prevent repeated muting when holding the button
                        // reset mute held flag
                        iMuteHeld = 0;
                        if (iFunctionMode == 0) {
                            // reset timer
                            timer1Reset();
                            // start call timer
                            t1con.TMR1ON = 1;
                        } else {
                            // exit function mode
                            iFunctionMode = 0;
                            showVolAndInput();
                            // turn off the timer
                            timer1Reset();
                        }
                    } else {
                        // Button held - this should reset timer1 before it interrupts, therefore avoiding processing the command until the button is released
                        iMuteHeld++;
                        // Reset timer
                        timer1Reset();
                        if (iMuteHeld > 14) {
                            // flag for entering function mode
                            cTask.TASK_TIMER1_FUNC = 1;
                        } else {
                            // Turn on the timer again
                            t1con.TMR1ON = 1;
                        }
                    }
                    break;
                case 16: // Volume up (16 / 0x10 / E)
                    if (iFunctionMode == 0) {
                        doVolumeUp();
                        showVolAndInput();
                    } else {
                        functionRaise();
                    }
                    break;
                case 17: // Volume down (17 / 0x11 / F)
                    if (iFunctionMode == 0) {
                        doVolumeDown();
                        showVolAndInput();
                    } else {
                        functionLower();
                    }
                    break;
                case 32: // Input right (32 / 0x20 / V)
                    if (rc5_flickBitOld != rc5_flickBit) { // Prevent repeated input changing when holding the button
                        if (iFunctionMode == 0) {
                            doInputUp();
                            showVolAndInput();
                        } else {
                            functionUp();
                        }
                    }
                    break;
                case 33: // Input left (33 / 0x21 / U)
                    if (rc5_flickBitOld != rc5_flickBit) { // Prevent repeated input changing when holding the button
                        if (iFunctionMode == 0) {
                            doInputDown();
                            showVolAndInput();
                        } else {
                            functionDown();
                        }
                    }
                    break;
            }
        }
        // Process power button regardless of power state
        if (rc5_command == 12) { // Power (12 / 0x0C / A)
            if (rc5_flickBitOld != rc5_flickBit) { // Prevent repeated power when holding the button
                // exit function mode
                iFunctionMode = 0;
                iPowerExternal = 0;
                // power up or down
                doPower();
            }
        }
        rc5_flickBitOld = rc5_flickBit;
    }
}
Processing of the mute timer once the button is released is done in the timer 1 interrupt:
/***********************************************************************************
  Interrupt handler
************************************************************************************/
void interrupt(void) {
    ...snip...
    // timer 1 interrupt - process mute button released
    if (pir1.TMR1IF) {
        // timer 1 will interrupt every 131ms with a 1:2 prescaler at 4MHz
        // This is just longer than an RC5 message

        // If held more than 14 times (114ms * 14 is just over 1.5 seconds), enter function mode
        if (iMuteHeld < 15) {
            // flag for muting
            cTask.TASK_TIMER1_MUTE = 1;
        }

        pir1.TMR1IF = 0; // Clear interrupt flag
    }
}
TDA7439 - I2C
The TDA7439 is an I2C follower/receiver device. The PIC will be the instructor/sender device and will send addresses and commands down the I2C bus.
The I2C protocol is bi-directional, but in this case the only command sent back from the TDA7439 is an ACK byte. I2C is a really flexible bus that allows multiple devices on the same bus and each command will be preceded with a start bit, a 7 bit address, and a read/write bit. Before the command is sent, the receiver should identifier that a start bit was sent, and an address matches that devices' internal address. If so, an ACK bit is sent back. The command (one or more bytes) will follow, with an ACK bit allowed to be sent back after each byte.
Two wires are used for I2C - the data wire and the clock wire. The sender/leader always controls the clock, and in the case of the TDA7439, the sender/leader can also always control the data wire, though I do let the TDA7439 control the data wire for the ACK bit.
The TDA7439 datasheet shows that the address is 0x88. Technically, the address is 0x44 because only the first 7-bits are the address. The read/write bit is always zero though (the sender always writes data) and the TDA7439 datasheet has already left shifted the address for us, and 0x88 is the full 8-bit byte that would be sent.
My PIC16F873 has a hardware MSSP module which has hardware support for the I2C protocol, so I'm letting the PIC take care of the communication. The speed has been set to 100kbps which is the standard I2C clock speed. Sounds slow, but for sending just three bytes, it's pretty much instant!
After some research, I found this initialisation code worked well:
    // Initialise I2C MSSP
    // Master 100KHz
    // TRISC set SCL and SDA pins as inputs above
    // SSPEN (I2C), CKP (clock polarity), SSPM3:SSPM0 -> 1000 = I2C Master mode,
    sspcon = 0x38; // I2C enabled (SSPEN), Master mode
    sspcon2 = 0x00;
    sspadd = 9; // Clock 100Khz @ 4Mhz Fosc - 4000000 / (4 * (9 + 1))
    sspstat.SMP = 1; // Slew rate disabled
    sspstat.CKE = 0;
    pir2.BCLIF = 0;
After initialising, using the hardware I2C is easy. The tricky part is before any activity happens, bits 0 to 4 in the SSPCON2 register need to be checked to ensure they are all zero and wait if they are not. Bit 3 in SSPSTAT must also be clear.
The while loop in i2cWait() handles this by blocking the execution until all those bits are cleared.
The rest is easy. Sending a start bit is done by setting SEN in the SSPCON2 register. A data byte is sent by writing a byte to SSPBUF. Sending a stop bit is done by setting PEN in the SSPCON2 register.
/***********************************************************************************
  I2C methods using MSSP
  https://www.hobbytronics.co.uk/tutorials-code/tutorials-microchip/hi-tech-c-i2c-master
************************************************************************************/
// i2c_Wait - wait for I2C transfer to finish
void i2cWait(void) {
    // sspcon2 bit 4 ACKEN: Initiate Acknowledge sequence on SDA and SCL pins and transmit ACKDT data bit. Automatically cleared by hardware.
    // sspcon2 bit 3 RCEN: Enables Receive mode for I2C
    // sspcon2 bit 2 PEN: Initiate STOP condition on SDA and SCL pins. Automatically cleared by hardware
    // sspcon2 bit 1 RSEN: Initiate Repeated START condition on SDA and SCL pins. Automatically cleared by hardware.
    // sspcon2 bit 0 SEN: Initiate START condition on SDA and SCL pins. Automatically cleared by hardware.
    // sspstat bit 3: Indicates that a START bit has been detected last
    while ((sspcon2 & 0x1F) || (sspstat & 0x04));
}

// i2c_Start - Start I2C communication
void i2cStart(void) {
    i2cWait();
    sspcon2.SEN = 1;
}

// i2c_Stop - Stop I2C communication
void i2cStop(void) {
    i2cWait();
    sspcon2.PEN = 1;
}

// i2cWrite - Sends one byte of data
void i2cWrite(char data) {
    i2cWait();
    sspbuf = data;
}
TDA7439 - Commands
As for what bytes to send - the TDA7439 datasheet is really helpful with that and it's simple to control.
Most of the time, only three byes need to be sent. The first is the address - always 0x88. The second is a sub-address. That will be either 0x00 to 0x07 - eight possible sub addresses which represent input select, input gain, volume, bass, mid, treble, right attenuation and left attenuation.
The final byte is the value. This can vary per sub address / function, but the datasheet has great examples.
During testing, I captured the communication using Sigrox PulseView and a cheap logic analyser. This example shows the volume being set.
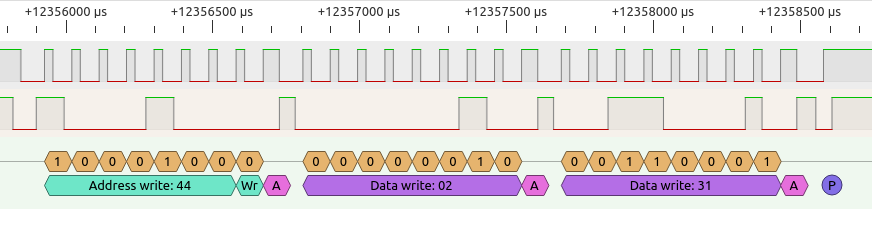
Volume is adjusted by sending sub address 0x02. Then the volume attenuation is sent with the final byte - in this case 0x31. 0x31 translates to 49 in decimal, or 0011 0001 in bits. The decimal value directly translates to attenuation, so 49 is -49dB (actually 49 is invalid as the highest value before muting is 47 - I corrected this in software after my capture).
It's different vs the PGA8310 where sending 0 means mute, but here 0 means no attenuation - full volume! Therefore, my volume up function actually does iVolume-- (reduce attenuation), and volume down does iVolume++ (increase attenuation).
The overall attenuation will be adjusted by the input gain, which I set to 3dB for most inputs, so the attenuation displayed is actually attenuation plus gain.
For other commands, the communication is similar, however the value byte (the last one) varies per function. Input is easy - send 0 as the sub address byte, then either 0, 1, 2 or 3 for the input selection, but note that 0=IN4, 1=IN3, 2=IN2 and 3=IN1.
Input gain is 1 followed by a value from 0 to 15 where the gain is 2x that. So, for 6dB gain (x4), send the byte as 3 (0000 0011). Input gain is per input, but to avoid any doubt my code just sends the input gain whenever the input is changed anyway.
Bass (low bass in my setup), Mid (bass), and Treble are all similar. Sub address 3, 4 or 5, followed by a number where 7 (0000 0111) is the neutral point. Then it gets a little confusing, data 0 to 6 is -14dB to -2dB, where 6 is the least attenuation. Then 8 to 15 is for 14dB to 2dB gain, where 15 is the least gain.
There is a pattern and flipping/inverting the last three bits will give a number that can be multiplied by 2 to get the decibel adjustment, for example both -10 and 10 dB have 010. Flip that to 101 and you get 5, times 2 gives 10. Bit 3 is then set for positive, unset for negative. I just did the translation in if statements though.
Speaker attenuation is similar to volume, but for some reason it allows a much greater value - down to 72dB. You can use the individual attenuation for a balance control by attenuating either the left or right speaker.
/***********************************************************************************
  TDA7439 methods
  Sub addresses:
  0x00 = input selector (data 0x00 to 0x03)
  0x01 = input gain (data 0x00 to 0x0F - for 0dB to 30dB)
  0x02 = volume (data 0x00 to 0x38  or 0 to 56 for attenuation in 1dB steps. 56 = mute)
  0x03 = bass gain (data 0x00 to 0x06 for -14dB to -2dB, 0x07 for 0dB, 0x08 to 0x0E for 14dB to 2dB)
  0x04 = mid gain (data 0x00 to 0x06 for -14dB to -2dB, 0x07 for 0dB, 0x08 to 0x0E for 14dB to 2dB)
  0x05 = treble gain (data 0x00 to 0x06 for -14dB to -2dB, 0x07 for 0dB, 0x08 to 0x0E for 14dB to 2dB)
  0x06 = R speaker attenuation (data 0x00 to 0x78 or 0 to 120 in 1dB steps. >=78 = mute)
  0x07 = L speaker attenuation (data 0x00 to 0x78 or 0 to 120 in 1dB steps. >=78 = mute)
************************************************************************************/
void tda7439Write(char bSubAddress, char bData) {
    i2cStart();
    i2cWrite(tda7439_addr); // send TDA7439 i2c address
    i2cWrite(bSubAddress); // send TDA7439 sub address
    i2cWrite(bData); // send data byte
    i2cStop();
}

void tda7439SetVolume() {
    if (iMute)
        tda7439Write(0x02, 56);
    else
        tda7439Write(0x02, iVolume);
}

void tda7439SetInput() {
    RLY_BLUETOOTH = (iActiveInput == 3);
    i2cStart();
    i2cWrite(tda7439_addr); // send TDA7439 i2c address
    i2cWrite(0x10); // send TDA7439 sub address - 0x10 will increment address from 0 to 7 (all of them)
    i2cWrite(iActiveInput); // send data byte
    i2cWrite(tda7439_gains[iActiveInput]); // send data byte
    i2cStop();
}

void tda7439SetBass() {
    tda7439Write(0x03, iBass);
}

void tda7439SetMid() {
    tda7439Write(0x04, iMid);
}

void tda7439SetTreble() {
    tda7439Write(0x05, iTreble);
}

void tda7439SetBalance() {
    // use address incrementing
    i2cStart();
    i2cWrite(tda7439_addr); // send TDA7439 i2c address
    i2cWrite(0x16); // send TDA7439 sub address - 0x16 will increment address from 6 to 7 (r+l attenuation)
    if (iAttenuateL > 0) {
        // If balance is negative, attenuate L speaker
        i2cWrite(0);
        i2cWrite(iAttenuateL);
    } else {
        // otherwise attenuate R speaker
        i2cWrite(iAttenuateR);
        i2cWrite(0);
    }
    i2cStop();
}
The TDA7439 also allows a combination of values to be set in one command with a feature known as auto address incrementing. This works by sending a sub address, plus 0x10 (bit 4). The TDA7439 will then process the first data byte it receives into the address sent (ignoring bit 4) but allows a second or more subsequent data bytes which will be loaded into the next sub address, until a stop condition occurs.
I use this to apply the balance (speaker attenuation) - done by method tda7439SetBalance(). To do each speaker separately, we could send two separate set of commands - e.g., to set the attenuation of both L and R channels to 0, we would send [start] 0x88, 0x06 and 0x00 [end], followed by [start] 0x88, 0x07, 0x00.
Here 0x88 is the TDA7439 address, 0x06 / 0x07 are the sub addresses for R and L attenuation respectively, and 0x00 is for no attenuation. But using address incrementing it could be sent as one command of 0x88, 0x16, 0x00, 0x00. The 0x16 is address incrementing, starting at 0x06. The first 0x00 byte sent goes into R attenuation, the second 0x00 byte sent goes into L attenuation (because the sub address is auto incremented from 0x06 to 0x07).
This is useful for the balance control, but it's also useful for the input selection and power on routines.
For the input selection, done by method tda7439SetInput(), I also apply the input gain at the same time. This allows me to use 4 bytes instead of 6. Sub address 0x10 is sent which is for 'Input selector' command, with address incrementing. The byte for the input to select follows, then the byte for the input gain. The stop bit tells the TDA7439 there's no more bytes to send so nothing goes into the remaining sub-addresses.
A hardcoded array of input gains for each input is in my .h file, where I use no gain for the Bluetooth and a 6dB gain for the other three inputs.
// 6dB gain except for bluetooth
// order in3, in3, in2, in1
const char tda7439_gains[] = {3, 3, 3, 0};
For the power on routine, I restore the selected input, gain, volume, bass, mid, treble and L/R attenuation from the prior values saved into the EEPROM. Here the sub address sent is 0x10, meaning start at sub address 0x00 (input selector). 8 data bytes are sent to cover all settings, so including the address and sub address, 10 bytes in total. It would have been 18 bytes with start/stop bits if every piece of data is sent separately.
void tda7439WriteAll() {
    RLY_BLUETOOTH = (iActiveInput == 3);
    // use address incrementing
    i2cStart();
    i2cWrite(tda7439_addr); // send TDA7439 i2c address
    i2cWrite(0x10); // send TDA7439 sub address - 0x10 will increment address from 0 to 7 (all of them)
    i2cWrite(iActiveInput); // send data byte
    i2cWrite(tda7439_gains[iActiveInput]); // send data byte
    i2cWrite(iVolume); // send data byte
    i2cWrite(iBass); // send data byte
    i2cWrite(iMid); // send data byte
    i2cWrite(iTreble); // send data byte
    if (iAttenuateL > 0) {
        // If balance is negative, attenuate L speaker
        i2cWrite(0);
        i2cWrite(iAttenuateL);
    } else {
        // otherwise attenuate R speaker
        i2cWrite(iAttenuateR);
        i2cWrite(0);
    }
    i2cStop();
}
TDA7439 - Volume Up/Down
The global variable iVolume handles the volume level of the system. It used to send directly to the TDA7439 via the above tda7439SetVolume().
Controlling the iVolume level is done only by the IR commands, but I've created separate methods for clarity.
The volume up method will unmute the system if it was muted, otherwise it will decrement the iVolume variable (this is equivalent to reducing attenuation). At max volume (when iVolume is zero), if it is decremented again and overflows to 255 then the iVolume is kept at zero.
Volume down is increasing attenuation, and once attenuation passes 47 the amplifier enters mute status.
After adjusting iVolume up or down, each method calls tda7439SetVolume() to apply the adjusted attenuation.
/***********************************************************************************
  Functions for volume control
************************************************************************************/
void doVolumeUp() {
    // Increase level (decrease attenuation --)
    if (iVolume == 56) { // come out of mute
        iMute = 0;
        iVolume = 47;
    } else {
        iVolume--;
    }

    if (iVolume > 56) { // overflowed
        iVolume = 0;
    }
    tda7439SetVolume();
}

void doVolumeDown() {
    // Decrease level (increase attenuation ++)
    iVolume++;
    if (iVolume > 47) { // muted
        iMute = 1;
        iVolume = 56;
    }
    tda7439SetVolume();
}
TDA7439 - Input Change
Changing the input is another set of up/down methods. That's because my simple remote only has channel up/down buttons, but if you were using something different you could have four dedicated buttons for each input. Changing the input is rarely done though, and cycling though them is quick enough.
These methods are simple. They adjust iActiveInput, overflowing it back to 0 if it goes beyond 3, or back to 3 if it goes below 0 (which is 255 for an overflowed unsigned byte). Then tda7439SetInput() is called to apply the newly selected input.
/***********************************************************************************
  Functions to change selected input
************************************************************************************/
void doInputUp() {
    // Decrement the active input
    iActiveInput--;
    if (iActiveInput > 4) // If overflowed (less than 0)
        iActiveInput = 3;
    tda7439SetInput();
}

void doInputDown() {
    // Increment the active input
    iActiveInput++;
    if (iActiveInput >= 4)
        iActiveInput = 0;
    tda7439SetInput();
}
TDA7439 - Functions Tone and Balance
My basic remote and setup gives power, mute, volume up/down and input up/down. The TDA7439 has additional controls though to allow adjustments of three tone bands and balance.
To adjust these settings the mute button is held for 1.5 seconds after which the function mode will be entered. In this mode, input (channel) up/down change between the four functions - Lo Bass, Bass, Treble and Balance.
As explained above, timers are used to determine how long the mute button is held for and if it is pressed and released briefly the amplifier will mute instead.
The volume up/down keys the alter the value of the selected function, for example, if Lo Bass is selected then pressing volume up will increase the bass.
Exiting the function mode happens when the mute key is pressed again. In function mode, the volume and input cannot be changed, but in practise this is fine because we'd want to be listening to one source at a particular comfortable volume to then go and change the tone and balance.
To handle all this, when function mode is entered an iFunctionMode variable is set. The rc5Process() method will then call the alternate functions for volume up/down and input up/down - functionRaise(), functionLower(), functionUp() and functionDown().
The functionUp() and functionDown() methods are simple and are just used for cycling between one of the four functions, in different directions. The functionDisplay() method (detailed later) deals with displaying the selected function and current value.
The functionRaise() and functionLower() methods are a little trickier as they behave a little differently depending on the function selected.
The tone functions (named in my code as bass, mid and treble per TDA7439 datasheet), call reusable methods functionValueRaise() and functionValueLower(). These deal with the odd configuration of bytes to send to the TDA7439 (though I think there is a pattern with inverted signed digits, it's also complicated).
They check against 7 (1111) being the flat position (this means no gain or attenuation of the tone control). Where it gets confusing is to raise the tone control to +2dB, the byte needs to now change to 14 (1110). It then gets lowered by 1 for each additional +2dB gain, until we reach 8 (1000) which represents the maximum +14dB gain. When cutting tone, 6 means -2dB through to 0 which means -14dB.
So functionValueRaise() needs to increment the value if it's less than 7 (cut), but when it reaches 7 it needs to jump from 7 to 14 in order to increment to +2dB, and then decrement from there.
The functionValueLower() is similar. In boost mode (>7), it needs to increment, unless the value is 14 when it jumps down to 7. Then it will decrement (until 0).
These methods return the correctly adjusted value which is used in functionRaise()/functionLower() to set the relevant iBass, iMid or iTreble variables that are then sent to the TDA7439 by tda7439SetBass(), tda7439SetMid() or tda7439SetTreble().
Balance is different. There are two variables for attenuating the left or right channels. Assuming balance is flat, pressing volume down will attenuate the right speaker. This is because the volume down key is on the left on my remote so attenuating the right speaker makes the sound more dominant from the left.
Pressing volume up will reduce the right speaker attenuation until it's back to zero (no attenuation), and then it will start attenuating the left speaker.
After adjusting the left or right balance variables, the result is sent to the TDA7439 using tda7439SetBalance(), which as I mentioned before sends out both bytes in auto-address incrementing mode.
char functionValueRaise(char iValue) {
    if (iValue == 7) // if flat, adjust to the 2dB position
        iValue = 14;
    else if (iValue > 8) // if boost, adjust to the next 2dB position (minus), stop at 8
        iValue--;
    else if (iValue < 7) // if cut, adjust to the next -2dB position (plus)
        iValue++;
    return iValue;
}

char functionValueLower(char iValue) {
    if (iValue == 14) // if 2dB boost, adjust to the flat position
        iValue = 7;
    else if (iValue > 7) // if boost, adjust to the next -2dB position (plus)
        iValue++;
    else if (iValue != 0) // if cut, adjust to the next 2dB position (negative), stop at 0
        iValue--;
    return iValue;
}

void functionRaise() {
    switch (iFunctionMode) {
        case 1: // Bass
            iMid = functionValueRaise(iMid);
            tda7439SetMid();
            break;
        case 2: // Treble
            iTreble = functionValueRaise(iTreble);
            tda7439SetTreble();
            break;
        case 3: // Lo Bass
            iBass = functionValueRaise(iBass);
            tda7439SetBass();
            break;
        case 4: // Balance
            if (iAttenuateL == 0) {
                // If left is zero, attentuate right
                iAttenuateR++;
                if (iAttenuateR > 78)
                    iAttenuateR = 78;
            } else {
                // otherwise reduce attentuation on left
                iAttenuateL--;
            }
            tda7439SetBalance();
            break;
    }

    functionDisplay();
}

void functionLower() {
    switch (iFunctionMode) {
        case 1: // Bass
            iMid = functionValueLower(iMid);
            tda7439SetMid();
            break;
        case 2: // Treble
            iTreble = functionValueLower(iTreble);
            tda7439SetTreble();
            break;
        case 3: // Lo Bass
            iBass = functionValueLower(iBass);
            tda7439SetBass();
            break;
        case 4: // Balance
            if (iAttenuateR == 0) {
                // If right is zero, attentuate left
                iAttenuateL++;
                if (iAttenuateL > 78)
                    iAttenuateL = 78;
            } else {
                // otherwise reduce attentuation on right
                iAttenuateR--;
            }
            tda7439SetBalance();
            break;
    }

    functionDisplay();
}

void functionUp() {
    iFunctionMode++;
    if (iFunctionMode > 4)
        iFunctionMode = 1;
    functionDisplay();
}

void functionDown() {
    iFunctionMode--;
    if (iFunctionMode < 1)
        iFunctionMode = 4;
    functionDisplay();
}
MAX7219
The MAX7219 is a handy chip that handles multiplexing of LED displays. It uses a serial synchronous protocol similar to SPI, but the latch line is not a chip select but rather a pulse to say 'now process the data I've sent' and it cannot be used with other 'true' SPI chips on the same bus. The PIC16F873 has hardware SPI, but it's on the same MSSP module that is already used for the I2C bus that the TDA7439 is connected to.
Therefore, I'm bit-banging the communication to the MAX7219. I use the same method as my Hi-Fi 5.1 LM3886 amplifier to communicate with the MAX7219, but since there is only one of the modules in this build the data commands are not repeated and the methods are simplified for processing only one array of ledData.
Also, to improve code speed and reduce size, the array of letters to segments has been bit shifted in the source code rather than done in the execution.
Finally, since the PIC16 family does not have instructions for multiply and divide (including modulus), I've split the data bytes into digits by using a function that will loop and decrement the value by 10 each time, leaving the units behind and a value that is incremented in each loop which is used for the tens.
The display intensity has been set to 9/32 (0x04) which is quite low brightness. This seems an ideal brightness so that the digits do not glare when watching TV but are still clearly visible through the smoke black (translucent) front plastic.
All methods associated with the MAX7219 are listed shown below:
/***********************************************************************************
  LED Display Functions
************************************************************************************/
// Converts a string of characters into decoded 7 segment bytes for LED character array
// Optionally writes these bytes to LED displays
void ledPrint(unsigned char *s) {
    char dig;
    for (dig = 0; dig < 8; dig++) {
        if (*s) {
            ledChar(dig, *s++);
        } else {
            ledData1[dig] = 0;
        }
    }
}

// Converts an ASCII char to decoded byte and places it in LED array
// Support decimal places
//void ledChar(char iCol, char iChar, char iHasDot) {
void ledChar(char iCol, char iChar) {
    char iDecoded = displayASCIItoSeg[iChar - 0x20];
    // dot is unused in this implementation
    //if (iHasDot)
    //    iDecoded = iDecoded | 0x80;
    ledData1[iCol] = iDecoded;
}

void ledSetDigits(char iValue, char iCol) {
    // start by left filling
    ledData1[iCol] = 0;

    // determine to second (left most) digit
    char dig2 = 0;
    // take off 10 from the value until it's less than 10
    while (iValue >= 10) {
       iValue -= 10;
       // each time we take off 10, the left most digit is incremented
       dig2++;
    }

    // if the left most digit is greater than zero, set the value into the array, adding on 48 to get the ascii value
    if (dig2 != 0)
        ledChar(iCol, dig2 + 48);
    // set the unit value in the array (what's left on iValue), adding on 48 to get the ascii value
    ledChar(iCol + 1, iValue + 48);
}

// Clears the LED display
void ledClear() {
    // Clear all data in the array, then write
    for (char n = 0; n < 8; n++) {
        ledData1[n] = 0;
    }
    ledWrite();
}

// LED test function
void ledTest() {
    ledPrint("Init on");
    ledWrite();
}


// Setup the MAX7219 LED displays by sending the required configuration bytes
void ledSetup() {
    // Scan limit
    ledLatchDown();
    ledSendChar(0x0B);
    ledSendChar(0x07); // Scan all 8 digits
    ledLatchUp();

    // Set no decode mode
    ledLatchDown();
    ledSendChar(0x09);
    ledSendChar(0);
    ledLatchUp();

    // Set intensity
    ledLatchDown();
    ledSendChar(0x0A);
    ledSendChar(0x05); // 4: 9/32
    ledLatchUp();
}

// Start LED display
void ledOn() {
    // v1.2 Power on and setup
    LEDDATA = 0;
    LEDCLOCK = 0;
    LEDLATCH = 1;
    LEDDISPON = 0;
    delay_ms(250);
    ledSetup();
    // No shutdown
    ledLatchDown();
    ledSendChar(0x0C);
    ledSendChar(0x01); // no shutdown
    ledLatchUp();
    // Startup time delay
    delay_us(250);
}

// Shutdown LED display
void ledOff() {
    // Shutdown
    ledLatchDown();
    ledSendChar(0x0C);
    ledSendChar(0x00); // shutdown
    ledLatchUp();
    // v1.2, remove the power
    LEDDISPON = 0;
    delay_ms(100);
}

// Write the bytes set in each array to the MAX7219 LED displays
void ledWrite() {
    char n;
    char d = 7; // Characters in array are written out backwards so start from furthest (7)

    // Loop through digits 0 to 8 (addressed as 1 to 9)
    for (n = 1; n < 9; n++) {
        ledLatchDown();
        // Writing character to device
        ledSendChar(n); // Digit to write
        ledSendChar(ledData1[d]); // Digit to write
        ledLatchUp();
        d--; // Decrement array counter
    }
}

void ledLatchDown() {
    // Load the new register
    LEDDATA = 0;
    LEDCLOCK = 0;
    LEDLATCH = 0; // Clock must fall so that last bit is clocked out
}

void ledLatchUp() {
    // Load the new register
    LEDLATCH = 1;
    LEDCLOCK = 0; // Clock must fall after latch raised
    LEDDATA = 0; // v1.2 Data to default
    delay_us(LEDDELAYUS); // Need to delay before starting again
}

// Write a single piece of data (byte) out serially
// Uses bit-banging to control protocol and delays
void ledSendChar(char iData) {
    // v1.2 made bit-bang loop more efficient
    for (char cBitSelect = 0x80; cBitSelect; cBitSelect >>= 1) { // This code puts the byte onto the shift register output
        LEDCLOCK = 0; // Clock cleared
        // LEDDATA pin set to the result of testing the bit in iData with logical AND
        if (iData & cBitSelect)
            LEDDATA = 1;
        else
            LEDDATA = 0;
        LEDCLOCK = 1; // Clock set high, so bit is loaded onto the shift register
    }
}
Display volume and input
When the unit is on, and not in function mode, the current selected input and volume level is always shown.
This method is called whenever the input or volume is changed, when powering on, or exiting function mode.
Limitations on what letters can be displayed on 7 segment displays meant I had to think a bit creatively. Having only eight digits too gives me limitations, but here's what I came up with:
- If muted, the display simply prints Snd OFF (meaning sound off)
- Otherwise, the first 3 digits/characters display the input - Blu (for Bluetooth), In1, In2 and In3 for the auxiliary inputs 1 to 3
- The fourth digit displays a minus sign if the volume is attenuation, or no sign if it's gain
- Fifth and sixth digits are split from the iVolume variable, adjusted by the input gain. Since this is never a three digit number, only two digits are required.
- Seventh and eighth digits just display dB, so it's obvious (at least to anyone knowing the existence of decibels) that the number displayed refers to volume
/***********************************************************************************
  Function to print the current input and volume to the LED display
************************************************************************************/
void showVolAndInput() {
    if (iMute) {
        ledPrint("Snd OFF"); // Media Centre PC
        ledWrite();
    } else {
        // show the input on the first 3 characters
        switch (iActiveInput) {
            case 0:
                ledPrint("In3"); // Input 3
                break;
            case 1:
                ledPrint("In2"); // Input 2
                break;
            case 2:
                ledPrint("In1"); // Input 1
                break;
            case 3:
                ledPrint("blu"); // Bluetooth
                break;
        }
        // show volume on next 5 characters e.g. -18db
        // Volume can be 0 to 55
        // Invert the volume to a negative gain (as a positive number) i.e. -56 to 0
        char cGain = iVolume;
        // work out an adjustment to gain based on the input gain value
        char cGainAdj = (tda7439_gains[iActiveInput] * 2);
        // adjust the final gain
        if (cGain < cGainAdj) {
            ledData1[3] = 0;
            cGain = cGainAdj - cGain;
        } else {
            // negative gain (attenuation)
            ledChar(3, '-');
            cGain -= cGainAdj;
        }

        ledSetDigits(cGain, 4);

        ledChar(6, 'd');
        ledChar(7, 'b');
        // Write Result to LED display
        ledWrite();
    }

    // Display green LED if volume is 0 (effectively mute) or mute is on
    if ((iVolume == 56) || iMute) {
        // Green on, blue off
        BLUE = 0;
        GREEN = 1;
    } else {
        // Green off, blue on
        BLUE = 1;
        GREEN = 0;
    }
}
Display function
In function mode, the display needs to give feedback about what we're adjusting. As input/volume cannot be adjusted in function mode anyway, the entire display is dedicated to displaying the function to be altered and its current setting. There are still the same limitations though - eight characters and a limited number of legible letters.
The method called is functionDisplay(). This prints the active function on the first four digits, either Lo b (for Low-Bass), Bass, Treb (for Treble) or Bal (for Balance).
If the balance is anything off centre, the letter L or r is shown instead of Bal to indicate left or right speaker attenuation.
To translate the tone values of iBass, iMid and iTreble to dB readings, functionValueDisplay() is used. This prints the sign on character 5, followed by the gain or cut value on the next digit.
All functions are adjusting the decibel value, so the remaining eighth digit always displays 'd', meaning dB, but I can't fit that!
/***********************************************************************************
  Functions to display and adjust amp functions i.e. bass, treble, balance
************************************************************************************/
void functionValueDisplay(char iValue) {
    // translate value to dB
    char isCut = 0;//(iValue < 7);
    if (iValue == 7) {
        // flat
        iValue = 0;
    } else if (iValue > 7) {
        // boost
        // 14=2dB 13=4dB ... 8=14dB
        iValue = (15 - iValue) * 2;
    } else {
        // cut 0=-14dB 1=-12db ... 6=-2dB
        isCut = 1;
        iValue = (7 - iValue) * 2;
    }
    // write characters to array
    if (isCut)
        ledChar(4, '-');
    ledSetDigits(iValue, 5);
}

void functionDisplay() {
    switch (iFunctionMode) {
        case 1: // Bass
            ledPrint("bASS"); // Bass
            functionValueDisplay(iMid);
            break;
        case 2: // Treble
            ledPrint("Treb"); // Treble
            functionValueDisplay(iTreble);
            break;
        case 3: // Lo Bass
            ledPrint("Lo b"); // Lo Bass
            functionValueDisplay(iBass);
            break;
        case 4: // Balance
            if (iAttenuateL > 0) { // left attenuation
                ledPrint("L   -"); // Balance
                ledSetDigits(iAttenuateL, 5);
            } else if (iAttenuateR > 0) {
                ledPrint("r   -"); // Balance
                ledSetDigits(iAttenuateR, 5);
            } else {
                ledPrint("BAL   0"); // Balance
            }
            break;
    }
    ledChar(7, 'd');
    // Write Result to LED display
    ledWrite();
}
Power on/off
This is similar to my other two amplifiers. A global variable iPower holds the current power status (1 or 0 for on or off). If it's zero, then the amplifier must power on.
Power on does the following:
- Make the LED green
- Disable timer 1 (just in case it was running)
- Print a HELLO message
- Switch on the main power relay
- Delay 2.6 seconds, by flashing the LED blue and green 26 times at 100ms each
- Write all the data to the TDA7439, which will activate the last selected input and apply the last used volume, as well as the tone/balance settings
- Display the current input and volume on the display (replacing the hello message)
Power off does the following:
- Make the LED green
- Disable timer 1 (just in case it was running)
- Print a Goodbye message
- Switch off the main power relay
- Switch off the Bluetooth relay too (don't want to leave this active when the amplifier is off)
- Wait 6 seconds
- Switch off the MAX7219
- Save current settings to the EEPROM
- Make the LED red
/***********************************************************************************
  Power on or off routine
************************************************************************************/
void doPower() {
    if (iPower) {
        // Switch on green (for muted)
        BLUE = 0;
        GREEN = 1;
        RED = 0;

        // Disable timer 1
        timer1Reset();

        // Goodbye!
        ledPrint("Goodbye");
        ledWrite();

        iPower = 0;

        RLY_POWER = 0; // Power off amps
        RLY_BLUETOOTH = 0; // Power off bluetooth
        delay_s(6); // Force a 6 second wait before the ability to switch on again (allows electronics to drain)

        ledOff();

        saveData(); // save data to eeprom to restore after power loss

        // Switch on red (for standby)
        BLUE = 0;
        GREEN = 0;
        RED = 1;
    } else {
        // Power on sequence
        // Switch on green (for muted)
        BLUE = 0;
        GREEN = 1;
        RED = 0;

        ledOn();
        ledPrint("HELLO");
        ledWrite();

        // v1.2 add delay after switching LED but before switching amp
        DELAY_SHORT;

        // Power on amps
        RLY_POWER = 1;
        iPower = 1;

        // Delay mute
        // Flash Green/Blue for 2.6 seconds
        char l;
        for (l=0; l<27; l++) {
            // Green off, blue on
            BLUE = 1;
            GREEN = 0;
            DELAY_SHORT;
            // Blue off, green on
            BLUE = 0;
            GREEN = 1;
            DELAY_SHORT;
        }

        // Write all values to TDA7439 (since it is now powered) - this will also unmute the volume
        tda7439WriteAll();
        // show the volume and input
        showVolAndInput();
    }
}
EEPROM - saving data
Even though the PIC16F873 will remain operating in standby/off in my amplifier, if I do unplug the device (or suffer a power cut), I don't want to lose the preferred settings for volume and input and in particular low-bass, bass, treble and balance.
The EEPROM on the PIC16F873 can be used to permanently save up to 128 bytes of data. I only need to save 7 bytes, plus 1 byte to indicate data was saved previously for reading during power on.
Data is written to the EEPROM whenever the amplifier is powered off. This is to minimise writes to the EEPROM in order to prolong its life. Furthermore, a data value is only written to the EEPROM if it changed compared to what is already in the EEPROM.
Below are the EEPROM methods:
/***********************************************************************************
  EEPROM read and write methods
************************************************************************************/
void saveData() {
    char didWrite = 0;
    // only write value if it is different
    didWrite += eepromWrite(1, iVolume);
    didWrite += eepromWrite(2, iAttenuateL);
    didWrite += eepromWrite(3, iAttenuateR);
    didWrite += eepromWrite(4, iBass);
    didWrite += eepromWrite(5, iMid);
    didWrite += eepromWrite(6, iTreble);
    didWrite += eepromWrite(7, iActiveInput);

    if (didWrite)
        eepromWrite(0, 10); // To indicate EEPROM has been saved
}

char eepromWrite(char address, char data) {
    char didWrite = 0;
    if (eepromRead(address) != data) {
        char intconsave = intcon;

        // Load address and data
        eeadr = address;
        eedata = data;

        eecon1.EEPGD = 0; // Point to DATA memory
        //eecon1.CFGS = 0; // Access EEPROM
        eecon1.WREN = 1; // Enable writes

        // Required write sequence
        intcon = 0;
        eecon2 = 0x55; // Write 55h
        eecon2 = 0xAA; // Write 0AAh
        eecon1.WR = 1; // Set WR bit to begin write
        intcon = intconsave;
        eecon1.WREN = 0; // Disable writes on write complete (EEIF set)
        while(!pir2.EEIF); // Wait for the interrupt bit EEIF to be set
        pir2.EEIF = 0; // Clear EEIF
        didWrite = 1;
    }
    return didWrite;
}

/******************************************************
  Function to read the current variables from ROM
*******************************************************/
void readData() {
    // Read initial values from EEPROM
    // Do not read other variables if the EEPROM has not been saved before
    // as all default will be 0xFF
    if (eepromRead(0) == 10) {
        iVolume = eepromRead(1);
        iAttenuateL = eepromRead(2);
        iAttenuateR = eepromRead(3);
        iBass = eepromRead(4);
        iMid = eepromRead(5);
        iTreble = eepromRead(6);
        iActiveInput = eepromRead(7);
    }
}

char eepromRead(char address) {
    // Load address
    eeadr = address;
    eecon1.EEPGD = 0; // Point to DATA memory
    //eecon1.CFGS = 0; // Access EEPROM

    // Read, data is available in eedata the next cycle.
    eecon1.RD = 1;

    // Return value
    return eedata;
}
Part 3 - Conclusion, Pictures...
References and more reading:
Source code on github.com
PIC 16F87X Datasheet
Source Boost
Sigrox PulseView software
Dring Engineering Services - IC Timer Calculator and Source Code Generator
Tamil Arduino - IR RC5 decoding code using interrupts
CCS - 7-segment LED display in 3-digit with 2x7W amplifier
ASCII Codes Table
MAX7219 Datasheet
Electronics StackExchange - Starting with I2C on PIC18s
Teachmemicro - PIC16 I2C Tutorial
Hobby Tronics - I2C Sample Code