
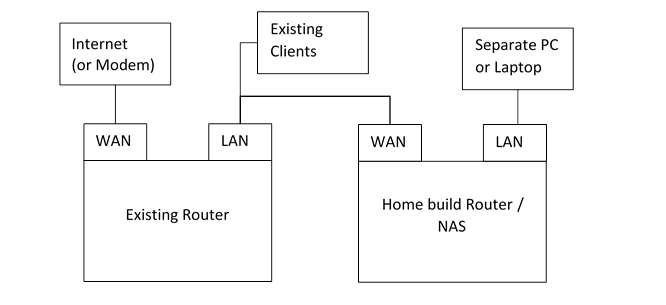
My Home-made PC Router and NAS Server - Page 2 - The router
I suggest reading about the rebuild first. Information below is for reference purposes and no longer recommended.
The build - Host Base
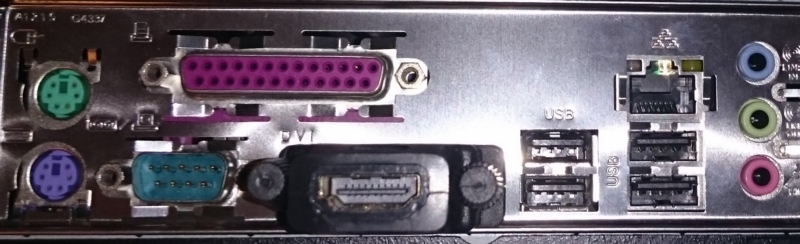
Before you start, plug the PC into a monitor, keyboard and mouse.
We're do most of the build connected to our existing router and network, so we can test things and keep our Internet during the build.
Plug the network socket that you intend to use as your WAN connection, into your existing router / LAN. Into the port intended for use as the LAN, we can plug a cable directly into another PC or laptop for testing.
This assumes Ubuntu LTS 16.04 Desktop version.
Download the ISO, and write it to a DVD or USB drive (made bootable by LinuxLive USB Creator).
Do the install. Countless resources on the web to guide you through this, and it's easy.
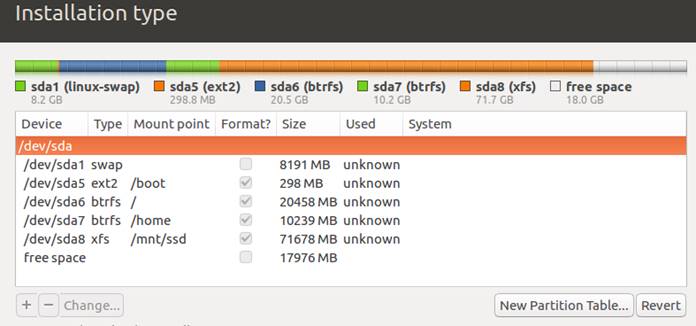
I choose to partition manually (the 'something else' option) - creating a 'special' kind of layout for partitioning. Here's the setup and why:
| Mont Point | Size | File System | Why? |
|---|---|---|---|
| 8GB | SWAP | Swap is usually a good idea. I've made it the size of my RAM. | |
| /boot | 300MB | Ext2 | Boot is a small and simple file system. Often 100MB but I've made it bigger to hold more kernel images during upgrades |
| / | 20GB | BTRFS | This is where the OS goes. 20GB should be more than enough. BTRFS (B-Tree File System) is a fast filesystem. |
| /home |
10GB |
BTRFS | 10GB for a separate home folder, in case I needed to format the OS in future but easily keep my home folder |
| /mnt/ssd | 70GB | XFS | An area to store files such as VMs that may run on this server. XFS fits this better. Extents option should be used |
| Some free space is kept for over-provisioning to keep SSD performance optimal |
Once partitions are done, after a few easy questions, the install completes, and boots.
When creating your user, choose to log in automatically (we'll need this since no keyboard / monitor is plugged in most of the time). Your computer name should be something simple and memorable. I used "dan-server".
When asked, choose the correct primary interface when asked. This should be where your WAN is plugged in.
Update:
Before going further - let's update everything first:
sudo apt-get update
sudo apt-get upgrade
sudo apt-get dist-upgrade
sudo reboot
Remote access.
For this build - the PC will be sitting with no monitor, keyboard or mouse plugged in and placed in a cupboard where the Internet WAN connection comes in.
When we need to connect and administer it though, we can use terminal and GUI remote methods to connect in.
SSH
SSH is a great way to connect in and run terminal commands. Most of the time, this is exactly what you'll need to administer the server, including updates, reboots, backups, file manipulation and so on.
Open SSH Server does the job we need. To install it:
sudo apt-get install openssh-server
sudo nano /etc/ssh/sshd_config
In this file, uncomment the line 'PasswordAuthentication yes'. Then save and enter these commands:
sudo service ssh stop
sudo service ssh start
You should now be able to connect from another PC to this one. I use mRemoteNG, which comes with PuTTy.

GUI - TeamViewer
For the GUI, teamviewer I find easier and works better than other methods I've tried. It's free for personal use. I found it a little hard to setup, but this install seems to get the right pre-requisite binaries in first.
sudo apt-get install libdbus-1-3:i386 libasound2:i386 libexpat1:i386 libfontconfig1:i386 libfreetype6:i386 libpng12-0:i386 libsm6:i386 libxdamage1:i386 libxfixes3:i386 zlib1g:i386 libice6:i386 libuuid1:i386 libsystemd0:i386 libgcrypt20:i386 libselinux1:i386 libgpg-error0:i386 libpcre3:i386 liblzma5:i386
wget https://download.teamviewer.com/download/teamviewer_i386.deb
sudo dpkg -i teamviewer_i386.deb
sudo apt-get -f install
sudo dpkg -i teamviewer_i386.deb
sudo teamviewer daemon enable
sudo teamviewer passwd 12345678     <-- set the password you wish to connect with
sudo teamviewer info
This may not work first time - but after a short delay, on the server's screen, will appear a licence agreement, which you will need to accept.
Then rerun:
sudo teamviewer info
Info will print the details you need to connect to the server.
The build - Guest Router
Install Virtual Box
Installing Oracle's Virtual Box is easy:
sudo apt-get install virtualbox
Now I will guide you through creating the server Virtual Machine.
Note: If you want, you can do the VM install on another machine (I did mine on a more powerful laptop) - as long as two NICs (LAN and Wifi) are available, we can set it all up, then copy the VM directory to the server later. This guide assumes installing directly on the server though.
Create VM, install Server OS
Open the Virtual Box GUI.
Create a new VM. One hard disk, dynamically allocated. The 8GB default is fine.
Configure some options that you will need to make the VM operate as a router
- Give it some RAM - I'd recommend 2GB or more
- Give it CPU access - 2 cores will be good
- Network
- Adapter 1 - Bridged
- Adapter 2 - Bridged
- Audio - Untick
- Choose an ISO for the hard drive, for example ubuntu-16.04.1-server-amd64.iso
Run the VM. The ISO should auto boot.
- Choose "Install Ubuntu Server"
- Choose your language, keyboard language
- Choose enp0s3 as the primary interface
- Enter a hostname - I used "dan-gateway" for example
- Enter your username / password. This will be the admin user for the system, so choose a strong password
- Encryption of the home directory isn't necessary
- Choose your timezone
- When asked about partitioning, we can go manual again, but with a
simpler option:
- Select the disk, choose Yes to create an empty partition table
- Select the free space, create three new primary partitions, for each, select "Beginning"
- /boot partition will need the bootable flag
- For / and /boot, you can select noatime and nodiratime
| Mount Point | Size | File System | Why? |
|---|---|---|---|
| 4GB | SWAP | Swap is usually a good idea. I've made it the size of my RAM. | |
| /boot | 300MB | Ext2 | Boot is a small and simple file system. Often 100MB but I've made it bigger to hold more kernel images during upgrades |
| / | 4GB | XFS | This is where the OS goes. The remaining space will be enough. Choose the same file system as that of the host, where the VM will be stored (in this case /mnt/ssd is XFS) |
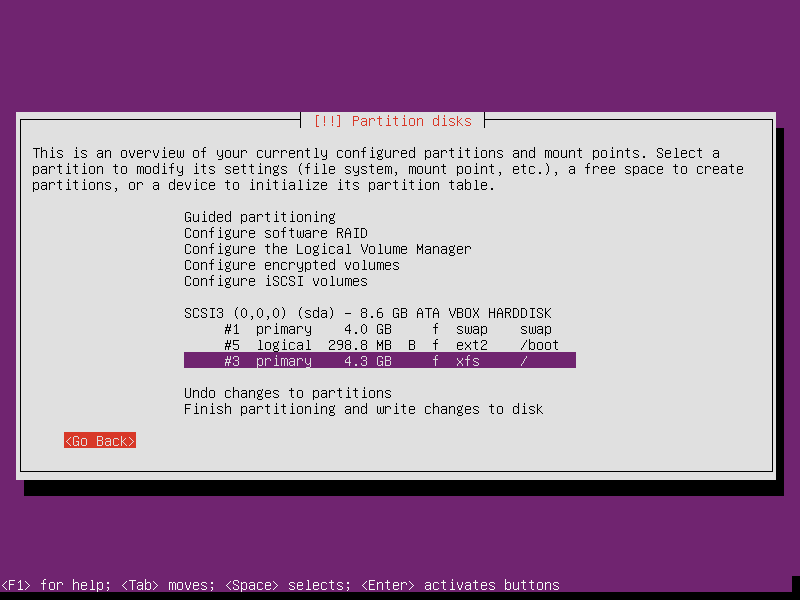
If you want, you can create a separate home partition, but for this O/S, we really don't expect to store much there and it can be considered more disposable.
You may be asked for this information during the install too:
- Proxy server (enter for none)
- Updates (auto security updates)
- Configure the server with standard utilities only. We're not using it for anything else.
- Install Grub to the master boot loader - Yes
Update the software
As before - let's update everything first:
sudo apt-get update
sudo apt-get upgrade
sudo apt-get dist-upgrade
sudo reboot
SSH
Like the host, SSH is a great way to connect in and run terminal commands, this time to our guest router. Once you connect to the guest with SSH, we can copy / paste commands in instead of typing them in the VM display.
For security, later we will prevent SSH listening on the WAN IP, but for now it is all default:
Open SSH Server does the job we need. To install it:
sudo apt-get install openssh-server
sudo nano /etc/ssh/sshd_config
In this file, uncomment the line 'PasswordAuthentication yes'. Then save and enter these commands:
sudo service ssh stop
sudo service ssh start
Create network
We will use /etc/network/interfaces for configuring the network
Our WAN interface (known as enp0s3) will be auto (DHCP), whereas our LAN interface (known as enp0s8) will be manual.
To avoid any conflicts with your existing LAN setup during configuration, we'll configure our new setup to use 10.0.1.x addresses. This is within the reserved range, but I've not seen any home routers use them.
During our setup, the WAN port should be plugged into our existing LAN, so the network card which will be the new WAN port, will receive an IP of say 192.168.0.100 (or similar) from our old router.
sudo nano /etc/network/interfaces
# This file describes the network interfaces available on your system
# and how to activate them. For more information, see interfaces(5).

# The loopback network interface
auto lo
iface lo inet loopback

# The primary network interface (WAN connection)
auto enp0s3
iface enp0s3 inet dhcp

# The secondary network interface (LAN connection)
auto enp0s8
iface enp0s8 inet static
        address 10.0.1.1
        netmask 255.0.0.0
Let's try it:
sudo ifup enp0s8
ifconfig
The output of ifconfig should show an IP assigned by our old router on enp0s3, and the static address 10.0.1.1 on enp0s8
NAT - enable forwarding
To enable port forwarding (permanently), edit /etc/sysctl.conf
sudo nano /etc/sysctl.conf
Uncomment the line (remove hash) #net.ipv4.ip_forward=1
# Uncomment the next line to enable packet forwarding for IPv4
net.ipv4.ip_forward=1

# Uncomment the next line to enable packet forwarding for IPv6
#  Enabling this option disables Stateless Address Autoconfiguration
#  based on Router Advertisements for this host
#net.ipv6.conf.all.forwarding=1
Save and Exit (Ctrl+O, Ctrl+X)
Reload the parameters by running:
sudo sysctl -p
NAT - IP tables
I liked the ways Ars Technica did it, so this is a copy of exactly that, but shortened!
First - the startup script:
sudo nano /etc/network/if-pre-up.d/iptables
#!/bin/sh
/sbin/iptables-restore < /etc/network/iptables
Set the permissions:
sudo chown root /etc/network/if-pre-up.d/iptables
sudo chmod 755 /etc/network/if-pre-up.d/iptables
Now create the iptables script:
sudo nano /etc/network/iptables
Here is mine...
The highlighted sections you don't need - I've left it as an example of how I do some port forwarding:
- How I forward Open VPN to the host machine, for VPN access
- How I configured VOIP to forward to my VOIP ATA, only from the IP of my VOIP provider (the -s parameter has the IP address of my VOIP provider)
*nat
:PREROUTING ACCEPT [0:0]
:INPUT ACCEPT [0:0]
:OUTPUT ACCEPT [0:0]
:POSTROUTING ACCEPT [0:0]

# enp0s3 is WAN interface, enp0s8 is LAN interface
-A POSTROUTING -o enp0s3 -j MASQUERADE

# NAT pinhole: Open VPN to LAN server
-A PREROUTING -p udp -m udp -i enp0s3 --dport 1194 -j DNAT --to-destination 10.0.1.100

# NAT holes: Open all VOIP ports to the voip
-A PREROUTING -p udp -m udp -i enp0s3 -s xxx.x.xxx.xx --dport 50601 -j DNAT --to-destination 10.0.1.118
-A PREROUTING -p udp -m udp -i enp0s3 -s xxx.x.xxx.xx --dport 5004 -j DNAT --to-destination 10.0.1.118

COMMIT

*filter
:INPUT ACCEPT [0:0]
:FORWARD ACCEPT [0:0]
:OUTPUT ACCEPT [0:0]

# Service rules

# basic global accept rules - ICMP, loopback, traceroute, established all accepted
-A INPUT -s 127.0.0.0/8 -d 127.0.0.0/8 -i lo -j ACCEPT
-A INPUT -p icmp -j ACCEPT
-A INPUT -m state --state ESTABLISHED -j ACCEPT

# enable traceroute rejections to get sent out
-A INPUT -p udp -m udp --dport 33434:33523 -j REJECT --reject-with icmp-port-unreachable

# DNS - accept from LAN
-A INPUT -i enp0s8 -p tcp --dport 53 -j ACCEPT
-A INPUT -i enp0s8 -p udp --dport 53 -j ACCEPT

# SSH - accept from LAN
-A INPUT -i enp0s8 -p tcp --dport 22 -j ACCEPT

# DHCP client requests - accept from LAN
-A INPUT -i enp0s8 -p udp --dport 67:68 -j ACCEPT

# drop all other inbound traffic
-A INPUT -j DROP

# Forwarding rules

# forward packets along established/related connections
-A FORWARD -m conntrack --ctstate RELATED,ESTABLISHED -j ACCEPT

# forward from LAN (enp0s8) to WAN (enp0s3)
-A FORWARD -i enp0s8 -o enp0s3 -j ACCEPT

# Open VPN traffic allow
-A FORWARD -p udp -d 10.0.1.100 --dport 1194 -j ACCEPT

# VOIP traffic allow
-A FORWARD -p udp -d 10.0.1.118 --dport 50601 -j ACCEPT
-A FORWARD -p udp -d 10.0.1.118 --dport 5004 -j ACCEPT

# drop all other forwarded traffic
-A FORWARD -j DROP

COMMIT
To apply the rules, run the script created earlier:
sudo /etc/network/if-pre-up.d/iptables
That completes the IP Tables setup.
You now have a router!
Local DNS
The guest VM will hold local DNS caching. This can be done by installing bind9:
sudo apt-get install bind9
And it's that simple.
Finally, let's reboot
The build - Host Router
Back to our host PC, we will now set this up to access the Internet through our Router VM, instead of directly. We'll also setup a DHCP server for handing out network details to our various clients.
Network Configuration
Like our router, we will use /etc/network/interfaces for configuring the network.
Our WAN interface (for me, known as enp2s0) will be manual shortly, but we will leave it unspecified for now (which means Ubuntu network manager will care for it). LAN interface (known as enp4s0) will be manual.
sudo nano /etc/network/interfaces
# This file describes the network interfaces available on your system
# and how to activate them. For more information, see interfaces(5).

# The loopback network interface
auto lo
iface lo inet loopback

# The LAN interface
auto enp4s0
iface enp4s0 inet static
	address 10.0.1.2
	gateway 10.0.1.1
	netmask 255.0.0.0
        dns-nameservers 10.0.1.1
Let's try it:
sudo ifup enp4s0
ifconfig
The output of ifconfig should show an IP assigned by our old router on enp0s3, and the static address 10.0.1.2 on enp0s8
DHCP server
At this stage, any client that needs to use the router, and plugged into the LAN network card, would have to statically define an IP, gateway and DNS.
We can use the host to run a DHCP server though. Why on the host? Well initially I did it on the guest, but when Virtual Box updates or we need to do anything with the router VM, all the clients lose access to the host too, preventing reconnection unless we manually choose an IP and gateway.
To install the DHCP server, again just a copy from Ars Technica, with modification:
sudo apt-get install isc-dhcp-server
sudo nano /etc/default/isc-dhcp-server
Set your interface here, this will be the LAN NIC, in my case:
INTERFACES="enp4s0"
sudo nano /etc/dhcp/dhcpd.conf
Change the options near the top:
option domain-name "youname.home";

option domain-name-servers 10.0.1.1;

authoritative;      (uncomment this)
Add this to the bottom. Note that in green I've highlighted how to define a static assigned IP address to my VOIP ATA, this is to ensure its IP does not change so the traffic is forwarded from the iptables rule to the right place.
Note IPs:
- 10.0.1.1 is the gateway LAN IP (static)
- 10.0.1.2 is the server host LAN IP (static)
- 10.0.1.100 to 10.0.1.199 allows 99 clients (laptops, phones, TVs, consoles, all the rest ...!)
- I've used 10.0.1.118 as an IP reserved for my VOIP ATA, using its specific MAC address. This is to ensure the port forwarding is always going to the right place (IP address). If you don't need this, remove the whole block host voip.
subnet 10.0.1.0 netmask 255.255.255.0  {
    range 10.0.1.100 10.0.1.199;
    option routers 10.0.1.1;
    option domain-name-servers 10.0.1.1;
    option broadcast-address 10.0.1.255;

    host voip {
        hardware ethernet 00:0b:43:14:78:d3;
        fixed-address 10.0.1.118;
        ddns-hostname "voip";
    }
}
To apply:
sudo service isc-dhcp-server start
To check if it started OK:
service isc-dhcp-server status
Setup host LAN and turn off WAN access
We're now ready to use the router to forward traffic. It should also route traffic for the host too (instead of the host directly connected) in order to make it more secure.
We'll first use /etc/network/interfaces on the host to specify WAN/LAN details. The WAN interface is set to manual, with the LAN remaining static as before.
sudo nano /etc/network/interfaces
# This file describes the network interfaces available on your system
# and how to activate them. For more information, see interfaces(5).

# The loopback network interface
auto lo
iface lo inet loopback

# The WAN interface (bring up with no IP)
auto enp2s0
iface enp2s0 inet manual
up ifconfig enp2s0 up

# The LAN interface
auto enp4s0
iface enp4s0 inet static
	address 10.0.1.2
	gateway 10.0.1.1
	netmask 255.0.0.0
up ifconfig enp4s0 up
Here we have used "up ifconfig xxx up" for each interface to make sure that they always come up, even with no IP assigned. This is so that the VM can use the interfaces, and the interfaces work once the VM has finished booting.
To doubly ensure that the host cannot connect directly, we will use iptables to prevent it:
Let's setup iptables similar to the router VM:
Again - the startup script:
sudo nano /etc/network/if-pre-up.d/iptables
#!/bin/sh
/sbin/iptables-restore < /etc/network/iptables
Set the permissions:
sudo chown root /etc/network/if-pre-up.d/iptables
sudo chmod 755 /etc/network/if-pre-up.d/iptables
Now create the iptables script. We'll also use this later for VPN access.
sudo nano /etc/network/iptables
*filter
:INPUT ACCEPT [0:0]
:FORWARD ACCEPT [0:0]
:OUTPUT ACCEPT [0:0]

# Drop all traffic going out and coming in on enp2s0 (the WAN interface)
-A INPUT -i enp2s0 -j DROP
-A OUTPUT -o enp2s0 -j DROP

COMMIT
Execute it using
sudo /etc/network/if-pre-up.d/iptables
At this stage, you can try plugging in a client into the LAN interface (i.e. with a straight cable to a laptop).
Here is ipconfig from a Windows client (laptop):
Ethernet adapter Ethernet:

   Connection-specific DNS Suffix  . : portal.home
   IPv4 Address. . . . . . . . . . . : 10.0.1.100
   Subnet Mask . . . . . . . . . . . : 255.0.0.0
   Default Gateway . . . . . . . . . : 10.0.1.1
Auto VM Start
We'll need our router guest VM to auto-start when the server is started, otherwise they'll be no internet access. Some scripts can do this, and I hunted around for the most reliable means. Tombert's on askubuntu.com (linked below) was a good start. I then combined it with a systemd script to start and stop the VM on boot/shutdown.
I created these scripts in the same directory as the VM, which for me is /mnt/ssd/Gateway
nano /mnt/ssd/Gateway/vm-start.sh
#! /bin/bash -e

function dostart()
{
    echo -n "Running Gateway ... "
    vboxheadless --startvm Gateway
    echo "now closed"
}
export -f dostart

if [ $(whoami) != "dan" ]; then
    su -c dostart dan
else
    dostart
fi
nano /mnt/ssd/Gateway/vm-stop.sh
#! /bin/bash

function dostop()
{
    ## check if WinXP is running
    vboxmanage showvminfo Gateway --machinereadable | grep -q 'VMState="running"' &> /dev/null
    if [ $? -ne 0 ]; then
        echo "Gateway not running"
        exit
    fi
    ## try gracefully shutdown
    echo -n "Shutting down Gateway ... "
    vboxmanage controlvm Gateway acpipowerbutton
    ## check vm status
    INDEX=60
    while [ $INDEX -gt 0 ]; do
        echo -n "$INDEX "
        vboxmanage showvminfo Gateway --machinereadable | grep -q 'VMState="running"' &> /dev/null
        if [ $? -ne 0 ]; then
            echo "gracefully done"
            break
        fi
        sleep 1
        let INDEX+=-1
    done
    ## close forcefully
    if [ $INDEX -eq 0 ]; then
        vboxmanage controlvm Gateway poweroff &> /dev/null
        echo "forcefully done"
    fi
}
export -f dostop

if [ $(whoami) != "dan" ]; then
    su -c dostop dan
else
    dostop
fi
Now create a system service (systemd). I found after many hours and searching around that these settings work best, otherwise the service would usually fail during boot:
sudo nano /etc/systemd/system/gateway.service
[Unit]
Description=Gateway VM
Wants=network-online.target
After=network-online.target

[Service]
Type=idle
User=dan
ExecStart=/mnt/ssd/Gateway/vm-start.sh
ExecStop=/mnt/ssd/Gateway/vm-stop.sh

[Install]
WantedBy=multi-user.target
sudo systemctl enable gateway
Test the service by running:
sudo systemctl start gateway.service
Launched the VirtualBox GUI, the VM should now show Started. Click Show to show it.
Then after the VM has fully booted, test stopping it
sudo systemctl stop gateway.service
This command should wait until the VM has fully shut down before exiting.
It should also work whenever the host system is started or shut down.
To diagnose any issues, use:
sudo systemctl status gateway -l
SSH security
Our SSH setup allows connections from anywhere, password authenticated.
Though we cannot connect to SSH from the internet unless we open an iptables rule, as added safety it is still good to tell SSH to only listen on the LAN adaptor, for both our guest router VM, and the host itself.
To get SSH from the outside, we can use Open VPN to access the server, and then SSH to the relevant LAN IP instead.
To tell SSH to only listen on certain IPs, you can edit /etc/ssh/sshd_config
sudo nano /etc/ssh/sshd_config
ListenAddress 10.0.1.1
Uncomment the ListenAddress line and put the static IP for the LAN address (10.0.1.1 for the gateway, 10.0.1.2 for the host).
You can check whether it works by issuing netstat -tunlp
Active Internet connections (only servers)
Proto Recv-Q Send-Q Local Address           Foreign Address         State       PID/Program name
tcp        0      0 10.0.1.1:53             0.0.0.0:*               LISTEN      -
tcp        0      0 188.172.155.73:53       0.0.0.0:*               LISTEN      -
tcp        0      0 127.0.0.1:53            0.0.0.0:*               LISTEN      -
tcp        0      0 10.0.1.1:22             0.0.0.0:*               LISTEN      -
tcp        0      0 127.0.0.1:953           0.0.0.0:*               LISTEN      -
tcp6       0      0 :::53                   :::*                    LISTEN      -
tcp6       0      0 ::1:953                 :::*                    LISTEN      -
udp        0      0 10.0.1.1:53             0.0.0.0:*                           -
udp        0      0 188.172.155.73:53       0.0.0.0:*                           -
udp        0      0 127.0.0.1:53            0.0.0.0:*                           -
udp        0      0 0.0.0.0:68              0.0.0.0:*                           -
udp6       0      0 :::53                   :::*                                -
We can see that in the Local Address column, port 22 (ending with :22) only shows for 10.0.1.1.
0.0.0.0 or ::: indicates a port/service listening on all IP addresses.
SSH is now only accessible on the LAN. Take care if assigning a new static IP via SSH though - if you change it and do not update the SSH configuration, you will lose access.
You can go further with SSH security and prevent password authentication. This involves generating a public-private key pair and authenticating with that instead of the password.
The main advantage of this is it prevents brute force attacks as your SSH server would continue to listen for the right password. I would say though just keep it off the Internet unless you really need it.