
Home-made PC Router and NAS Server [Page 1] - Introduction and Hardware

Many routers exist these days, as do many dedicated NAS systems. I, however, wanted to improve performance and reliability of these devices, and gain the know-how to build my own.
Over the years, this started as a NAS at first, and then recently evolved to become a router as well as a NAS.
The latest evolution brings my previous build up-to-date with Ubuntu's Long-term support offering, version 18.04, later upgraded to 20.04. This guide is applicable to both versions. It also uses the latest router/network options (netplan) and logical volume management for disk setup and snapshots.
In this write up - I'll take you through the complete build both a router and a NAS built around a Personal Computer and Open Source software.
Before we start though - what would I consider the requirements for a router, and a NAS?
Router
Well, a router for me actually needs to be simple - it needs to be able to forward traffic from many Internet connected devices inside my home (on my Local Area Network or LAN) to my one outgoing cable to the Internet, via my Internet Service Provider (ISP).
Each of my devices have their own Internet Protocol (IP) address, but my Internet connection has only one, so to allow them access my router needs to do Network Address Translation (NAT).
Along with NAT, my router may also need to open pinholes (or ports) from my public IP address to specific services inside my LAN (such as telephone connection, which uses VOIP).
The one other thing I require from my router is an ability to dynamically assign unique IP addresses to everything that connects to my LAN. DHCP (Dynamic Host Configuration Protocol) can do this.
So, NAT (with port forwarding) and DHCP. That, in a nutshell, is all I really require from a router. And I suspect it is all most people need too. But it should be flexible for me to add things in future.
NAS
What do I need from a NAS? NAS is simply 'Network Attached Storage', and that is all I want to do - make storage (disk space) available to my LAN. It should perform fast, be secure and be resilient.
Though if you spend decent money, you can get good commercial hardware, the curious brain inside me wanted to build a complete 'server', which has the flexibility to host services (such as a NAS service), as well as route traffic.
Why not just buy them?
Commercial routers and NAS systems are available cheap, but they are quite slow due to the lack of hardware capability. To get a good router, you need to spend upwards of £100, and the same again for a good NAS. Reliability can also be a problem - the router I replaced would sometimes stop working properly, losing Internet access, or failing to hand out IPs to devices.
Security is also a problem - I see increasing amounts of reports of all sorts of routers being hacked into, and it's often not automatic to keep them up-to-date and secure, and even when it is, that's another door a hacker could open.
The other reason is the general DIY reason - learning, and a sense of achievement.
My Project
My project is very much a home solution - it is not for the office or commercial use, but you may feel free to attempt it. It's also very much my own consolidation of many articles I've read online.
This project came in two stages, and then was rebuilt for the most optimum configuration.
The first inspiration was to build a NAS and get some familiarity using Linux as a server. This started over three years before creating a router from it.
It ended up with a Linux desktop OS - Linux Mint, having Samba configured on it and a configuration of drives that let me store data and make it available to the LAN. I also added my own VPN later on to it, so I could access UK services (mainly TV!) whilst I was in Japan for a few months.
In early 2016, an article on how a homebrew router improved speed was also put on Ars Technica - one to the great tech sites I frequently read: http://arstechnica.com/gadgets/2016/01/numbers-dont-lie-its-time-to-build-your-own-router/
Articles followed later to help you build it and I had planned for many months to do the same with the hardware I already had.
My latest build, which started after Ubuntu 18.04 was released and updated when I upgraded my disks to 2TB was completed at the end of 2018.
The hardware
The hardware isn't particularly considered modern these days, but well-up for the task! As I write this, the processor will reach 6 years since release. It's an Intel 'Ivy Bridge' Core i5 3475S. Having brought a Sandy Bridge laptop in 2011, I was always impressed in the great leap of performance this gave, and continued to invest in that hardware platform by buying Mini ITX hardware. Ivy Bridge is a small evolution of Sandy Bridge and uses the same socket so with a BIOS upgrade, many motherboards are compatible. This server was originally running on a Core i3 2100T, and I only upgraded it because the Core i5 CPU came from a different desktop I upgraded!
Mini ITX is a great platform allowing you to build small machines, but still with a full-size processor, RAM and enough I/O ports. For the server build, I was unsure how well it would work so I brought the cheaper versions of most things!
So here is list of what I used:
- CPU - Currently Intel Core i7 3700S (64-bit quad core with hyperthreading, 3.1GHz processor, up to 3.9GHz, 8M cache), but previously Intel Core i5 3475S (64-bit quad core, 2.9GHz processor, up to 3.6GHz, 6M cache). Both have a thermal limit of 65W which is a good limit for Mini-ITX systems. Many Mini-ITX cases and PSUs will only support 35W TDP processors, and my first CPU was an Intel Core i3 2100T. The reason why I've got an i7 processor is not for the NAS or Router duties, but to be able to run Virtual Machines on it and other services.
- Motherboard - originally Gigabyte GA-H61N-D2V (cheapest at the time), but now an Intel DH61DL. These are socket LGA1155 Mini ITX sized motherboards, with two full size DDR3 RAM slots. For some amusing reason they come with plenty of hardware from the 00's and 90's - parallel port, serial port, PS/2 ports and the Gigabyte board also came with PCI (32 bit, not PCI-E) slot. USB 2.0 is there, but not USB 3.0. Importantly, both do have one 1Gbps LAN interface built in.
- RAM - DDR3 Patriot Viper 2x8GB 1600MHz. This is the most the CPU/Motherboard supports. Previously Crucial dual channel 2x4GB sticks was used, so 8GB total. Before that I used only 2GB RAM for NAS duties, and for NAS/Router duties, you don't need more! Again running Virtual Machines is why I wanted 16GB RAM.
- Drives - A 120GB SSD from my laptop I used from 2011 to 2013 - this is an OCZ Agility 3. Also 2011 hardware, but still pretty fast and boots Linux in just a few seconds and still working fine in 2020.
- Drives - Two 1TB Crucial MX500 SSD drives, and a 250GB MX500 SSD, all for files. 1x Seagate 2TB 2.5-inch hard drive for backup. Originally there was 2x Seagate 2TB drives (RAID 1 mirrored) but one failed
- HP NC360T Dual-Port Gigabit NIC (low profile) now I have a PCIe motherboard, with the slot cut so it fits in a PCIe 1x slot. Originally had a D-Link DGE-528T Gigabit PCI (not PCIe!) 1Gbps Network Card for the Gigabyte board.
- To get the extra SATA ports, a two port Mini-PCI-E to SATA converter fits nicely into where the Wifi card is supposed to go in the Intel DH61DL. As this motherboard only has three SATA ports, this gives me a total of five.
- All of that is put an InWin BM639 Mini ITX case
If you're buying the hardware now, you probably be able to get newer stuff that Is also more power efficient. Equally, if you already have even older stuff, it could already work well! Carefully consider the right value for your project - don't spend too much! But, be wary of soldered (non-upgradeable), low power processors such as Intel Atom, Celeron, and AMD AM1 - they will not outperform the above! A Core i3 2nd generation or later is ideal, and modern Celerons are also fine.
The InWin BM639 case is fairly large for Mini ITX (and will even take Mini DTX, as known as some very small micro-ATX motherboards), but is a good compromise. This server has been in three cases - the first one was far too large, second was too small and got uncomfortably warm. The case has lots of room for drives too - if I brought the right adaptors, I'd be able to squeeze six 2.5" hard drives! Many cases were also not an option due to the absence of PCI/PCIe card slots (something I needed to install an extra network adaptor).
The case has been tweaked with a different outlet fan at the top of the case (since the cheap one that came with the case failed!), and a smaller 60mm intake fan at the back was added so there is some airflow over the motherboard itself. To prevent them from being extremely noisy, I've fitted an LM2956 voltage regulator module (these are obtainable cheap) in-line with a 12V fan power connector, and adjusted the voltage output on that to a more reasonable noise level, but still with plenty of airflow.
Network Connections
It is important that you have two network ports. You cannot make a router otherwise! Most motherboards come only with one, so if you don't get one with two, make sure you have a PCI or PCI-express spare to use. A USB network port adaptor might work too, but latency and throughput could be worse, especially if its USB 2.0.
For me, I had the ancient PCI slot - these were around in 1992! They can reach 133 MB/s though, so a Gigabit Network Interface Controller card (NIC) does work, but under testing I discovered it is limited to about 500MBit/s in reality, and hence it will be used for my Internet connection (which is max 150MBit/s). Having a PCIe (PCI Express) slot will work better if your hardware has it instead.
If you're building a small system in a case like mine, get a low-profile card. Do also check there is good support for Linux.
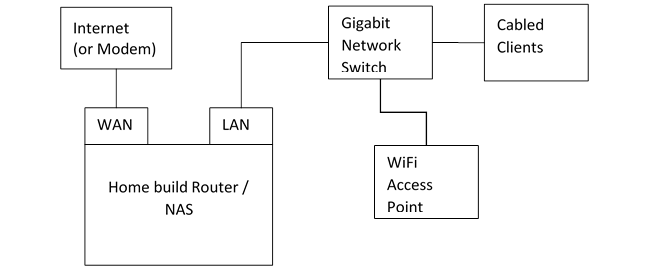
In its final configuration, your PC will have two LAN ports - one will be considered a WAN port, where the Internet connection is plugged in, the other is a LAN port. This will lead a to Network Switch (I use a 5 port D-Link Go) and the rest of your LAN.
WiFi?
This is one thing pretty much all commercial / home routers come with - WiFi support. My home build will not though. PC WiFi cards are not designed to accept multiple connections, acting as an access point, so you're better off getting real hardware to do it.
Given I was to swap out my existing router, I decided to jump to a more professional wireless access point and I recommend the Ubiquiti Unifi AP-AC Lite.
This I mounted on the ceiling in the hallway of my flat and I get a full signal on every device in every room. It doesn't create split 2.4GHz and 5GHz networks either - all 5GHz compatible clients will automatically connect at the higher speed.
Any other wireless access point with a LAN port should also work well. Make sure you get wireless AC (aka Wi-Fi 5, or wireless AX aka Wi-Fi 6) and forget Wireless N (Wi-Fi 4), especially if you live in flats where the airwaves are congested from everyone else's WiFi - it is not fast enough!
You can also use an existing router, just disable everything else on it so it behaves like a WiFi access point. Plug your LAN into the LAN ports, not the WAN.
Software - Operating System
I used the latest LTS (long term support) edition of Ubuntu for the Operating System (O/S), version 18.04 (now upgraded to 20.04). Linux has a huge community following and very popular. It is also open-source and free to use, updates quicker and is generally considered to be more secure than Windows.
Linux has a huge number of distributions. A lot of the steps here are applicable to most of them, but there are variances I won't cover. Installing software will be one such variations where I will show commands for 'apt' which will apply to Debian, Ubuntu, Linux Mint and others, but not to Slackware, CentOS, Arch, Mandriva, Clear or many others. I picked Ubuntu as it's got a huge community around it, making it easier to find solutions to problems.
The key services, my host would contain are:
- IPTABLES - to perform NAT, forwarding and firewall duties, acting as a router
- DHCP - provides IP addresses for any laptops, phones, TVs, consoles etc connected to my LAN
- Samba - this is the NAS element and allows me to share my hard drives to LAN PCs (mostly Windows), easily and with password security
- SSH - for administration
- OpenVPN - for connecting remotely, securely and masking my location
In my original build, I used a separate VM for routing duties, however this was sometimes unreliable and was inconvenient to patch. In the original build I also used a desktop flavour of Ubuntu (with GUI).
In this build, all services are on the bare-metal machine, and I'm using a Server Edition of Ubuntu 18.04 Long-term support, with no GUI.
Read on...
You can find more details of the build, on these pages: