
7.1 channel Hi-Fi microprocessor/PC controlled Preamp
I suggest reading about the rebuild first. Information below is for reference purposes.
Volume
This page includes the description and code required to manage 4 PGA2310 volume controls, and a total of 8 channels!
First lets look at the hardware...
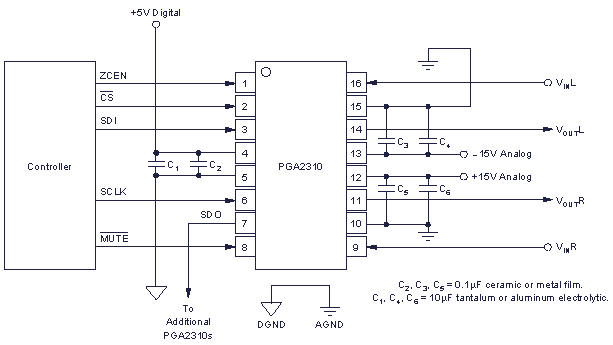
From Datasheet
/MUTE always remains high in my case, since to mute these chips you can also send the data value of 0x00h - minimum volume level. ZCEN also remains high since this keeps the volume control from making any pops on volume changes.
SDI, SCLK and /CS are connected to the microprocessor directly, and I label them as DATA, CLOCK and LATCH respectively from here onwards.
SDO goes to additional PGA2310's. Each addition one still needs a CLOCK and DATA signal, so these wires are paralleled with the ones connecting to the PGA2310 before.
If you want more information on how to connect additional PGA2310's, the datasheet explains this clearly. Don't forget the pull-up resistor!
C2C Code for the volume
I will dive straight into showing you the routine that outputs code to all four of my PGA2310 chips...
|
8 bytes in total needs to be sent. One for each channel, representing a volume level from 0-255 (or -96dB to +31.5dB).
Each volume level is stored in an array, with position 0 being the subwoofer channel and 7 being front left (it works in reverse order from what you would suspect). Essentially, one 64-bit word is sent out, meaning this whole process can last a few hundred micro seconds (us) - but it is fast enough as in pratice I notice no delay from turning the encoder to having a change in volume.
Connections in the above routine are all on port c. Pin 0 is serial Data (SDI), pin 1 is Clock (SCLK) and pin 2 is Latch (/CS). They can be changed as you see fit.
Calculating the volume in dB for the LCD
This is quite a complex process, as this C compiler, and PIC's in general do not support floating point numbers natively - so having a decimal point becomes slightly difficult!
However, I worked a way around it, and the code is shown below for your convenience.
|
Its not tooo complex once you've scratched your head and studied it a bit, but in
case you don't care, there are a few things to point out if you want to use this code
in your project. lcdText(' ') is an important routine - this just takes
a simple character and writes it to an LCD - and it will of course vary depending on
the LCD you have. To make sure the text is wrote to the last line of my display, I
call a routine called lcdLine(3). This again will vary according to your
LCD.
Note this routine only takes one volume character - a sort of universal volume level unaffected by rear/sub/center volume cut or boost, or balance if you add that too. Since I have no balance, the character sent to this routine is one of the front levels (i.e. left).
Levels - for cut/boost
Another array of 8 chars is used to represent cut/boost to certain speakers, such as rear, center or subwoofer.
|
This routine takes a universal volume level, and automatically applies the levels from the levels array. It deals with overflow, preventing any sudden change from min to max and vice versa.
The levels array is set from byte codes sent from PIC#1 using:
|
Balance is ignored, hence the loop counter starts at 2, and applies the first byte to every rear channel. More details on how each level is set on PIC#1 is described later in the PIC control page.