
Home-made PC Router and NAS Server [Page 3] - Router
Creating a router
Create network
Before starting, keep your server with its WAN socket connected to your existing LAN (as per previous page). Only plug the Internet into your router server once it is fully configured from below.
Previous versions of Ubuntu and other distros used /etc/network/interfaces for configuring the network
This has been replaced with a new method - netplan - and the following setup has been changed to use netplan instead. For some information to setup the alternative way though, see my previous version ("Create network section").
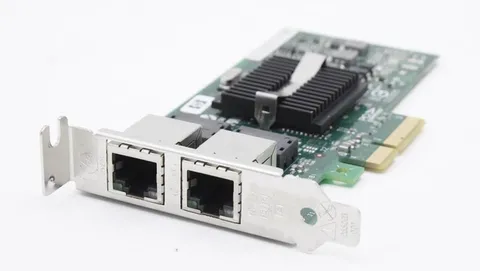
First, let's remind ourselves about the two network card interfaces:
Our WAN interface (for me known as enp4s0) connects to the Internet and will be set to receive an IP address and gateway automatically (DHCP), whereas our LAN interface (for me known as enp2s0) will have an IP address specified (static, no DHCP).
To avoid any conflicts with your existing LAN setup during configuration, we'll configure our new setup to use 10.0.1.x addresses. This is within the local reserved IPV4 range, but I've not seen any home routers use them (usually they are 192.168.x.x or 10.0.0.x range).
During the setup, the WAN port should be plugged into our existing LAN, so the network card which will be the new WAN port, will receive an IP of say 192.168.0.100 (or similar) from our old router.
Netplan is setup during the install and is modified by using a YAML file.
YAML (YAML Ain't Markup Language) is a data serialisation language often used for configuration files, and netplan uses it. The important thing to note is that indentation (whitespace) matters, and tabs cannot be used to do that indentation.
I'm editing the default one that Ubuntu server comes configured with - /etc/netplan/00-installer-config.yaml (for Ubuntu 18.04 this may be /etc/netplan/50-cloud-init.yaml)
sudo nano /etc/netplan/00-installer-config.yaml
The following configuration is what I use for my setup. If you configured the network during install, it should look very similar. Substitute in your correct network interfaces and preferred static IP address for the LAN. I added the additional 'optional' attribute set to true, so that I can still boot if either connection is down. The WAN adaptor also has DNS name servers set to the Google DNS IPs 8.8.8.8 and 8.8.4.4 (rather than accepting the DNS my Internet provider ISP gives me).
# This is the network config written by 'subiquity'
network:
  ethernets:
    enp1s0f0:
      addresses:
      - 10.0.1.2/8
      dhcp4: false
      nameservers:
        addresses: []
        search: []
      optional: true
    enp1s0f1:
      addresses: []
      dhcp4: true
      nameservers:
        addresses: [8.8.8.8,8.8.4.4]
      optional: true
  version: 2
Let's try it:
sudo netplan --debug generate
sudo netplan apply
ip address
The output of ip address should show an IP assigned by our old router on enp1s0f1, and the static address 10.0.1.2 on enp1s0f0.
If you didn't get an IP address from your old router on the port you set dhcp4: true on, swap the cables as you may have mixed the ports up!
NAT - enable forwarding
For port forwarding, I will continue to use the kernel and iptables to do this. In theory netplan can also do it, but I could not get it to work.
To enable port forwarding (permanently), edit /etc/sysctl.conf
sudo nano /etc/sysctl.conf
Uncomment the line (remove hash) #net.ipv4.ip_forward=1
# Uncomment the next line to enable packet forwarding for IPv4
net.ipv4.ip_forward=1

# Uncomment the next line to enable packet forwarding for IPv6
#  Enabling this option disables Stateless Address Autoconfiguration
#  based on Router Advertisements for this host
#net.ipv6.conf.all.forwarding=1
Save and Exit (Ctrl+O, Ctrl+X)
Reload the parameters by running:
sudo sysctl -p
NAT - IP tables
Since moving to netplan, the previous setup using if-pre-up.d scripts no longer works. To restore the iptable rules during boot and network disconnect/reconnects, iptables-persistent works fine.
It does need to be installed though, and these commands will do that:
sudo apt-add-repository universe
sudo apt install iptables-persistent
Now create an iptables script:
sudo nano /etc/iptables/rules.v4
Here is an example of a 'vanilla' script that will do the router tasks like a dedicated router would when brought from the store. That is, traffic from inside your LAN if it is DNS and DHCP can reach both the server, LAN traffic is forwarded to the WAN (Internet), but no traffic on the WAN can reach your server or any other machines on your LAN.
In my example enp1s0f1 is the WAN port (the one connected to the Internet) and enp1s0f0 is the LAN port (the one with the static address).
# -----------------------------------------
#  Enabling NAT
# -----------------------------------------
*nat
:POSTROUTING ACCEPT [0:0]
# enp1s0f1 is WAN interface, enp1s0f0 is LAN interface
-A POSTROUTING -o enp1s0f1 -j MASQUERADE

COMMIT

*filter
:INPUT ACCEPT [0:0]
:FORWARD ACCEPT [0:0]
:OUTPUT ACCEPT [0:0]

# -----------------------------------------
#  Allowing pings and traceroutes (LAN and WAN)
# -----------------------------------------
# basic global accept rules - ICMP, loopback, traceroute, established all accepted
-A INPUT -s 127.0.0.0/8 -d 127.0.0.0/8 -i lo -j ACCEPT
-A INPUT -p icmp -j ACCEPT
-A INPUT -m state --state ESTABLISHED,RELATED -j ACCEPT

# enable traceroute rejections to get sent out
-A INPUT -p udp -m udp --dport 33434:33523 -j REJECT --reject-with icmp-port-unreachable

# -----------------------------------------
#  Ports that are open to the LAN only
# -----------------------------------------
# DNS - accept from LAN
-A INPUT -i enp1s0f0 -p tcp --dport 53 -j ACCEPT
-A INPUT -i enp1s0f0 -p udp --dport 53 -j ACCEPT

# DHCP client requests - accept from LAN
-A INPUT -i enp1s0f0 -p udp --dport 67:68 -j ACCEPT

# SSH - accept from LAN
-A INPUT -s 10.0.0.0/8 -p tcp -m tcp --dport 22 -j ACCEPT

# drop all other inbound traffic
-A INPUT -j DROP

# -----------------------------------------
#  Allowing traffic out to the Internet
# -----------------------------------------
# Forwarding rules
# forward packets along established/related connections
-A FORWARD -m conntrack --ctstate RELATED,ESTABLISHED -j ACCEPT

# forward from LAN (enp1s0f0) to WAN (enp1s0f1)
-A FORWARD -i enp1s0f0 -o enp1s0f1 -j ACCEPT

# drop all other forwarded traffic
-A FORWARD -j DROP

COMMIT
To expand it further, such as opening ports for specific services as well as forwarding VPN traffic, here is mine in full. It shows:
- How I forward Open VPN to the host machine, for VPN access
- How I configured VOIP to forward to my VOIP ATA, only from the IP of my VOIP provider (the -s parameter has an example of the IP address of my VOIP provider, 141.0.0.0)
# -----------------------------------------
#  Enabling NAT
# -----------------------------------------
*nat
:POSTROUTING ACCEPT [0:0]
# enp1s0f1 is WAN interface, enp1s0f0 is LAN interface
-A POSTROUTING -o enp1s0f1 -j MASQUERADE

# NAT holes: Open all VOIP ports to the voip
-A PREROUTING -s 141.0.144.12/32 -i enp1s0f1 -p udp -m udp --dport 50601 -j DNAT --to-destination 10.0.1.118
-A PREROUTING -s 141.0.144.12/32 -i enp1s0f1 -p udp -m udp --dport 5004 -j DNAT --to-destination 10.0.1.118

# Allow traffic from OpenVPN client to LAN and WAN interface
-A POSTROUTING -s 10.8.0.0/24 -o enp1s0f0 -j MASQUERADE
-A POSTROUTING -s 10.8.0.0/24 -o enp1s0f1 -j MASQUERADE

COMMIT

*filter
:INPUT ACCEPT [0:0]
:FORWARD ACCEPT [0:0]
:OUTPUT ACCEPT [0:0]

# -----------------------------------------
#  Allowing pings and traceroutes (LAN and WAN)
# -----------------------------------------
# basic global accept rules - ICMP, loopback, traceroute, established all accepted
-A INPUT -s 127.0.0.0/8 -d 127.0.0.0/8 -i lo -j ACCEPT
-A INPUT -p icmp -j ACCEPT
-A INPUT -m state --state ESTABLISHED,RELATED -j ACCEPT

# enable traceroute rejections to get sent out
-A INPUT -p udp -m udp --dport 33434:33523 -j REJECT --reject-with icmp-port-unreachable

# -----------------------------------------
#  Ports that are open to the LAN only
# -----------------------------------------
# DNS - accept from LAN
-A INPUT -i enp1s0f0 -p tcp --dport 53 -j ACCEPT
-A INPUT -i enp1s0f0 -p udp --dport 53 -j ACCEPT

# DHCP client requests - accept from LAN
-A INPUT -i enp1s0f0 -p udp --dport 67:68 -j ACCEPT

# SSH - accept from LAN and OVPN
-A INPUT -s 10.0.0.0/8 -p tcp -m tcp --dport 22 -j ACCEPT

# Samba - accept from LAN and OVPN
-A INPUT -s 10.0.0.0/8 -p tcp -m state --state NEW -m tcp --dport 137 -j ACCEPT
-A INPUT -s 10.0.0.0/8 -p tcp -m state --state NEW -m tcp --dport 138 -j ACCEPT
-A INPUT -s 10.0.0.0/8 -p tcp -m state --state NEW -m tcp --dport 139 -j ACCEPT
-A INPUT -s 10.0.0.0/8 -p tcp -m state --state NEW -m tcp --dport 445 -j ACCEPT

# -----------------------------------------
#  Ports that are open to the WAN (Internet)
# -----------------------------------------
# openvpn - accept from WAN
-A INPUT -i enp1s0f1 -p tcp -m state --state NEW -m tcp --dport 443 -j ACCEPT

# openvpn - accept all incoming traffic from the vpn tun0 and tun1 interfaces
-A FORWARD -i tun0 -j ACCEPT

# drop all other inbound traffic
-A INPUT -j DROP

# -----------------------------------------
#  Allowing traffic out to the Internet
# -----------------------------------------
# Forwarding rules

# forward packets along established/related connections
-A FORWARD -m conntrack --ctstate RELATED,ESTABLISHED -j ACCEPT

# forward from LAN (enp1s0f0) to WAN (enp1s0f1)
-A FORWARD -i enp1s0f0 -o enp1s0f1 -j ACCEPT

# -----------------------------------------
#  Allowing traffic to reach another system on the LAN (e.g. VOIP)
# -----------------------------------------
# VOIP traffic allow
-A FORWARD -p udp -d 10.0.1.118 --dport 50601 -j ACCEPT
-A FORWARD -p udp -d 10.0.1.118 --dport 5004 -j ACCEPT

# -----------------------------------------
#  Allowing traffic from Open VPN to reach LAN and WAN
# -----------------------------------------
# Allow forwarding from OpenVPN LAN
-A FORWARD -i tun0 -j ACCEPT

# drop all other forwarded traffic
-A FORWARD -j DROP

COMMIT
To apply the rules immediately, run iptables-restore:
sudo iptables-restore /etc/iptables/rules.v4
That completes the IP Tables setup.
You now have a router!
DHCP server
At this stage, any client that needs to use the router, and plugged into the LAN network card, would have to have a static IP defined, and also manually entering the gateway and DNS name servers.
We can use the server to run a DHCP server though. DHCP will tell all the clients what IP address they should have, subnet, gateway and DNS. To install the DHCP server, use:
sudo apt-get install isc-dhcp-server
sudo nano /etc/default/isc-dhcp-server
Set your interface here, this will be the LAN interface, in my case:
INTERFACESv4="enp1s0f0"
INTERFACESv6=""
sudo nano /etc/dhcp/dhcpd.conf
Change the options near the top (I'm using Google's free DNS nameservers, which are fast):
option domain-name "youname.home";

option domain-name-servers 8.8.8.8, 8.8.4.4;

authoritative;      (uncomment this)
Add this next section to the bottom. Note IPs:
- 10.0.1.2 is the server and gateway host LAN IP (static)
- 10.0.1.100 to 10.0.1.250 allows 150 clients (desktops, laptops, phones, TVs, consoles, all the rest ...!)
- I've used 10.0.1.118 as an IP reserved for my VOIP ATA, using its specific MAC address (00:1b:32:88:25:3d is a made-up example). This is to ensure the port forwarding is always going to the right place (IP address). If you don't need this, remove the whole block host voip.
subnet 10.0.1.0 netmask 255.255.255.0 {
    range 10.0.1.100 10.0.1.250;
    option routers 10.0.1.2;
    option domain-name-servers 8.8.8.8, 8.8.4.4;
    option broadcast-address 10.0.1.255;

    host voip {
        hardware ethernet 00:1b:32:88:25:3d;
        fixed-address 10.0.1.118;
        ddns-hostname "voip";
    }
}
To apply:
sudo service isc-dhcp-server start
To check if it started OK:
service isc-dhcp-server status
If it fails for any reason, more detailed messages may be seen by checking 'journalctl -xe'
At this stage, you can try plugging in a client into the LAN interface port (i.e., with a straight cable to a laptop). It should automatically assign itself an IP address.
Here is ipconfig from a Windows client (my laptop):
Ethernet adapter Ethernet:

   Connection-specific DNS Suffix  . : portal.home
   IPv4 Address. . . . . . . . . . . : 10.0.1.100
   Subnet Mask . . . . . . . . . . . : 255.255.255.0
   Default Gateway . . . . . . . . . : 10.0.1.2
I found with the netplan setup and Ubuntu 20.04, after a machine restart or cold boot, the DHCP service was not working.
This was found to be because the DHCP service was starting before the network interfaces were fully up. Upon checking service dependencies, they seemed fine so a quick solution to it is to add a delay to the start of the DHCP service. 30 seconds is enough and works reliably. Feel free to test restarts without this fix though in case the bug has been fixed since.
Update: Don't edit the file directly in /lib/systemd/system/isc-dhcp-server.service - it'll get lost. The command below will create a copy as /etc/systemd/system/isc-dhcp-server.service.
sudo systemctl edit isc-dhcp-server --full
Find the line starting 'exec dhcpd ...' and add 'sleep 30;' in front:
[Unit]
Description=ISC DHCP IPv4 server
Documentation=man:dhcpd(8)
Wants=network-online.target
After=network-online.target
After=time-sync.target
ConditionPathExists=/etc/default/isc-dhcp-server
ConditionPathExists=|/etc/ltsp/dhcpd.conf
ConditionPathExists=|/etc/dhcp/dhcpd.conf

[Service]
EnvironmentFile=/etc/default/isc-dhcp-server
RuntimeDirectory=dhcp-server
# The leases files need to be root:dhcpd even when dropping privileges
ExecStart=/bin/sh -ec '\
    CONFIG_FILE=/etc/dhcp/dhcpd.conf; \
    if [ -f /etc/ltsp/dhcpd.conf ]; then CONFIG_FILE=/etc/ltsp/dhcpd.conf; fi; \
    [ -e /var/lib/dhcp/dhcpd.leases ] || touch /var/lib/dhcp/dhcpd.leases; \
    chown root:dhcpd /var/lib/dhcp /var/lib/dhcp/dhcpd.leases; \
    chmod 775 /var/lib/dhcp ; chmod 664 /var/lib/dhcp/dhcpd.leases; \
    if test -n "$INTERFACES" -a -z "$INTERFACESv4"; then INTERFACESv4="$INTERFACES"; fi; \
    sleep 30; exec dhcpd -user dhcpd -group dhcpd -f -4 -pf /run/dhcp-server/dhcpd.pid -cf $CONFIG_FILE $INTERFACESv4'

[Install]
WantedBy=multi-user.target
Test by issuing:
sudo systemctl daemon-reload
sudo service isc-dhcp-server start
sudo service isc-dhcp-server status
Then do a full reboot and confirm that the service is starting fine and assigning IP addresses to clients connected to the LAN port.
Local DNS Cache
Optionally you can install local DNS caching, which may help with slower Internet connections by caching regularly used Internet addresses. This can be done by installing bind9:
sudo apt-get install bind9
You can then edit the DHCP config above and replace Google's IP addresses with the servers own IP (10.0.1.2). And it's that simple.
References and more reading:
Ars Technica - The Ars guide to building a Linux router from scratch
Netplan.io - Examples
Linux Config - How to configure static IP address on Ubuntu 18.04
Server Fault - Ubuntu - dhcp server 'not configured to listen on any interfaces