
LED Mods
A small change I made to the front of my case is to change the LED's for power and hard disk activity.
This mod is very easy to do, and you can apply it to any other LED's you may prefer to get, including lovely blue ones...
Changing your case LED's is more then likely going to involve soldering. However I have seen cases which use simple two pins sockets which accept most LED's of the same size as the original ones. My case on the other hand had two 3mm LED's which were soldered and glued to the front of the case. I decided that their viewing angle was limited and they were too small. With intensions to change them, I brought two 8mm LED's instead, which were 29p each (not a very big investment). I went for the same colours as the originals - green for power and red for hdd activity. You can get blue LED's in the sizes of 5mm and 3mm as far as I know and these will also replace your current ones with ease.
Wiring
The most likely case you will have is that your LED wires to the front of your case have two wires - one which is white, and the other is either green or red, depending on the LED. When you look at the bottom of your LED, you will notice a flat edge near one of the pins:

As the diagram shows, you need to solder the white lead (negative -) to the edge with the flat side, and the red or green lead (positive +) will go to the other side. If you are unsure, look at how your current LED's are wired and note what wire goes to the flat edge.
Mounting
As I changed the size of my LED's from 3mm to 8mm, I needed to widen the holes to accept the new size. This just involved a little bit of filling with a round needle file. It filled down the plastic to the size I needed with ease and I got results after about 10 minutes of filling. Since the old LED's had been glued in with just blobs of soft glue at the back, which was easily removed with a flat head screwdriver, I had to find another method of mounting the larger ones. I decided gaffer tape was the simplest method. It should hold the LED's in place under most conditions, although I would expect it to give way under pressing the LED's hard from the front (but who does that anyway :-)
The result is shown below:
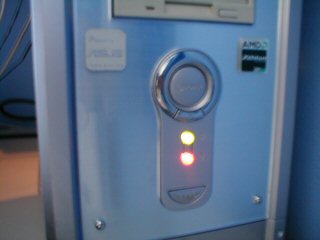
The lights are much more pleasing and work well, plus I can view them from any angle I choose, and they are still bright enough.
What if I just want another constantly on LED in my case?
Its easy to power an LED from a 12V power connector inside your PC. Either by 12V LED's or standard ones with one extra component.
12V LED's are easily available which will connect straight to your 12V PSU output (the yellow wire). Connectors for your power plugs inside your case can also be brought from most electronics stores. Again it is important to which way round you connect the LED the correct way. In this case, the black wire would go to the side of the LED with the flat edge, and the yellow to the other side. If you decide not to use 12V LED's, you need to get a resistor so that the normal ones don't blow up :-)
The resistor you need to obtain is a 470 ohm one for most LED's. This will make the LED glow quite bright whilst limiting it to a current it can cope with. This resistor must go in series, as shown below:
This should now allow you to connect standard LED's to your PSU outputs :-)