
Electric Heating Radiators Timer Thermostat using Raspberry Pi Pico W
Updated 3rd November 2024.
Whilst repairing various Nobo heaters (see Part 1), I found a fault with the original timer on one of them which essentially prevents the heater from working. Whilst it is possible to bypass the timer and manually switch on/off, I thought about replacing the timer itself.
The heater location isn't convenient anyway, needed a stretch to activate it and if you want to read what was on the LCD - good luck with that!
What if I could build a Wi-Fi enabled timer so I could set the time and trigger on/off the heating from my Smartphone?
It's possible! Thanks to cheaply obtained modern 32-bit processors that are easily programmed by Micropython.
Whilst a Raspberry Pi/Raspberry Pi Zero would also do the job, they are overkill as they are personal computers requiring an OS and keeping them up to date etc. The Raspberry Pi Pico however is plenty enough for needs like this.
I got the Pico W as a Christmas gift and quickly researched options to use it.
Hardware
Firstly, the hardware.
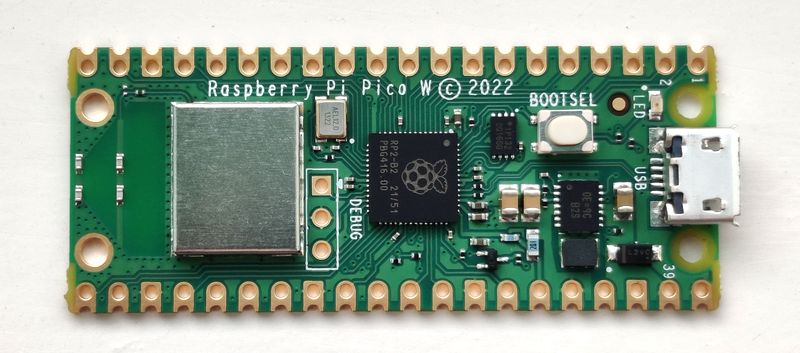
Most of the hardware is the Raspberry Pi Pico W (RP2040) itself - but we need a way to trigger on/off the heating. Since I already pulled apart my Nobo heaters and investigated how the existing timer enables / disables the heating, I could interface with that safely using a cheap opto-coupler - the 4N25.
If you want to control an electric heater without dismantling it though, you will have to switch on/off via the mains cable. Check the power rating - mine are all less than 2kW but I'd suggest de-rating to a 20A+ relay which should be obtainable with 5V coils.
To measure the room temperature - I had a DS18B20 which is more accurate than the built in sensor on the Pico, so I also added this.
So, for me this is a very cheap upgrade, costing me a couple of resistors, a DS18B20, stripboard, cable and an LED (the Pico was a gift).
WARNING: This project exposes you to DANGEROUS MAINS VOLTAGES. Please proceed if qualified and confident and not as your first project.
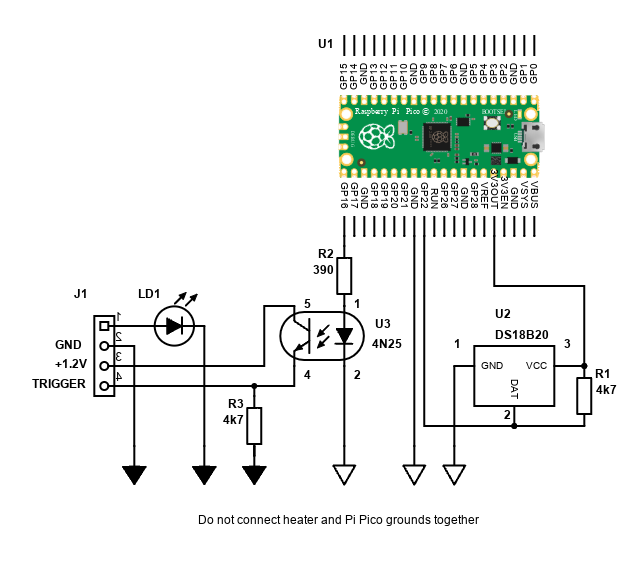
Below is my schematic for the control for my Nobo heaters, connected via the old timer cable:
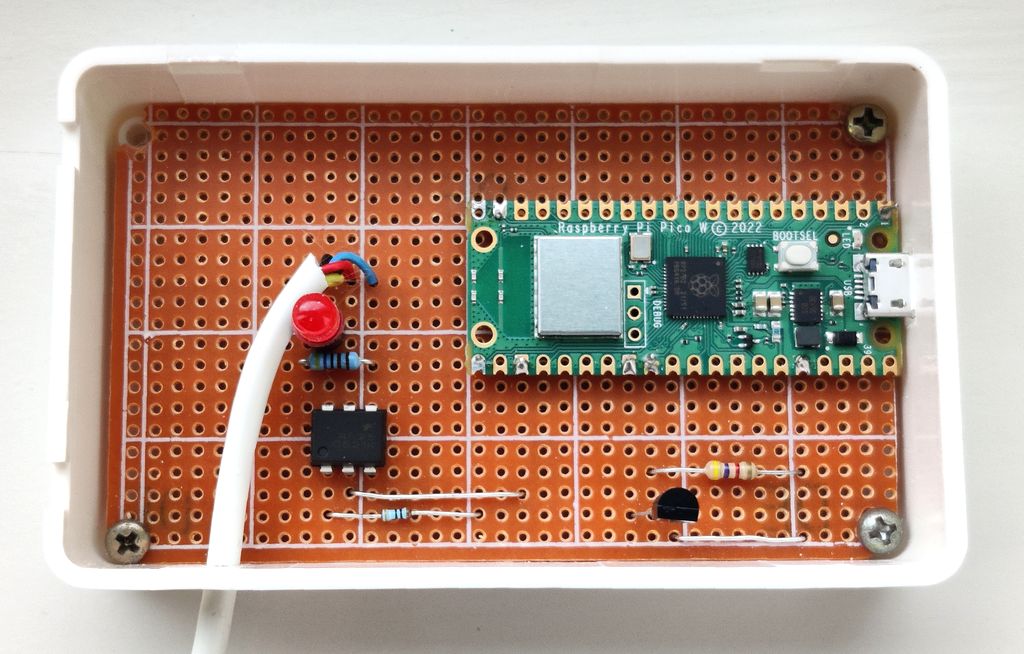
The stripboard layout is simple and since I got the Pico without the headers (which I prefer), I just used off-cuts from resistors to solder to the headers I needed only. This makes it easier to de-solder them if I re-purposes the Pico board later.
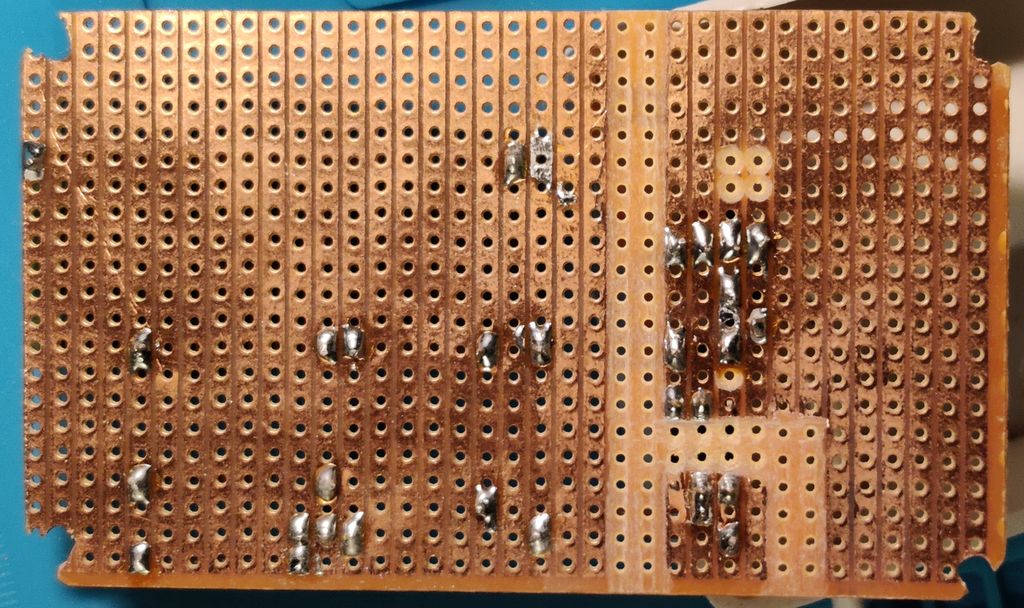
Note the 6mm clearance gap I created by removing tracks. This helps ensure the Pico isn't destroyed if the transformerless supply in the heater fails and goes high voltage.
The 4N25 isolates the Nobo heater from the Pico. Inside the 4N25 is an LED which is current limited by R2 (this is appropriate for 3.3V drive from the Pico's GP pin).
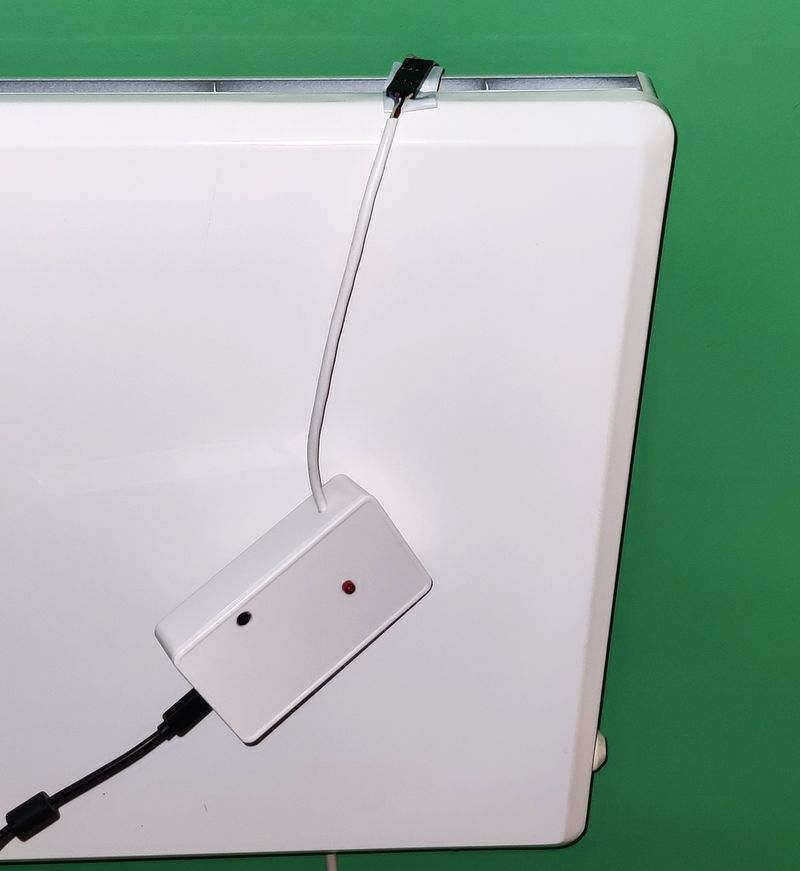
The output of the 4N25 is pulled down to ground using R3. LD1 is a replacement red LED from the one in the original timer that indicates whether the heating is active / triggered.
The thermometer DS18B20 only needs a 4.7k pull up resistor R1 on its data line to 3.3V.
Altogether, it fits nicely inside a small and cheap project box (100mm x 60mm x 25mm).
For a generic heater switched by mains:- here is a schematic you could use for relay control:
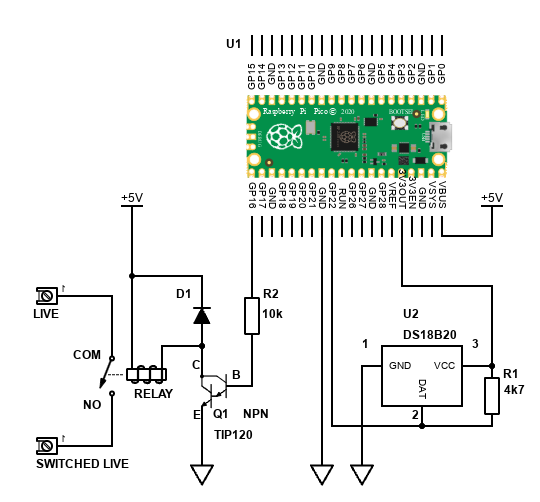
The choice of Relay is critical, and I suggest a 20A one. However, to switch high currents, these usually have low resistance coils - for example 25 ohms for a 5V relay - meaning 200mA+ is required.
The Pico can only drive 16mA from its pin, and can only provide 3.3V. Small generic NPN transistors such as BC547 won't have enough collector current, and larger ones such as BD139 won't switch on fully from the current available at their base - so I've suggested a Darlington transistor instead (TIP120 is common), as this can switch fairly high currents with just a small amount of current - resistor R2 limits the current.
Generic diode D1 (signal or rectifier) is there to protect the transistor against back EMF.
Alternatively, you could buy a module like this one:
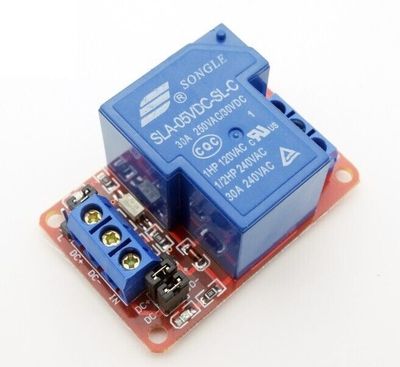
For switching mains, you'll need to house the project in a sturdy box and make sure the mains connections, including earth, are securely passed through to the heater.
Software
Update - I've changed the UI by adding save / cancel / apply buttons to each card. I've also made some core code changes so that the Pico recovers and re-connects to the WiFi automatically if your router (DHCP server), access point or network goes down.
Whilst some hours were spent soldering the hardware and making a few holes in a project box, most of the time was spent on the software. However, even that I reused and adjusted much of the excellent work out there.
The code is written in MicroPython. Python isn't my favourite language, and it isn't for the best performance, but it is much easier to get started with and coding is quick and easy and surely one of the reasons behind its popularity. The Pi Pico does have a C/C++ SDK for more serious coding!
Some of the logic is done on the client though via JavaScript. The UI via HTML / CSS.
What's nice is the web page using asynchronous - AJAX "Asynchronous JavaScript and XML", although we're actually using JSON instead of XML to communicate.
I've also recently adjusted the project to use Server Side Events (SSE). This is used to push updates to the browser without polling, improving the UI experience.
The web page to constantly updates with the temperature and heating status. As a nice side benefit, settings change on one client automatically updates on the other, so everyone's view of the heating status is constant (although it's not really intended to be multiuser).
The code is based on four projects. The first one below is courtesy of Bytes N Bits, and the code is nicely explained with YouTube videos.
https://github.com/getis/micropython-web-control-panel
What I like about this implementation is it is a more complete coding of a web server, and it is setup to use JavaScript with a /api callback to get data and perform functions. Though I am now no longer using the web server behind it, the idea was a great starting point.
The second project that helped is courtesy of MultiWingSpan, which shows how to use the DS18B20. More details at https://www.multiwingspan.co.uk/pico.php?page=wasync
The third project is courtesy of Microcontrollerslab.com - see https://microcontrollerslab.com/raspberry-pi-pico-ds18b20-web-server-weather-station/. I only really used this as a basis for the web page style.
Finally, I'm using MicroDot - see https://github.com/miguelgrinberg/microdot/ as the web server. This is because it supports SSE and WebSockets, as well as being able to handle API end points and serve static files (the html and js) like before.
To explain my implementation, I used the following files:
- main.py - this is the main logic file, initially based on cp_simple.py from getis and code from multiwingspan. I've since changed it considerably to use the MicroDot web framework.
- WiFiConnection.py - this is copied from getis repository and is used to make a Wi-Fi connection. I've modified it to use secrets.py as only this file contains my personal information, and added hostname support.
- secrets.py - contains the Wi-Fi SSID to connect to and its password.
- index.html - this is the HTML file (with CSS embedded), using the responsive card layout style. I've added sliders to set a target temperature and heating on/off times. I've modified the styles to support dark or light mode.
- heating.js - this is the JavaScript file. It executes on the client (your desktop or smartphone). Again, copied from getis repository but modified with different functions to send the correct XMLHttpRequest and parse the expected response (as JSON) so that the controls / text on the html page is dynamically updated as appropriate. This also uses SSE to continuously update the status from the heating controller.
- config.txt - this is simple storage of the target temperature and heating on/off times (in minutes since midnight format). The Pico will write to this on each change so it is stored in flash memory and after power removal, settings can be restored.
Before using this project, create a file named secrets.py with the following contents:
SSID = "your_wifi_ssid"
PASSWORD = "your_password"
Replace your_wifi_ssid and your_wifi_password with your actual network ID and password.
My repo (except the secrets) is hosted here for you to look at:
https://github.com/electro-dan/PiPicoWHeatingControlI deliberately coded this using native browser css, JavaScript and fonts with no images. This is because libraries such as JQuery or fonts such as Font-Awesome would require to be linked out to Internet urls, which could change over time, and would always require the Internet, or would take up valuable space in the Pi Pico's 4MB flash memory.
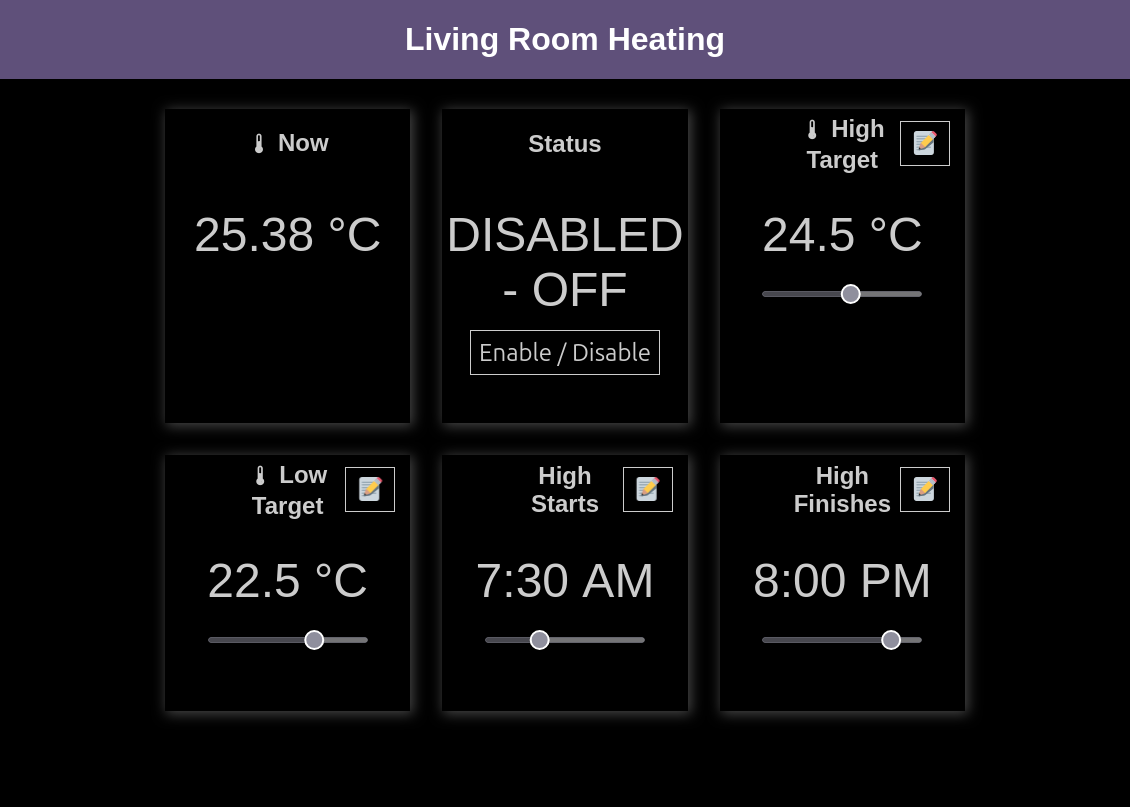
Below is a screenshot of how the page looks like on a smartphone:
