
Recliner Sofa Repair DFS eMoMo-HX90
One side of our recliner sofa failed some time before Christmas 2021 (the wife's side, unfortunately for her!). The sofa was under guarantee and was repaired after a wait for an engineer to come and look (and conclude the same I did), long wait for a replacement part to come from China, and another long wait to have it fitted.
The issue was the recliner just stopped working altogether. A quick look myself showed that the LED on the power pack went out and whilst at first, I thought it would be a dead PSU, unplugged it from the sofa and the light came on again. I even switched the PSUs with the working side of the sofa and the result was the same.
This leaves a problem with the controller, or the motors. The sofa didn't fail whilst reclining, it just simply didn't work when trying to recline it the next day. No bad noise came from the motors the day before, so I thought it would most likely be the controller.
Once a new controller arrived and was fitted by the engineer, the sofa worked again (almost 2 months later though!).
I kept the broken controller to try and learn more about it, and to possibly fix it if the fault happens again, particularly once the warranty is over.

The controller is the eMoMo HX90HU / HX90HUN (investigated was the HX90HUN, which is the one for the right side of the sofa when facing it, or left is sitting on it). It's used in some DFS sofas in the UK, and maybe other brands too. A reader from the US has also let me know that the same controller is used over there too (brand unknown), though replacement controllers are easier to obtain.
Removing the controller is quite easy for my sofa. It has a plastic facing which just pulls off. The controller is then screwed in with two wood screws. Underneath, near the side and back is the 5 pin DIN (the same type as used on old MIDI connections) which has a lever that should be lifted first in order to disconnect it (just like the 2 pin DIN power supply connection). This then needs to be threaded through arm rest and removed with the controller (sadly the controller does not have a connection - the cable goes straight to the module (and even the PCB inside it).
Opening it requires slicing the label and voiding the warranty of course. So, if you're still covered, don't do this. Even the repair was hard with standard hobby electronics tools so for most people, consider the extended warranty.
I expected to find a bunch of power MOSFETS and controller, but actually the motor control is performed completely through the micro-switches, with TVS protection diodes. Below is the schematic with what I could work out. Some capacitors values are unknown though, and the inductor and fuse are an assumption from the IP6503S datasheet.
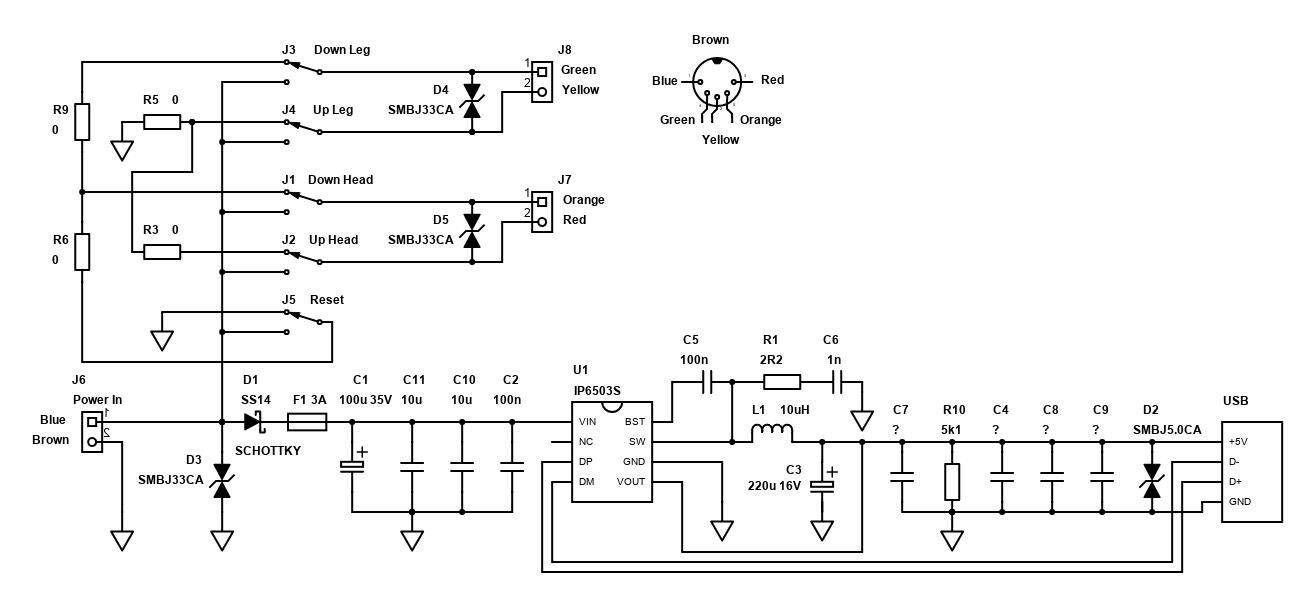
This schematic is for the left side only (left if sitting on the sofa). The other side should be similar but as I'm under warranty still I'm not touching it. I also cannot guarantee it's correct - it's as far as my knowledge and patience took me. Empty spaces for resistors that are not installed are not shown, so the PCB is probably adjusted for different models...

Above: Front view showing the switches, USB port and two electrolytic capacitors.

Above: TVS diodes SMBJ33CA, Schottky diode SS14 and Fuse leading to the USB charger. Also 0 ohm resistors (jumpers) and spaces for resistors that are not installed.
Those micro-switches are single pole double throw (SPDT)/changeover, and the normally open contact connects the motor output to ground - so it looks like everything is short circuit, but when pressing the switch, you'll see most things are not.

Above: IP6503S USB step down convertor and components around it. Inductor has been removed.
The rest of the electronics on the board is dedicated to the USB charger, which is mostly handled by a step-down buck convertor which has built in USB power communication. The chip is IP6503S, but if you look at some datasheets it's for a different type of convertor. The one I could find that looks closest is at https://xonstorage.blob.core.windows.net/pdf/injoinic_ip6503s24a_Lcs01_link.pdf.
It's the input to the USB charger where I found the actual problem.
The power supply input is the blue and brown wires (it's not mains or AC though - it's about 29V DC). These did not immediately show as a short circuit because the fault appears after the diode D1 (SS14). The diode needs some voltage across it to conduct which the standard continuity test on the multimeter does not do.
After testing for continuity between ground and after this diode though, I found the short circuit. You'd expect fuse F1 to have blown, but I guess those DC bricks have a faster reacting short circuit protection then this fuse does, and the current is cut at the PSU before the fuse reacts. That's good because I don't have to replace the fuse (it's not PTC), but I suppose bad for the consumer as if it had blown, the recliner would have still worked just without the USB charger.

Above: Cable connections before removing.
Before working on it, I desoldered the cables so I could work freely (they are not detachable sadly), as well as the output inductor L1 (the coil wrapped in black plastic). Here is the challenge though - the solder on this thing (probably lead-free) has a high melting point and it was a right pain to try and desolder with a standard 25W soldering iron. The best I could do is add leaded solder (which has flux too) to the pads and wiggle the connections out - but I did make a mess though, ruining a couple of pads!
I then looked for the actual fault by desoldering the components after D1 but before the step-down convertor U1. The electrolytic capacitor C1 looked fine, so I skipped removing that for now and removed SMD capacitors C11, C10 and C2. Even removing those with my small soldering iron was a challenge. I'll be buying an SMD rework / hot air station with powerful iron some day!
Result though! After removing those three capacitors, the short between ground and the VIN pin (pin 1) to U1 and F1 disappeared.

Upon testing each desoldered capacitor, I found C10 was shorted. Given it's the same size as C11, I'm assuming this is a 10µF capacitor, as that is what C11 measures. C2 is a physically smaller capacitor that measured 82nF but is probably 100nF.
The size of C10 is 0805 in SMD imperial size. D1 will drop very little voltage, so the capacitor is essentially across 29V to ground so must be a well rated part.
Ideally, MLCC (multi-layer ceramic) capacitors should be used as input capacitors for a buck step down convertor, but 10µF MLCCs in the small 0805 size capable of handling 35V or more are very rare, and expensive. Therefore, I assume these are not MLCC's and just standard thick film ceramic. I ordered some 0805 X7R 10µF which are rated to 100V off AliEexpress (100 of them!) for less than £3. They even arrived within 3 weeks.
I only needed one and soldered it in next to the original 100nF C2 and put C11 back too. I then soldered headers back where the cables were removed and used Dupont connectors for the cables (so I could remove them easily), scratching off some of the PCB screen to solder to where I damaged the original pads. Tested it today and both sofa reclining and USB charger work on the original and repaired controller.
Repairing isn't a simple skill, but I've repaired quite a few things in my life (even as a teenager years ago). It's much harder now devices are so small, and I'm looking at a rework station to help me out. Some things just aren't worth it to repair, but it's always worth a look. For this though, I've got lucky. No components blew or burned, and the fault was easy to isolate thanks to the diode.
Do note though that beyond a quick test, I'm not using this repair daily so cannot give any guarantee's it's perfect and I got the right replacement capacitor. As mentioned, you need good equipment. Most people won't even have a soldering iron or a multimeter, or some old 15W job if they do. It's a shame there is nowhere to buy the controller on its own, but for people who can repair, it's worthwhile as replacing the whole sofa is expensive. Getting rid of the broken one may even cost you more (and the planet) if nobody is willing to buy it!