
My cooling setup
Here's a few details of computer "mods" I have done to my case.
The main intention was to improve cooling by a large factor. Before these changes to my system, my system was running at 60 degrees + for the processor and about 37 degrees for the case.
(Update) The first thing I needed to sort was the processor cooling. Intially, I simply put a 60mm to 80mm fan adaptor on my copper heatsink and this dropped temperatures a fair bit. However - my copper heatsink was far too small - so I invested in a Thermaltake Venus Silent Boast . This is a good heatsink and fan and coupled with some Artic Silver 5 thermal compound I borrowed off a freind, my temperatures were down to the range of 40 degrees. Under load it rarely goes above 50 - even with the current overclock.
Further to my mod was a 120mm fan that will replace the one on the side of the case. This fan will be run along with my other 4 80mm fans on the front and back of the case with my fan speed controller to keep the noise low. Below is a diagram of the overall layout of the fans in my case:
(Update) I now only run the 120mm off the fan controller - for reasons of the 80mm fans are quiet enough and slowing them also means the leds on them dim.
Hopefully the picture illustrates the flow of the air inside the case. This is meant to be optimal. The CPU fan blows onto the heatsink rather then sucks because I believe this is more efficient as it creates higher air pressure, which helps transfer heat. With the all the fans set at full speed (12V), the system was put through 3D game playing which requires a lot CPU power and graphics. The system temperature read at 27 degrees whilst the processor rarely climbed above 40 degrees.
I decided would overclock too. I pushed my Athlon XP2400+ from a front side bus of 133MHz to 166MHz. The multiplier is lowered to 14 - but this gives a speed of ~2.324GHz - an overclock of over 300MHz and the temperatures remain below 50 degrees
Easy removal of 120mm fan
As the 120mm is on the case side, when this is removed, the cable needs to be disconnected easily. I also did not want to cut the plug it came with off as it looks nice how it is. To get around this problem, I built a small circuit boards with pins to connect the plug to. It was a very simple stripboard layout and in case you are curious how to wire it, here's a diagram:
I also have a picture of the board in place inside my case:
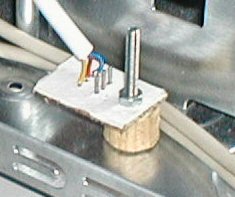
Stripboard, pcb pins, bolts, nuts and wire can all be obtained from maplin.
When connecting the board to the case, you cannot let any of the pins short to the case, otherwise a fault will occur. I have used a wooden spacer to keep the soldered back away from the case. The hole for the bolt was also stripped of any copper track near it, other wise the circuit can short to the case through the bolt. Use a Multimeter to check for any shorting connections before you connect it all up to the motherboard or PSU. Any shorts need to be sorted appropriately.
In total, all the modifications cost me approximately £15 (not including speed controller), worth the money for the improvement it results in. You may also be able to find fans and accessories cheaper then me too.