
Hi-Fi LM3886 5.1 channel amplifier, with digital control - Control Android Bluetooth Application
1 - Intro, 2 - The design, 3 - Pre-amplifier, 4 - Power Amplifiers, 5 - Power Supply, 6 - Grounding, 7 - Control - Hardware, 8 - Control - Software, 9 - Android App, 10 - Summary
Digital Control - Android App
On this page...
App introduction
Update: As of July 2022, I've removed Bluetooth RS232 in my amp to reduce idle power consumption, therefore I no longer use this app. Things move fast in the smart phone world too, but my app still worked fine in Android 12 prior to stopping its use. It has only been tested on a OnePlus 5 and a OnePlus Nord. You can consider Kotlin as the preferred choice for Android development as of 2019, info below will still be of interest though and Java is still supported and a great programming language (IMO).
Full code for the app is on github.com - see AndroidApp folder, with explanations and info below.
Throughout my builds, I'd always provided some 'alternative' form of control. In the early days it was via an RS232 serial cable plugged into my PC and a Java desktop application - but that barely got used and became useless as PCs started to come without RS232 ports, and the system became more bound to my TV then my PC.
I did briefly consider using the USB features of the port to replace the RS232 communication, but the rise of Bluetooth got me interested and Bluetooth quite nicely has a specification for RS232/serial communications.
I did start to look at Java applications for the 'feature' phones of those days, but the rise of the Smart-phone really changed things and I've used an Android phone since 2009 (now on my fifth as of 2022).
They've all had Bluetooth support, but completion of the app was something I only achieved in 2018, even though prototypes started some time ago. Therefore, this app is targeted to more recent Android versions, but in theory (with some code changes), it could be made to support older phones.
Having an Android application means I can place those extra settings that are not available on the IR remote into the application, and use 'touch' to adjust the settings in a far more convenient way than I've seen on many complex remote controls.
Here I will show some information about how I used Android Studio to design and code an application that is lightweight, requires few permissions and convenient to use.
Tools
There is a choice of tools you can do this in.
My choice however is Android Studio. The reason is because the community and info out on the web is very strong and anything you want to do, an Internet search and chances are someone has asked the same. Tutorials are also good. Android Studio however is quite a beast, so expect it to take your entire evening to download, install and update.
Alternatives include Visual Studio (with Xamarin) if you want to try in C#. I think this is great for a generic app targeting Android, iOS and Windows Phone, but for Bluetooth I found the information was a bit lacking and definitely not multi-platform.
For Android only, some existing Java developers might prefer to work in Eclipse. My first prototype was done in Eclipse and the tools worked OK.
For iOS, there is a problem, and Apple won't let you connect to a JY-MCU HC-06 or many other Bluetooth RS232 adaptors. You have to use very specific Bluetooth adaptors accepted in MFi (that naturally cost more - loads more!). Assuming you do that, the tools to build an app will be different and much of what I write below will be less use. There are no Apple devices in my home, so I've never experimented with Objective-C or Swift, but I'm sure someone has and if you wanted to build an amp like mine and control it from an iOS device, I'm sure it is possible.
For those who are happy with a phone OS that gives you more freedom - read on!
User Interface
I somewhat started on a top-down approach to the implementation of the app. That means putting buttons and sliders where I wanted and then adding the code for what I wanted them to do later. This may actually be a good way to build phone apps - because the user interface is not just what is displayed, it is what you touch too.
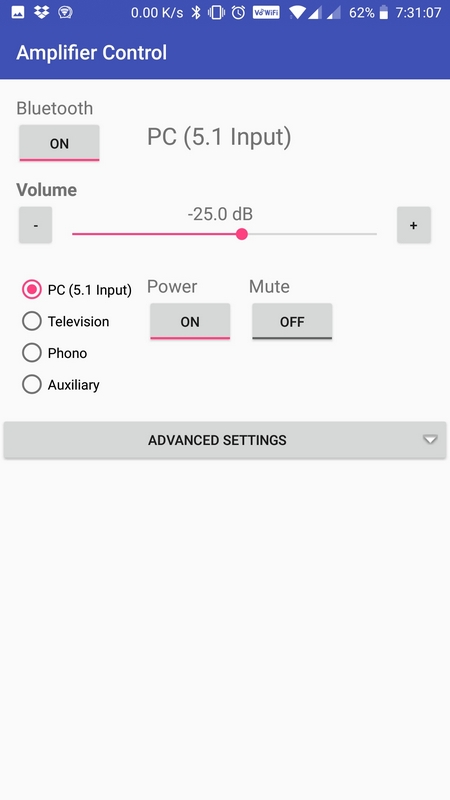
Application main page look and feel
My UI I believe is built to be simple, looks good enough and isn't over-complicated or too flash. It's not going into Google Play and exists only for me, so I don't have to worry about the world giving me reviews for it! For me though, I'm pleased with how I got it to work and the tips I'll list can be applied to real-world apps too!
To get this interface simple - I'm using RelativeLayout for both the main view, and the advanced controls. This is a simple layout that is quite tolerant to phone screens of different sizes and easy to use. I've only tested the layout on a OnePlus 5 phone though, but this has quite a typical screen resolution and size/ratio of most phones these days.
The advanced controls I did not want visible all the time, but rather than place them in a different 'activity' (needed to show a different page in the app), I used the component com.github.aakira.expandablelayout.ExpandableRelativeLayout, found from here.
This allows me to hide the advanced controls by default, and still keep all the code nice and simple in a single Activity.
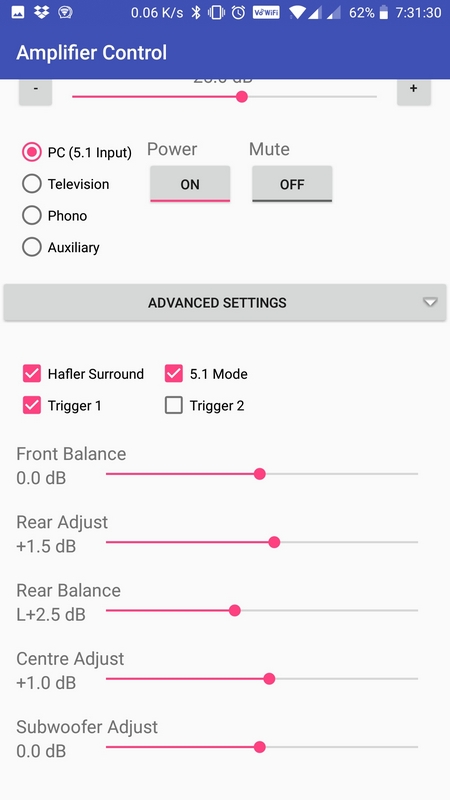
Application with expanded advanced controls
During use, all controls are disabled until both the Bluetooth is connected, and if the Power is off, then again, all the controls (except the Power button) are disabled too.
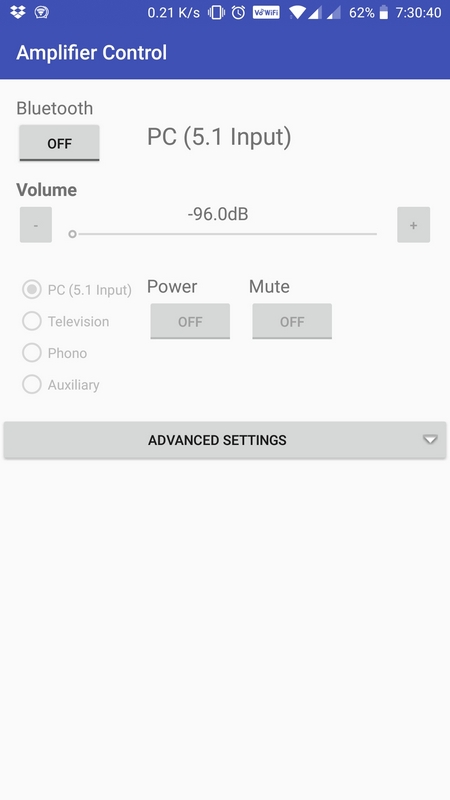
Application startup with controls disabled, except Bluetooth button
The SeekBar is used for the volume, which is a nice way to drag the volume up or down, but you can also touch anywhere on the seek bar which could cause insane jumps in volume on the amplifier. To disable this, in code I prevent the SeekBar from changing if the position from where it was to where it is moved to is larger than +/- 10 steps (translates to +/- 5dB), then the change is ignored.
Finally, ProgressDialog is used in two cases. One being a wait message whilst the Bluetooth does its connection, and the other being the power on/off delay.
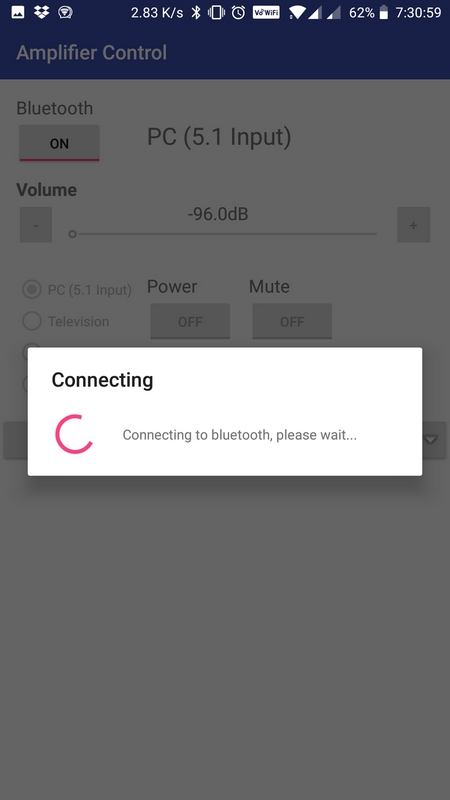
Connecting to Bluetooth progress dialog
The layouts are controlled by three xml files
- activity_main.xml - the parent activity layout
- content_home.xml - the top panel with the standard controls
- content_advanced.xml - the hidden panel with the advanced controls
activity_main.xml
This is the main layout, where the toolbar is specified and a scroll layout to allow the overall content to scroll if required. LinearLayout is then used for the placement of the content_home panel (standard controls) followed by the com.github.aakira.expandablelayout.ExpandableRelativeLayout control, used to show/hide advanced controls
<?xml version="1.0" encoding="utf-8"?>
<LinearLayout xmlns:android="http://schemas.android.com/apk/res/android"
    xmlns:tools="http://schemas.android.com/tools"
    xmlns:app="http://schemas.android.com/apk/res-auto"
    android:id="@+id/activity_main"
    android:layout_width="match_parent"
    android:layout_height="match_parent"
    android:orientation="vertical"
    tools:context="uk.co.electro_dan.ampcontrol.MainActivity">

    <android.support.v7.widget.Toolbar
        xmlns:android="http://schemas.android.com/apk/res/android"
        android:layout_width="match_parent"
        android:layout_height="wrap_content"
        android:id="@+id/toolBar"
        android:background="?attr/colorPrimary"
        android:minHeight="?attr/actionBarSize"
        android:fitsSystemWindows="true"
        app:title="Amplifier Control"
        android:theme="@style/ThemeOverlay.AppCompat.Dark.ActionBar">

    </android.support.v7.widget.Toolbar>

    <ScrollView
        android:layout_width="match_parent"
        android:layout_height="wrap_content">

        <LinearLayout
            android:layout_width="match_parent"
            android:layout_height="match_parent"
            android:orientation="vertical">

            <include layout="@layout/content_home" />

            <Button
                android:id="@+id/expandableButton1"
                android:layout_width="fill_parent"
                android:layout_height="wrap_content"
                android:layout_alignParentBottom="true"
                android:layout_alignParentStart="true"
                android:drawableRight="@android:drawable/arrow_down_float"
                android:text="Advanced settings" />

            <com.github.aakira.expandablelayout.ExpandableRelativeLayout
                android:id="@+id/expandableLayout1"
                android:layout_width="match_parent"
                android:layout_height="match_parent"
                android:layout_below="@+id/expandableButton1"
                android:padding="16dp"
                app:ael_duration="400"
                app:ael_expanded="false"
                app:ael_interpolator="accelerate"
                app:ael_orientation="vertical">

                <include layout="@layout/content_advanced" />

            </com.github.aakira.expandablelayout.ExpandableRelativeLayout>


        </LinearLayout>

    </ScrollView>


</LinearLayout>
content_home.xml
This is the standard layout. Here a number of TextView, ToggleButton, SeekBar, Button and RadioButton controls are used to build the layout of the standard interface, using a RelativeLayout.
Most of this xml was just generated by Android Studio when dragging and dropping the controls on the preview pane. In some cases, I then fine-tuned the padding and layout snapping.
The controls on here are:
- ToggleButton for the Bluetooth connection on or off. Toggling on will initiate the Bluetooth connection process.
- TextView to display the selected Input - e.g., PC (5.1 Input)
- SeekBar for volume, with TextView to display the current level in dB and Button controls to make small volume up/down increments as an alternative to the slider
- RadioButtonGroup of 5 RadioButton controls to choose one of four inputs
- ToggleButton for Power on/off
- ToggleButton for Mute on/off
<?xml version="1.0" encoding="utf-8"?>

<RelativeLayout xmlns:android="http://schemas.android.com/apk/res/android"
    xmlns:app="http://schemas.android.com/apk/res-auto"
    xmlns:tools="http://schemas.android.com/tools"
    android:layout_width="match_parent"
    android:layout_height="match_parent"
    android:paddingBottom="@dimen/activity_vertical_margin"
    android:paddingLeft="@dimen/activity_horizontal_margin"
    android:paddingRight="@dimen/activity_horizontal_margin"
    android:paddingTop="@dimen/activity_vertical_margin"
    app:layout_behavior="@string/appbar_scrolling_view_behavior"
    tools:context="uk.co.electro_dan.ampcontrol.MainActivity">

    <TextView
        android:layout_width="wrap_content"
        android:layout_height="wrap_content"
        android:textAppearance="?android:attr/textAppearanceMedium"
        android:text="Bluetooth"
        android:id="@+id/textView3"
        android:layout_alignParentLeft="true"
        android:layout_alignParentStart="true" />

    <TextView
        android:id="@+id/textView"
        android:layout_width="wrap_content"
        android:layout_height="wrap_content"
        android:layout_alignStart="@+id/togglePower"
        android:layout_alignTop="@+id/radioGroup1"
        android:layout_marginTop="0dp"
        android:text="Power"
        android:textAppearance="?android:attr/textAppearanceMedium" />

    <TextView
        android:layout_width="wrap_content"
        android:layout_height="wrap_content"
        android:textAppearance="?android:attr/textAppearanceMedium"
        android:text="Mute"
        android:id="@+id/textView5"
        android:layout_above="@+id/toggleMute"
        android:layout_alignLeft="@+id/toggleMute"
        android:layout_alignStart="@+id/toggleMute" />

    <ToggleButton
        android:layout_width="wrap_content"
        android:layout_height="wrap_content"
        android:text="Connect"
        android:id="@+id/toggleConnect"
        android:layout_below="@+id/textView3"
        android:layout_alignParentLeft="true"
        android:layout_alignParentStart="true" />

    <ToggleButton
        android:id="@+id/togglePower"
        android:layout_width="wrap_content"
        android:layout_height="wrap_content"
        android:layout_below="@+id/textView"
        android:layout_marginStart="15dp"
        android:layout_marginTop="0dp"
        android:layout_toEndOf="@+id/radioGroup1"
        android:checked="false"
        android:text="Power" />

    <ToggleButton
        android:id="@+id/toggleMute"
        android:layout_width="wrap_content"
        android:layout_height="wrap_content"
        android:layout_alignBaseline="@+id/togglePower"
        android:layout_alignBottom="@+id/togglePower"
        android:layout_marginStart="15dp"
        android:layout_toEndOf="@+id/togglePower"
        android:checked="false"
        android:text="Mute" />

    <TextView
        android:id="@+id/textView4"
        android:layout_width="wrap_content"
        android:layout_height="wrap_content"
        android:layout_alignStart="@+id/textView"
        android:layout_alignTop="@+id/toggleConnect"
        android:text="PC (5.1 Input)"
        android:textSize="24dp"
        android:textAppearance="?android:attr/textAppearanceMedium" />

    <TextView
        android:id="@+id/textView6"
        android:layout_width="wrap_content"
        android:layout_height="wrap_content"
        android:layout_alignParentStart="true"
        android:layout_below="@+id/toggleConnect"
        android:layout_marginTop="10dp"
        android:textStyle="bold"
        android:text="Volume"
        android:textAppearance="?android:attr/textAppearanceMedium" />

    <Button
        android:id="@+id/buttonVolDown"
        android:layout_width="40dp"
        android:layout_height="wrap_content"
        android:layout_alignParentLeft="true"
        android:layout_alignParentStart="true"
        android:layout_alignStart="@+id/textView3"
        android:layout_below="@+id/textView6"
        android:text="-" />

    <Button
        android:id="@+id/buttonVolUp"
        android:layout_width="41dp"
        android:layout_height="wrap_content"
        android:layout_alignParentEnd="true"
        android:layout_alignParentRight="true"
        android:layout_below="@+id/textView6"
        android:text="+" />

    <TextView
        android:id="@+id/txtVol"
        android:layout_width="75dp"
        android:layout_height="wrap_content"
        android:layout_below="@+id/textView6"
        android:layout_centerHorizontal="true"
        android:text="-96.0dB"
        android:textAppearance="?android:attr/textAppearanceMedium" />

    <SeekBar
        android:id="@+id/seekBar"
        android:layout_width="wrap_content"
        android:layout_height="wrap_content"
        android:layout_below="@+id/txtVol"
        android:layout_marginLeft="1dp"
        android:layout_marginRight="1dp"
        android:layout_toLeftOf="@+id/buttonVolUp"
        android:layout_toRightOf="@+id/buttonVolDown"
        android:indeterminate="false"
        android:max="255"
        android:progress="0" />

    <RadioGroup
        android:id="@+id/radioGroup1"
        android:layout_width="wrap_content"
        android:layout_height="wrap_content"
        android:layout_alignParentTop="true"
        android:layout_alignStart="@+id/textView3"
        android:layout_marginTop="180dp"
        android:orientation="vertical">

        <RadioButton
            android:id="@+id/radioButton1"
            android:layout_width="wrap_content"
            android:layout_height="wrap_content"
            android:layout_alignParentLeft="true"
            android:layout_alignParentStart="true"
            android:layout_below="@+id/txtVol"
            android:layout_marginTop="00dp"
            android:checked="true"
            android:text="PC (5.1 Input)" />

        <RadioButton
            android:id="@+id/radioButton2"
            android:layout_width="wrap_content"
            android:layout_height="wrap_content"
            android:layout_alignParentLeft="true"
            android:layout_alignParentStart="true"
            android:layout_below="@+id/radioButton1"
            android:checked="false"
            android:text="Television" />

        <RadioButton
            android:id="@+id/radioButton3"
            android:layout_width="wrap_content"
            android:layout_height="wrap_content"
            android:layout_alignParentLeft="true"
            android:layout_alignParentStart="true"
            android:layout_below="@+id/radioButton2"
            android:checked="false"
            android:text="Phono" />

        <RadioButton
            android:id="@+id/radioButton4"
            android:layout_width="wrap_content"
            android:layout_height="wrap_content"
            android:layout_alignParentLeft="true"
            android:layout_alignParentStart="true"
            android:layout_below="@+id/radioButton3"
            android:checked="false"
            android:text="Auxiliary" />

    </RadioGroup>

</RelativeLayout>
content_advanced.xml
This is the advanced layout. Here a number of TextView, CheckBox and SeekBar controls are used to build the layout of the advanced interface, again using RelativeLayout.
Again, most of this xml was just generated by Android Studio when dragging and dropping the controls on the preview pane, with manual fine tuning.
The controls on here are:
- 4 CheckBox controls for switching between 'Hafler' surround (using ESP Project 18) or just stereo only for the stereo inputs, a 5.1 check box for switching between 5.1 external decoding or the 'Halfer' decoding, and two on/off controls for the two 12V trigger outputs
- 5 SeekBar controls, with associated TextView to display the current setting. These are front balance, rear speaker adjustment, rear speaker balance, centre speaker adjustment and subwoofer adjustment
<?xml version="1.0" encoding="utf-8"?>

<RelativeLayout xmlns:android="http://schemas.android.com/apk/res/android"
    xmlns:app="http://schemas.android.com/apk/res-auto"
    android:layout_width="match_parent"
    android:layout_height="match_parent"
    android:paddingBottom="0dp"
    android:paddingLeft="0dp"
    android:paddingRight="0dp"
    android:paddingTop="@dimen/activity_vertical_margin"
    app:layout_behavior="@string/appbar_scrolling_view_behavior">


    <CheckBox
        android:id="@+id/check51Mode"
        android:layout_width="wrap_content"
        android:layout_height="wrap_content"
        android:layout_alignParentTop="true"
        android:layout_toEndOf="@+id/textViewSubAdj"
        android:checked="true"
        android:text="5.1 Mode" />

    <CheckBox
        android:id="@+id/checkHafler"
        android:layout_width="wrap_content"
        android:layout_height="wrap_content"
        android:layout_alignParentStart="true"
        android:layout_alignParentTop="true"
        android:checked="true"
        android:text="Hafler Surround" />

    <CheckBox
        android:id="@+id/checkTrigger1"
        android:layout_width="wrap_content"
        android:layout_height="wrap_content"
        android:layout_alignParentStart="true"
        android:layout_below="@+id/check51Mode"
        android:checked="false"
        android:text="Trigger 1" />

    <CheckBox
        android:id="@+id/checkTrigger2"
        android:layout_width="wrap_content"
        android:layout_height="wrap_content"
        android:layout_alignStart="@+id/check51Mode"
        android:layout_below="@+id/check51Mode"
        android:checked="false"
        android:text="Trigger 2" />

    <TextView
        android:id="@+id/textViewFrontBal"
        android:layout_width="wrap_content"
        android:layout_height="wrap_content"
        android:layout_alignParentStart="true"
        android:layout_below="@+id/checkTrigger2"
        android:layout_marginTop="20dp"
        android:text="Front Balance"
        android:textAppearance="?android:attr/textAppearanceMedium" />

    <TextView
        android:layout_width="75dp"
        android:layout_height="wrap_content"
        android:textAppearance="?android:attr/textAppearanceMedium"
        android:text="0dB"
        android:id="@+id/txtFrontBal"
        android:layout_below="@+id/textViewFrontBal"
        android:layout_alignParentLeft="true"
        android:layout_alignParentStart="true" />

    <SeekBar
        android:layout_width="wrap_content"
        android:layout_height="wrap_content"
        android:id="@+id/seekBarFrontBal"
        android:max="63"
        android:progress="31"
        android:indeterminate="false"
        android:layout_alignTop="@+id/txtFrontBal"
        android:layout_alignParentRight="true"
        android:layout_alignParentEnd="true"
        android:layout_toRightOf="@+id/txtFrontBal"
        android:layout_toEndOf="@+id/txtFrontBal" />

    <TextView
        android:layout_width="wrap_content"
        android:layout_height="wrap_content"
        android:textAppearance="?android:attr/textAppearanceMedium"
        android:text="Rear Adjust"
        android:id="@+id/textViewRearAdj"
        android:layout_below="@+id/txtFrontBal"
        android:layout_alignParentLeft="true"
        android:layout_alignParentStart="true"
        android:layout_marginTop="20dp" />

    <TextView
        android:layout_width="75dp"
        android:layout_height="wrap_content"
        android:textAppearance="?android:attr/textAppearanceMedium"
        android:text="0dB"
        android:id="@+id/txtRearAdj"
        android:layout_below="@+id/textViewRearAdj"
        android:layout_alignParentLeft="true"
        android:layout_alignParentStart="true" />

    <SeekBar
        android:layout_width="wrap_content"
        android:layout_height="wrap_content"
        android:id="@+id/seekBarRearAdj"
        android:max="63"
        android:progress="31"
        android:indeterminate="false"
        android:layout_alignTop="@+id/txtRearAdj"
        android:layout_alignParentRight="true"
        android:layout_alignParentEnd="true"
        android:layout_toRightOf="@+id/txtRearAdj"
        android:layout_toEndOf="@+id/txtRearAdj" />

    <TextView
        android:layout_width="wrap_content"
        android:layout_height="wrap_content"
        android:textAppearance="?android:attr/textAppearanceMedium"
        android:text="Rear Balance"
        android:id="@+id/textViewRearBal"
        android:layout_below="@+id/txtRearAdj"
        android:layout_alignParentLeft="true"
        android:layout_alignParentStart="true"
        android:layout_marginTop="20dp" />

    <TextView
        android:layout_width="75dp"
        android:layout_height="wrap_content"
        android:textAppearance="?android:attr/textAppearanceMedium"
        android:text="0dB"
        android:id="@+id/txtRearBal"
        android:layout_below="@+id/textViewRearBal"
        android:layout_alignParentLeft="true"
        android:layout_alignParentStart="true" />

    <SeekBar
        android:layout_width="wrap_content"
        android:layout_height="wrap_content"
        android:id="@+id/seekBarRearBal"
        android:max="63"
        android:progress="31"
        android:indeterminate="false"
        android:layout_alignTop="@+id/txtRearBal"
        android:layout_alignParentRight="true"
        android:layout_alignParentEnd="true"
        android:layout_toRightOf="@+id/txtRearBal"
        android:layout_toEndOf="@+id/txtRearBal" />

    <TextView
        android:layout_width="wrap_content"
        android:layout_height="wrap_content"
        android:textAppearance="?android:attr/textAppearanceMedium"
        android:text="Centre Adjust"
        android:id="@+id/textViewCentreAdj"
        android:layout_below="@+id/txtRearBal"
        android:layout_alignParentLeft="true"
        android:layout_alignParentStart="true"
        android:layout_marginTop="20dp" />

    <TextView
        android:layout_width="75dp"
        android:layout_height="wrap_content"
        android:textAppearance="?android:attr/textAppearanceMedium"
        android:text="0dB"
        android:id="@+id/txtCentreAdj"
        android:layout_below="@+id/textViewCentreAdj"
        android:layout_alignParentLeft="true"
        android:layout_alignParentStart="true" />

    <SeekBar
        android:layout_width="wrap_content"
        android:layout_height="wrap_content"
        android:id="@+id/seekBarCentreAdj"
        android:max="63"
        android:progress="31"
        android:indeterminate="false"
        android:layout_alignTop="@+id/txtCentreAdj"
        android:layout_alignParentRight="true"
        android:layout_alignParentEnd="true"
        android:layout_toRightOf="@+id/txtCentreAdj"
        android:layout_toEndOf="@+id/txtCentreAdj" />

    <TextView
        android:layout_width="wrap_content"
        android:layout_height="wrap_content"
        android:textAppearance="?android:attr/textAppearanceMedium"
        android:text="Subwoofer Adjust"
        android:id="@+id/textViewSubAdj"
        android:layout_below="@+id/txtCentreAdj"
        android:layout_alignParentLeft="true"
        android:layout_alignParentStart="true"
        android:layout_marginTop="20dp" />

    <TextView
        android:layout_width="75dp"
        android:layout_height="wrap_content"
        android:textAppearance="?android:attr/textAppearanceMedium"
        android:text="0dB"
        android:id="@+id/txtSubAdj"
        android:layout_below="@+id/textViewSubAdj"
        android:layout_alignParentLeft="true"
        android:layout_alignParentStart="true" />

    <SeekBar
        android:layout_width="wrap_content"
        android:layout_height="wrap_content"
        android:id="@+id/seekBarSubAdj"
        android:max="63"
        android:progress="31"
        android:indeterminate="false"
        android:layout_alignTop="@+id/txtSubAdj"
        android:layout_alignParentRight="true"
        android:layout_alignParentEnd="true"
        android:layout_toRightOf="@+id/txtSubAdj"
        android:layout_toEndOf="@+id/txtSubAdj"
        android:layout_marginBottom="60dp"/>


</RelativeLayout>
That covers all the controls and their layout on the app view.
Coding
The main code is in a single Java file (because it's just a single Activity app) and comes in at just over 1000 lines of code. That's not too cumbersome!
The layout of the code is:
- Imports at the top - specifying all the libraries we need
- A single class - MainActivity, which extends the Android AppCompatActivity class, and in this class...
- Private variables for the UI elements, and the amplifier variables
- The onCreate method (overrides the default one in AppCompatActivity) - here the layout is chosen (from the xml activity_main), the UI variables are assigned and listeners for touch actions are created
- The setUiEnabled method - enables or disables the interface
- Bluetooth methods - btInit, onActivityResult, btBond, btConnect, btConnectionHandler, beginListenForData, btReceivedUpdateHandler, sendMessageToAmp, rs232SendNibble, rs232ReceiveNibble
- UI methods - updateLevelDisplay, setRadioInput, doPowerChange, updateFrontBalance, updateRearBalance, updateRearAdjust, updateCentreAdjust, updateSubAdjust
Below I'll describe a little on how each section works.
Android Lifecycle methods - onCreate
Android Activities (pages in an App) have a Lifecycle - onCreate() -> onStart() -> onResume() -> onPause() -> onStop() -> onDestroy()
All of these methods exist in the Activity class that our class will extend (AppCompatActivity in my case). All of these methods can be overridden.
The 'extends' keyword means that our class is going to extend all the code that already exists (thanks to Google and so) for Activity. The 'extends' keyword is a feature known as Inheritance in Object Oriented Programming. That means in my case, the class MainActivity contains all the methods the Activity (or AppCompatActivity) class has.
The @Override methods is an example of Polymorphism in Object Oriented Programming. It's a way of saying 'in my class, do this instead'. The 'super' keyword in our overrides methods allows them to still call the original code in the class we extend before/after code we want to do.
The onCreate() method is the one that is most commonly overridden method, because here we will want to initialise all our controls.
I've used it to do three things - assign the private variables in my class the actual controls, disable them all, and for each control that needs it, assign a 'listener' by overriding the default methods in those objects.
For example, my toggleConnect control is a ToggleButton and its toggleConnect property can be assigned an OnClickListener class. The onClick() method in that class is then overridden and I do the code I want when a user clicks the button.
The code I do for toggleConnect being clicked is to initialise the Bluetooth connection process if it is toggled to true or disconnect the Bluetooth connection if it is toggled to false.
        // This is the action when toggling to connect to the bluetooth adapter
        toggleConnect.setOnClickListener(new View.OnClickListener() {
            @Override
            public void onClick(View arg0) {
                if (toggleConnect.isChecked()) {
                    // If the user checked to connect...
                    // Show connecting dialog
                    pDialog = ProgressDialog.show(MainActivity.this, "Connecting", "Connecting to bluetooth, please wait...", true);
                    // Call the initialisation routine
                    btInit();
                } else {
                    // If the user checked to disconnect...
                    // Set disconnected
                    isConnected = false;
                    // Stop the listener thread
                    doStopListenThread = true;
                    // Disable the GUI
                    setUiEnabled(false);
                    // Close the bluetooth objects
                    try {
                        if (outputStream != null) outputStream.close();
                        if (inputStream != null) inputStream.close();
                        if (btSocket != null) btSocket.close();
                    } catch (IOException ioe) {
                        Log.e(TAG, "Can't disconnect", ioe);
                    }
                }
            }
        });
For the volume, I have listener for the volume down button (decrements the volume by two, stopping at zero), volume up button (increments the volume by two, stopping at 255), and a handler for the volume slider being dragged.
All of these methods call updateLevelDisplay(), which I'll show later, and this handles volume changes, and can send the new volume to the amplifier.
        // Add click handler to volume down button
        buttonVolDown.setOnClickListener(new View.OnClickListener() {
            @Override
            public void onClick(View arg0) {
                // Toggle advanced settings
                iVolLevel -= 2;
                if (iVolLevel < 0)
                    iVolLevel = 0;
                // First call sets the slider
                updateLevelDisplay(false);
                // Second call sends the message
                updateLevelDisplay(true);
            }
        });

        // Add click handler to volume down button
        buttonVolUp.setOnClickListener(new View.OnClickListener() {
            @Override
            public void onClick(View arg0) {
                // Toggle advanced settings
                iVolLevel += 2;
                if (iVolLevel > 255)
                    iVolLevel = 255;
                // First call sets the slider
                updateLevelDisplay(false);
                // Second call sends the message
                updateLevelDisplay(true);
            }
        });

        // Add a change listener to the seek bar
        seekBar.setOnSeekBarChangeListener(new SeekBar.OnSeekBarChangeListener() {
            public void onStopTrackingTouch(SeekBar bar) {
            }
            public void onStartTrackingTouch(SeekBar bar) {
            }
            public void onProgressChanged(SeekBar bar,int iProgress, boolean fromUser) {
                // Un-mute first
                if (toggleMute.isChecked()) {
                    // Un-mute if slider is dragged
                    toggleMute.setChecked(false);
                    iMute = 0;
                    sendMessageToAmp(R.string.msgMuteSend);
                    try {
                        Thread.sleep(200);
                    } catch (InterruptedException mie) {
                        Log.i("UI", "SeekBar sleep thread was interrupted");
                    }
                }
                updateLevelDisplay(fromUser);
            }
        });
My RadioGroup needs a handler when the user touches a new radio button. This sets the TextView to the active radio button text, sets the iActiveInput variable to the correct state and sends the new state to the amplifier.
        // Add change listener to the radio button group
        radiogroup.setOnCheckedChangeListener(new RadioGroup.OnCheckedChangeListener() {
            public void onCheckedChanged(RadioGroup group, int checkedId) {

                RadioButton checkedRadioButton = (RadioButton)findViewById(checkedId);
                TextView txtInputSelected = (TextView)findViewById(R.id.textView4);

                if ((checkedRadioButton != null) && (txtInputSelected != null)) {
                    // This switch comparing each radio ID against the checkedId is more reliable than getRadioInput
                    if (checkedRadioButton.isChecked()) {
                        switch (checkedId) {
                            case R.id.radioButton1:
                                iActiveInput = 0;
                                break;
                            case R.id.radioButton2:
                                iActiveInput = 1;
                                break;
                            case R.id.radioButton3:
                                iActiveInput = 2;
                                break;
                            case R.id.radioButton4:
                                iActiveInput = 3;
                                break;
                        }
                    }

                    txtInputSelected.setText(checkedRadioButton.getText());

                    // Set state to write relay
                    if (toggleConnect.isChecked()) {
                        sendMessageToAmp(R.string.msgInputSend);
                    }
                }
            }
        });
The togglePower ToggleButton calls my separate doPowerChange() method.
        // Add click handler to the input settings button
        togglePower.setOnClickListener(new View.OnClickListener() {
            @Override
            public void onClick(View arg0) {
                // Change power status
                doPowerChange();
            }
        });
The toggleMute ToggleButton sets the iMute variable to 0 or 1, and then sends that to the amplifier.
        toggleMute.setOnClickListener(new View.OnClickListener() {
            @Override
            public void onClick(View arg0) {
                // Mute
                if (toggleConnect.isChecked()) {
                    if (toggleMute.isChecked())
                        iMute = 1;
                    else
                        iMute = 0;
                    sendMessageToAmp(R.string.msgMuteSend);
                }
            }
        });
The expandableButton1 Button toggles the ExpandableRelativeLayout visible or not visible.
        // Add click handler to expand button, for advanced settings
        expandableButton1.setOnClickListener(new View.OnClickListener() {
            @Override
            public void onClick(View arg0) {
                // Toggle advanced settings
                expandableLayout1 = (ExpandableRelativeLayout) findViewById(R.id.expandableLayout1);
                if (expandableLayout1 != null)
                    expandableLayout1.toggle(); // toggle expand and collapse
            }
        });
The checkHafler, checkTrigger1, checkTrigger2 and check51Mode are all CheckBox controls with similar handlers. These handlers set iSurroundMode, iTrigger or iExtSurroundMode and then send that relevant state to the amplifier.
The trigger ones are slightly different - because the iTrigger integer is used to control the outputs of my two triggers, it will contain the bits 00 (both off), 01 (trigger 1 only), 10 (trigger 2 only) or 11 (both on). Bitwise operators |= and &= are used to set or clear the relevant bits.
        // Add click handler to the Hafler button
        checkHafler.setOnClickListener(new View.OnClickListener() {
            @Override
            public void onClick(View arg0) {
                // Toggle surround
                if (toggleConnect.isChecked()) {
                    if (checkHafler.isChecked())
                        iSurroundMode = 1;
                    else
                        iSurroundMode = 0;
                    sendMessageToAmp(R.string.msgSurroundSend);
                }
            }
        });

        // Add click handler to the 5.1 mode button
        check51Mode.setOnClickListener(new View.OnClickListener() {
            @Override
            public void onClick(View arg0) {
                // Toggle surround
                if (toggleConnect.isChecked()) {
                    if (check51Mode.isChecked())
                        iExtSurroundMode = 1;
                    else
                        iExtSurroundMode = 0;
                    sendMessageToAmp(R.string.msgExtSurroundSend);
                }
            }
        });

        // Add click handler to the Hafler button
        checkTrigger1.setOnClickListener(new View.OnClickListener() {
            @Override
            public void onClick(View arg0) {
                // Toggle surround
                if (toggleConnect.isChecked()) {
                    if (checkTrigger1.isChecked())
                        iTrigger |= 1; // Set bit 0
                    else
                        iTrigger &= 2; // Clear bit 1
                    sendMessageToAmp(R.string.msgTriggerSend);
                }
            }
        });

        // Add click handler to the Hafler button
        checkTrigger2.setOnClickListener(new View.OnClickListener() {
            @Override
            public void onClick(View arg0) {
                // Toggle surround
                if (toggleConnect.isChecked()) {
                    if (checkTrigger2.isChecked())
                        iTrigger |= 2; // Set bit 1
                    else
                        iTrigger &= 1; // Clear bit 1
                    sendMessageToAmp(R.string.msgTriggerSend);
                }
            }
        });
Finally, the SeekBar's for the volume or balance adjustments for front, rear, centre and sub need handlers too. These call separate methods in my class. Below is the example listener for frontBalance only:
        // Add a change listener to the seek bar
        seekBarFrontBal.setOnSeekBarChangeListener(new SeekBar.OnSeekBarChangeListener() {
            public void onStopTrackingTouch(SeekBar bar) {
            }
            public void onStartTrackingTouch(SeekBar bar) {
            }
            public void onProgressChanged(SeekBar bar,int iProgress, boolean fromUser) {
                updateFrontBalance(fromUser);
            }
        });
The onCreate() method is the only one I override in the Activity Lifecycle. I did not want to do anything when the application is paused - the App stays alive and connected to the amplifier (if it was already) if I switch to another App. This makes sense to me because I might want to flip between my Amp control app, then to (say) an App that is casting radio, music, video to the Chromecast or TV, and then switch back to my Amp control without having to reconnect.
The impact on the battery on leaving it connected and alive will be something, but it does not seem to be really noticeable!
Disabling and enabling the controls
Most the controls should not operate unless the amplifier is connected via Bluetooth, and the Power is on.
The following method will disable all the controls (except the Bluetooth connect control) if Bluetooth is not connected and disable all controls except the Power button if the power is off.
    // Disables or enables the interface based on the bluetooth connection
    public void setUiEnabled(boolean bool) {
        togglePower.setEnabled(bool);

        // For the rest of the components, make false if power is off
        bool = bool && (iPower == 1);

        seekBar.setEnabled(bool);
        buttonVolDown.setEnabled(bool);
        buttonVolUp.setEnabled(bool);
        toggleMute.setEnabled(bool);
        radiogroup.setEnabled(bool);
        for (int i = 0; i < radiogroup.getChildCount(); i++) {
            RadioButton btn = (RadioButton) radiogroup.getChildAt(i);
            btn.setEnabled(bool);
        }
        check51Mode.setEnabled(bool);
        checkHafler.setEnabled(bool);
        checkTrigger1.setEnabled(bool);
        checkTrigger2.setEnabled(bool);
        seekBarFrontBal.setEnabled(bool);
        seekBarRearBal.setEnabled(bool);
        seekBarRearAdj.setEnabled(bool);
        seekBarCentreAdj.setEnabled(bool);
        seekBarSubAdj.setEnabled(bool);
    }
Bluetooth Methods
Bluetooth initialisation and connecting was something that was a bit of a challenge. The result is thanks to information I found online, but I've enhanced it to not hang the UI whilst connecting (avoiding the 'skipped frames' warning in ADB) and display a 'Connecting' progress dialog when it is operating.
For long operations, I'm using these Message and Handler classes, so that a separate Thread can send a Message back to the main Activity and cause actions to happen there. This is a little bit of multi-threading programming in action!
The connection process will be a short-lived thread that takes a few seconds usually. I do it in a Thread, so it doesn't make the App look like it is hanging whilst the connection process is occurring in the Thread itself, and the spinning circle of the progress dialog still spins! Otherwise, you initially get the warning something like 'Skipped 300 frames! The application may be doing too much work on its main thread.'.
Once the connection is made - another Thread is used to listen for incoming data from the Amp. Since this Thread is listening for data constantly - it will loop indefinitely until the Thread is destroyed by disconnecting the Bluetooth, or closing the whole App. This is quite different from the 'Interrupt' approach in the procedural programming on the PIC, so you can see how you have to approach requirements differently.
These Threads cannot directly update the UI though, so that's why Message and Handlers are used so the UI can be told it needs to do something by the separate Thread.
The code below are the methods used for the connection process.
    // Initialisation method for bluetooth. Will check bluetooth support, if present, requests it to be enabled. If enabled, goes straight to bond.
    public void btInit() {
        BluetoothAdapter btAdapter = BluetoothAdapter.getDefaultAdapter();
        if (btAdapter == null) {
            Toast.makeText(getApplicationContext(), "Device doesn't Support Bluetooth", Toast.LENGTH_SHORT).show();
        } else if (!btAdapter.isEnabled()) {
            Intent intentEnableAdapter = new Intent(BluetoothAdapter.ACTION_REQUEST_ENABLE);
            startActivityForResult(intentEnableAdapter, 0);
        } else {
            btBond();
        }
    }

    // This is called after the user has enabled bluetooth
    @Override
    protected void onActivityResult(int requestCode, int resultCode, Intent data){
        super.onActivityResult(requestCode, resultCode, data);
        if (resultCode == RESULT_OK) {
            Log.i("Bluetooth", "Attempting to bond");
            // Now bluetooth is enabled, bond the device
            btBond();
        } else if (resultCode == RESULT_CANCELED) {
            if (pDialog != null)
                pDialog.dismiss();
            Toast.makeText(getApplicationContext(), "Enabling bluetooth cancelled", Toast.LENGTH_SHORT).show();
            toggleConnect.setChecked(false);
        }
    }

    // Checks bonded devices. Request to pair made here
    public void btBond() {
        boolean isFound = false;
        BluetoothAdapter btAdapter = BluetoothAdapter.getDefaultAdapter();
        Set<BluetoothDevice> bondedDevices = btAdapter.getBondedDevices();
        if (bondedDevices.isEmpty()) {
            Toast.makeText(getApplicationContext(), "Please Pair the Device first", Toast.LENGTH_SHORT).show();
            if (pDialog != null)
                pDialog.dismiss();
        } else {
            Log.i("Bluetooth", "Checking bonded devices");
            for (BluetoothDevice iterator : bondedDevices) {
                // If we found a paired device named 'Amp', we can connect to this one
                if (iterator.getName().equals(DEVICE_NAME)) {
                    btDevice = iterator;
                    isFound = true;
                    Log.i("Bluetooth", "Found " + DEVICE_NAME);
                    break;
                }
            }
        }
        // If we found 'Amp' is paired, now connect
        if (isFound)
            btConnect();
    }


    // Connect to the RF comm interface
    public void btConnect() {
        // Connect in a thread to prevent locking the GUI
        new Thread() {
            @Override
            public void run() {

                try {
                    btSocket = btDevice.createRfcommSocketToServiceRecord(PORT_UUID);
                    btSocket.connect();
                    isConnected = true;
                } catch (IOException e) {
                    e.printStackTrace();
                }
                // If we connected OK - get the input and output steams
                if (isConnected) {
                    try {
                        outputStream = btSocket.getOutputStream();
                    } catch (IOException e) {
                        isConnected = false;
                        e.printStackTrace();
                    }
                    try {
                        inputStream = btSocket.getInputStream();
                    } catch (IOException e) {
                        isConnected = false;
                        e.printStackTrace();
                    }
                }

                // Once connection is complete, send back to the handler
                Message msg = btConnectionHandler.obtainMessage();
                btConnectionHandler.sendMessage(msg);
            }
        }.start();
    }

    // Handles a completed bluetooth connection
    private final Handler btConnectionHandler = new Handler(new Handler.Callback() {
        @Override
        public boolean handleMessage(Message msg) {
            // Dismiss the connecting... dialog
            if (pDialog != null)
                pDialog.dismiss();

            // Based on connection
            if (isConnected) {
                // Enable the GUI
                toggleConnect.setChecked(true);
                //setUiEnabled(true); - now done in the receive handler based on power status of amp
                doStopListenThread = false;
                beginListenForData();
                // Get the status from the Amp
                sendMessageToAmp(R.string.msgGetStatus);
            } else {
                // If not connected, disable GUI
                toggleConnect.setChecked(false);
                setUiEnabled(false);
                // Show a message
                Toast.makeText(getApplicationContext(), "Could not connect to amplifier", Toast.LENGTH_SHORT).show();
            }
            return false;
        }
    });
With the code above, the entire flow is following this stream:
- btInit() - this is the first method called from the toggleConnect button. It checks if Bluetooth is enabled. If it is not, it creates an Activity with Intent to enable Bluetooth. If Bluetooth is already enabled, it jumps straight to the btBond() method, step 3
- onActivityResult() - this handles the result of the activity that was created in step 1 (if Bluetooth was not Enabled). If the user clicks 'Allow', the connection process can continue and btBond() is run. If the user clicked cancel, the connection process stops here, and the application remains unconnected.
- btBond() - this is the method that bonds the application to the Bluetooth device. To do that, it needs to be paired first. If the user has not paired the device, a notification will appear on the notification bar, and the connection process ends here. If it is already paired, the code searches the paired devices for the Bluetooth device named 'Amp' and sets the global Class variable 'btDevice' to be that one.
- btConnect() - this makes the connection to the Bluetooth adapter. Because this can take a second or two, it's Threaded. The Thread will make the connection, and then set inputStream and outputStream global Class variables, enabling the app to read data received, and transmit data back. Once the connection is complete, it creates a Message, which is used to notify the main application thread that the connection is complete
- Handler btConnectionHandler - this is the receiver of the message raised in step 4 above. It dismisses the 'Please wait' dialog and, if connected, enables the UI and starts a 'listen' Thread which will be used to continuously check
Bluetooth - sending data
Transmitting data is done by each relevant UI interaction. This causing a command letter (byte) to be sent, followed by the subsequent bytes to send the required value.
The methods below are common to handle the sending of data to the amplifier.
    // Send a message to the amp via bluetooth
    private void sendMessageToAmp(int arg1) {
        if (toggleConnect.isChecked()) {
            // Build correct message
            StringBuilder sbOut = new StringBuilder();
            sbOut.append("Amp1:"); // Key

            // Depending on the argument, sends the command indicator based on the shared strings, and then the command value
            switch (arg1) {
                case R.string.msgGetStatus :
                    // Just send G
                    sbOut.append(getResources().getString(arg1));
                    break;
                case R.string.msgPowerSend :
                    // Send P followed by power value
                    sbOut.append(getResources().getString(arg1));
                    sbOut.append(iPower);
                    break;
                case R.string.msgMuteSend :
                    // Send P followed by power value
                    sbOut.append(getResources().getString(arg1));
                    sbOut.append(iMute);
                    break;
                case R.string.msgVolumeSend :
                    // Send V followed by two bytes representing volume nibbles
                    sbOut.append(getResources().getString(arg1));
                    sbOut.append(rs232SendNibble(iVolLevel));
                    break;
                case R.string.msgInputSend :
                    // Send I followed by input value
                    sbOut.append(getResources().getString(arg1));
                    sbOut.append(iActiveInput);
                    break;
                case R.string.msgFrontBalanceSend :
                    // Send F followed by two bytes representing volume nibbles
                    sbOut.append(getResources().getString(arg1));
                    sbOut.append(rs232SendNibble(iFrontBalance));
                    break;
                case R.string.msgRearBalanceSend :
                    // Send R followed by two bytes representing volume nibbles
                    sbOut.append(getResources().getString(arg1));
                    sbOut.append(rs232SendNibble(iRearBalance));
                    break;
                case R.string.msgRearAdjustSend :
                    // Send r followed by two bytes representing volume nibbles
                    sbOut.append(getResources().getString(arg1));
                    sbOut.append(rs232SendNibble(iRearAdjust));
                    break;
                case R.string.msgCenAdjustSend :
                    // Send C followed by two bytes representing volume nibbles
                    sbOut.append(getResources().getString(arg1));
                    sbOut.append(rs232SendNibble(iCentreAdjust));
                    break;
                case R.string.msgSubAdjustSend :
                    // Send S followed by two bytes representing volume nibbles
                    sbOut.append(getResources().getString(arg1));
                    sbOut.append(rs232SendNibble(iSubAdjust));
                    break;
                case R.string.msgSurroundSend :
                    // Send M followed by new value
                    sbOut.append(getResources().getString(arg1));
                    sbOut.append(iSurroundMode);
                    break;
                case R.string.msgExtSurroundSend :
                    // Send E followed by new value
                    sbOut.append(getResources().getString(arg1));
                    sbOut.append(iExtSurroundMode);
                    break;
                case R.string.msgTriggerSend :
                    // Send T followed by new value
                    sbOut.append(getResources().getString(arg1));
                    sbOut.append(iTrigger);
                    break;
            }

            // Send end of message indicator
            sbOut.append("\n");

            try {
                // Write the complete message to the amp
                Log.i("String sent to amp", sbOut.toString());
                outputStream.write(sbOut.toString().getBytes());
            } catch (IOException e) {
                Log.e("Exception", e.getMessage());
                e.printStackTrace();
            }
        }
    }

    // Splits one byte into two nibbles and sends
    private String rs232SendNibble(int i) {
        if (i < 0) {
            i += 256;
        }


        byte[] bytes = new byte[2];
        // Upper nibble first
        bytes[0] = (byte)(((i & 0xF0) >> 4) + 48);
        // then lower
        bytes[1] = (byte)((i & 0x0F) + 48);

        return new String(bytes);

        // Translation:
        // Byte of x = nibble character
        // 0   = 0,0
        // 64  = 4,0  0100 = 4,  4  + 48 = 52 : 4  - 0100 0000
        // 100 = 6,4  0110 = 6,  6  + 48 = 54 : 6  - 0110 0100
        // 128 = 8,0  1000 = 8,  8  + 48 = 56 : 8  - 1000 0000
        // 255 = ?,?  1111 = 15, 15 + 48 = 63 : ?  - 1111 1111

        // For the character values - 16 possible (adding to 48) gives:
        // 0,1,2,3,4,5,6,7,8,9,:,;,<,=,>,?
    }
The sendMessageToAmp method is called by any UI listener method with an instruction containing what to send. This uses android resource strings defined strings.xml. These messages are simple one character instructions which are sent to the amplifier (see page before to see how it handles these).
    <string name="msgGetStatus">G</string>
    <string name="msgPowerSend">P</string>
    <string name="msgMuteSend">Q</string>
    <string name="msgVolumeSend">V</string>
    <string name="msgInputSend">I</string>
    <string name="msgFrontBalanceSend">F</string>
    <string name="msgRearBalanceSend">R</string>
    <string name="msgRearAdjustSend">r</string>
    <string name="msgCenAdjustSend">C</string>
    <string name="msgSubAdjustSend">S</string>
    <string name="msgSurroundSend">M</string>
    <string name="msgExtSurroundSend">E</string>
    <string name="msgTriggerSend">T</string>
A StringBuilder is used to build the entire string of bytes to send to the amplifier. This will always contain a command byte (G,P,Q,V,I,F,R,r,C,S,M,E or T above) and will then be followed by one, two or no value bytes.
As mentioned on the previous page, because sending a byte that can range from 0 to 255 in value (all 256 possibilities), this can interfere with handling of commands because the value sent might be the ascii representation of any of the command bytes above, or it could represent the line break bytes (decimal values 10 or 4). To get around this, bytes that cover this entire range (such as volume levels), are sent as two separate bytes representing each half (or nibble) of the entire byte.
This gives a range of just 16 possibilities. The rs232SendNibble method handles this by taking a single byte and splitting it into the most significant four bits first, shifting them 4 bits of the right and adding 48, and then creating another byte by taking the least significant 4 bits and again adding 48.
Adding 48 is done so that the nibbles sent cover the ascii range of characters from 0 (decimal 48) to the ? symbol (decimal 63). These are all numbers and characters that are not used for commands and are not line breaks or unprintable values.
The two halves are added to an array of two bytes, and this is returned as a String.
Some variables in the Android application are signed - these are the volume adjustments which range from negative values to positive values. The amplifier needs to receive these as unsigned character bytes though. The first piece of code in rs232SendNibble will make the value unsigned by checking if the value is negative, and if so, the number 256 is added to it to make it a correct unsigned value.
Back on the sendMessageToAmp method, once it has constructed a full StringBuilder containing the command and values, it adds a final byte \n to the StringBuilder (this is the line feed, or decimal value 10) and it sends the String to the amp by writing directly to the outputStream variable.
Bluetooth - receiving data
Receiving data is different. It may not be initiated by a user interacting with the UI and could be caused by a change on the amplifier itself, such as someone using the IR control instead.
When this happens, the app needs to be updated with the change in state of the amplifier itself. So that is can happen a Thread to listen for received data runs continuously whilst the app is active, and the Bluetooth is connected.
The listener runs in its own Thread itself, which is started only once the Bluetooth connection is initially complete (via the btConnectionHandler method). Since the Thread runs independently from the UI, Message and Handlers are again used so that the listener Thread can tell the main UI that data was received, and something needs to change.
Below is the code for that Thread, as well as the btReceivedUpdateHandler and associated rs232ReceiveNibble method.
    // This is the listener method, running a thread to listen for incoming
        status info from the Amp
    private void beginListenForData() {

        new Thread() {
            @Override
            public void run() {

                // Endless until requested to stop
                while (!doStopListenThread) {
                    try {
                        // Get the input stream
                        BufferedReader brInputStream = new BufferedReader(new InputStreamReader(inputStream));
                        final String sBTReceived = brInputStream.readLine();
                        if (sBTReceived != null) {

                            Log.d(TAG, "RECD: " + sBTReceived);

                            // Typical input string = P0V00Q0I0F00R00r00C00S00M1E1T1
                            // Valid stream must start with P
                            if (sBTReceived.startsWith("P")) {
                                // Valid stream must be 30 bytes long
                                if (sBTReceived.length() == 30) {
                                    // All OK - process input data
                                    // Start looping over the information - start from the 2nd character
                                    for (int iReceivedCounter = 1; iReceivedCounter < 30; iReceivedCounter++) {
                                        // Check the previous character
                                        int iIn;
                                        // Check the previous character in a switch
                                        switch (sBTReceived.charAt(iReceivedCounter - 1)) {
                                            case 'P':
                                                // Power status 1 or 0
                                                iIn = Character.getNumericValue(sBTReceived.charAt(iReceivedCounter));
                                                if ((iIn == 0) || (iIn == 1))
                                                    iPower = iIn;
                                                break;
                                            case 'Q':
                                                // Mute status 1 or 0
                                                iIn = Character.getNumericValue(sBTReceived.charAt(iReceivedCounter));
                                                if ((iIn == 0) || (iIn == 1))
                                                    iMute = iIn;
                                                break;
                                            case 'V':
                                                // Volume level comes from the two nibbles
                                                iVolLevel = rs232ReceiveNibble(sBTReceived.charAt(iReceivedCounter), sBTReceived.charAt(iReceivedCounter + 1), false);
                                                // Advance forward another character as this command was two bytes long
                                                iReceivedCounter++;
                                                break;
                                            case 'I':
                                                // Active input 1 to 5
                                                iIn = Character.getNumericValue(sBTReceived.charAt(iReceivedCounter));
                                                if ((iIn >= 0) && (iIn <= 5))
                                                    iActiveInput = iIn;
                                                break;
                                            case 'F':
                                                // Volume level comes from the two nibbles
                                                iFrontBalance = rs232ReceiveNibble(sBTReceived.charAt(iReceivedCounter), sBTReceived.charAt(iReceivedCounter + 1), true);
                                                // Advance forward another character as this command was two bytes long
                                                iReceivedCounter++;
                                                break;
                                            case 'R':
                                                // Volume level comes from the two nibbles
                                                iRearBalance = rs232ReceiveNibble(sBTReceived.charAt(iReceivedCounter), sBTReceived.charAt(iReceivedCounter + 1), true);
                                                // Advance forward another character as this command was two bytes long
                                                iReceivedCounter++;
                                                break;
                                            case 'r':
                                                // Volume level comes from the two nibbles
                                                iRearAdjust = rs232ReceiveNibble(sBTReceived.charAt(iReceivedCounter), sBTReceived.charAt(iReceivedCounter + 1), true);
                                                // Advance forward another character as this command was two bytes long
                                                iReceivedCounter++;
                                                break;
                                            case 'C':
                                                // Volume level comes from the two nibbles
                                                iCentreAdjust = rs232ReceiveNibble(sBTReceived.charAt(iReceivedCounter), sBTReceived.charAt(iReceivedCounter + 1), true);
                                                // Advance forward another character as this command was two bytes long
                                                iReceivedCounter++;
                                                break;
                                            case 'S':
                                                // Volume level comes from the two nibbles
                                                iSubAdjust = rs232ReceiveNibble(sBTReceived.charAt(iReceivedCounter), sBTReceived.charAt(iReceivedCounter + 1), true);
                                                // Advance forward another character as this command was two bytes long
                                                iReceivedCounter++;
                                                break;
                                            case 'M':
                                                // Surround mode 1 or 0
                                                iIn = Character.getNumericValue(sBTReceived.charAt(iReceivedCounter));
                                                if ((iIn == 0) || (iIn == 1))
                                                    iSurroundMode = iIn;
                                                break;
                                            case 'E':
                                                // External surround mode 1 or 0
                                                iIn = Character.getNumericValue(sBTReceived.charAt(iReceivedCounter));
                                                if ((iIn == 0) || (iIn == 1))
                                                    iExtSurroundMode = iIn;
                                                break;
                                            case 'T':
                                                // Trigger activation - 0, 1, 2 or 3
                                                iIn = Character.getNumericValue(sBTReceived.charAt(iReceivedCounter));
                                                if ((iIn >= 0) && (iIn <= 3))
                                                    iTrigger = iIn;
                                                break;
                                        }
                                    }

                                    // Send to handler to update the GUI
                                    Message msg = btReceivedUpdateHandler.obtainMessage();
                                    btReceivedUpdateHandler.sendMessage(msg);

                                }
                            }

                        }
                    } catch (IOException ex) {
                        doStopListenThread = true;
                    }
                }
            }
        }.start();
    }

    // Handler based on updated variables received from Amp
    private final Handler btReceivedUpdateHandler = new Handler(new Handler.Callback() {

        @Override
        public boolean handleMessage(Message msg) {
            // Update the app display
            togglePower.setChecked(iPower == 1);
            setUiEnabled(isConnected);
            updateLevelDisplay(false);
            setRadioInput();
            toggleMute.setChecked(iMute == 1);
            check51Mode.setChecked(iExtSurroundMode == 1);
            checkHafler.setChecked(iSurroundMode == 1);
            checkTrigger1.setChecked((iTrigger & 1) > 0);
            checkTrigger2.setChecked((iTrigger & 2) > 0);
            updateFrontBalance(false);
            updateRearBalance(false);
            updateRearAdjust(false);
            updateCentreAdjust(false);
            updateSubAdjust(false);
            return false;
        }
    });

    // From two nibbles, returns the complete byte
    private int rs232ReceiveNibble(char su, char sl, boolean isSigned) {
        // Upper nibble first
        int cu = (su - 48) << 4;
        // then lower
        int cl = (sl - 48) & 0x0F;

        int co = cu + cl;
        if (isSigned && (co >= 128)) {
            co -= 256;
        }

        return co;
    }
This listen thread works by having an endless while loop that stops only when doStopListenThread is true. It creates a BufferedReader over the inputStream and will read a line from it. The readLine method will read an entire line, which means the amplifier must have sent bytes followed by the line feed byte (decimal 10).
I've designed the amplifier to send all its values at once. This means the command can be validated to ensure it is a length of 30 characters before processing. The following for loop will then process every command in the received bytes.
A switch statement will look for the current increment value (iReceivedCounter), minus 1 and check if it is either P,Q,V,I,F,R,r,C,S,M,E or T.
If it is any of these, the following byte or two is then processed. If the command is P,Q,I,M,E or T, only one following byte is processed, and the numeric value of the received byte is written to the relevant global variable in the Android application. In the Power example, this sets the global variable iPower, but only if the received value is either 0 or 1.
If the command is V,F,R,r,C or S - then the byte that follows could be anything from 0 to 255 and is therefore received in two halves (nibbles). The method rs232ReceiveNibble handles this by passing in the two separate received bytes, taking 48 from them, shifting the first received byte to the most significant 4 bits and then adding the two separate 4-bit values together.
Commands F,R,r,C or S are volume adjustment bytes, so in the application, they can be negative. To make sure the result is returned in a 32-bit signed int containing value of -127 to 128), if the result is higher than 128, then 256 is taken away from it.
Display and handling methods
To handle both user changes from controls and sending the result to the amplifier, as well as updating controls based on commands received from the amplifier, the following methods run on the main UI program.
Updating the volume is done with updateLevelDisplay. This has a parameter stating whether the update is from the user or not.
    // Update the volume level and show dB value
    private void updateLevelDisplay(boolean fromUser) {
        // If received from the user (user moved slider), get the volume level from the slider, or set it instead
        if (fromUser) {
            // only allow changes by 10 up or down
            if ((seekBar.getProgress() > (iVolLevel+10)) || (seekBar.getProgress() < (iVolLevel-10))) {
                seekBar.setProgress(iVolLevel);
            } else {
                iVolLevel = seekBar.getProgress(); // Seek bar contains the new volume
            }
        } else
            seekBar.setProgress(iVolLevel); // Seek bar needs setting to the current volume

        // Calculate dB level
        // Gain is 0dB
        float fLevel = 0;
        if (iVolLevel != 192) {
            fLevel = 31 - ((254-(float)iVolLevel) / 2);
        }
        NumberFormat formatter = new DecimalFormat("+#0.0;-#0.0");
        String sVolMessage = formatter.format(fLevel) + " dB";
        txtVol.setText(sVolMessage);

        // If connected and request was from user, send this to the amp
        if (isConnected && fromUser) {
            sendMessageToAmp(R.string.msgVolumeSend);
        }
    }
If the update is from the user, then a drag operation happened on the volume slider (SeekBar) and the result will be sent to the amplifier.
To prevent accidental sliding which could cause huge jumps in volume, a check is made to see if the new value is within 5dB (10 increments) of the previous value. If it isn't, the new value is ignored and the slider resets to the original position. If it is within the tolerance, global variable iVolLevel is set of the seek bar value.
Receiving data is different. It may not be initiated by a user interacting with the UI and could be caused by a change on the amplifier itself, such as someone using the IR control instead.
If the update is not from the user, then the volume slider is just set to the value of iVolLevel (which would have been set earlier by the Bluetooth receive methods).
The text box on the application will then display the value of iVolLevel in decibels dB. A float variable fLevel is calculated by taking 254 from the current volume, dividing that by 2 and taking the result away from 31. This gives the range of -95.5dB to 31.5dB in 0.5dB steps from a range of 0 to 255. With this calculation, the result value will be the same level displayed on the amplifier's LED character display.
For balance, the updateFrontBalance and updateRearBalance are similar to above. The SeekBar sliders are constrained to a range of 0 to 63 (31 being the centre). This gives plenty of range for balance and rear/centre/sub speaker adjustments in practice.
    // Update the front balance level and show dB value
    private void updateFrontBalance(boolean fromUser) {
        // For balance - positive means right balance - reduce left channel, negative means reduce right channel
        // If received from the user (user moved slider), get the volume level from the slider, or set it instead
        if (fromUser)
            iFrontBalance = seekBarFrontBal.getProgress() - 31; // Seek bar contains the new volume
        else
            seekBarFrontBal.setProgress(iFrontBalance + 31); // Seek bar needs setting to the current volume

        // Calculate dB level
        // Gain is 0dB
        float fLevel = 0;
        NumberFormat formatter;
        if (iFrontBalance != 0) {
            fLevel = (((float)iFrontBalance) / 2);
            formatter = new DecimalFormat("R+#0.0;L+#0.0");
        } else {
            formatter = new DecimalFormat("#0.0");
        }
        String sVolMessage = formatter.format(fLevel) + " dB";
        txtFrontBal.setText(sVolMessage);

        // If connected and request was from user, send this to the amp
        if (isConnected && fromUser) {
            sendMessageToAmp(R.string.msgFrontBalanceSend);
        }
    }
The calculation for the adjustment in dB displays L/R depending on the direction of the slider.
For level adjustments (rear, centre and subwoofer), again it is similar.
    // Update the Rear adjust level and show dB value
    private void updateRearAdjust(boolean fromUser) {
        // If received from the user (user moved slider), get the volume level from the slider, or set it instead
        if (fromUser)
            iRearAdjust = seekBarRearAdj.getProgress() - 31; // Seek bar contains the new volume
        else
            seekBarRearAdj.setProgress(iRearAdjust + 31); // Seek bar needs setting to the current volume

        // Calculate dB level
        // Gain is 0dB
        float fLevel = 0;
        NumberFormat formatter;
        if (iRearAdjust != 0) {
            fLevel = (((float)iRearAdjust) / 2);
            formatter = new DecimalFormat("+#0.0;-#0.0");
        } else {
            formatter = new DecimalFormat("#0.0");
        }
        String sVolMessage = formatter.format(fLevel) + " dB";
        txtRearAdj.setText(sVolMessage);

        // If connected and request was from user, send this to the amp
        if (isConnected && fromUser) {
            sendMessageToAmp(R.string.msgRearAdjustSend);
        }
    }
Level adjustment is displayed in dB with +/- in front depending on if the value is positive or negative.
For the input selection, this method is just an update from the amplifier rather than the user. The sending of a new value to the amplifier is done in the control handler itself.
// Set the current radio button from the current active input
    private void setRadioInput() {
        TextView txtInputSelected = (TextView)findViewById(R.id.textView4);
        RadioGroup radiogroup = (RadioGroup)findViewById(R.id.radioGroup1);

        if ((txtInputSelected != null) && (radiogroup != null)) {
            // Get the nth child from the input number
            RadioButton btn = (RadioButton) radiogroup.getChildAt(iActiveInput);
            // Check this button (others get deselected)
            radiogroup.check(btn.getId());
            // Set the current input text box to the text of this button
            txtInputSelected.setText(btn.getText());
        }
    }
It works by getting the child radio button in the group that matches the active input. Active input is from 0 to 3 and the order of the radio buttons in the group follow the same order as the relays attached to the preamplifier board! The text box is then set to the same text of the active radio button, so it is visually easy to identify in the app which input is active.
The final handler is for power on and off.
Toggling the power is a long operation. These methods send the command to the amplifier and whilst the amplifier program initiates that sequence, the application will display a progress dialog, preventing any other operations, for 9 seconds.
    // Power change method - changes the power state with a wait dialog
    public void doPowerChange() {
        if (iPower == 1) {
            // Switch off by sending new power
            iPower = 0;
            sendMessageToAmp(R.string.msgPowerSend);
            // Show powering off please wait... dialog
            pDialog = ProgressDialog.show(MainActivity.this, "Switching off", "Powering off, please wait...", true);
        } else {
            // Switch on by sending new power
            iPower = 1;
            sendMessageToAmp(R.string.msgPowerSend);
            // Show powering on please wait... dialog
            pDialog = ProgressDialog.show(MainActivity.this, "Switching on", "Powering on, please wait...", true);
        }
        // Wait for power to change - 9 seconds
        new Thread() {
            @Override
            public void run() {
                try {
                    Thread.sleep(9000);
                } catch (InterruptedException e) {
                    e.printStackTrace();
                }
                // After waiting 9 seconds, send to handler to dismiss the please wait... message
                Message msg = powerComplete.obtainMessage();
                powerComplete.sendMessage(msg);
            }
        }.start();
    }

    // Handler for power change complete
    private final Handler powerComplete = new Handler(new Handler.Callback() {
        @Override
        public boolean handleMessage(Message msg) {
            // Power sequence completes, dismiss the please wait... message
            if (pDialog != null)
                pDialog.dismiss();
            setUiEnabled(isConnected);
            return false;
        }
    });
The dialog is displayed and closed by using a Thread which sleeps for 9 seconds, and then sends a Message which is picked up by the handler powerComplete, which then closes the wait dialog and enables / disables the UI controls.
App Conclusion
Update: As of July 2022, I've now retired Bluetooth RS232 in my amp to reduce idle power consumption, therefore I no longer use this app.
Still, I'm pleased with the result, miss using it (even though it was infrequently used), and it might be useful info for someone. When I did use it, control of my amplifier is convenient and reliable, with ease of use by a simple IR remote control, but where further settings are needed, configuring using an Android app is pretty slick and far easier to use than any dedicated remote control I've ever used (with about 100 button on it).
The other benefit is I learned a bit about Smart-phone app development along the way, which may prove useful in future. Although it was somewhat time consuming to get to the result, since this was a new learning path for me, the result is only just over 1000 lines of Java code in total. This is a very manageable amount of code, without splitting off into separate classes and packages.
I used to use it on occasions. Firstly, it has the more advanced controls. In day-to-day use, if the remote is near me then it's quicker to pick that up and adjust the volume. If it isn't though, it is quite quick to switch on the phones' Bluetooth, open the app, connect and change the volume. Partly though it's also remembering that I have it too!
Now though, I have a function mode built into the IR remote (by pressing and holding the mute button), which allows fairly easy adjustment of speaker levels, balance, triggers and surround modes.
References and more reading:
Source code on github.com
Android Expandable Layout Control
Google Developers - Android Developer Guides
Google Developers - Android Studio
All About Circuits - Control an Arduino with
Bluetooth
Code Is All - Android Expandable Layout